Handheld Termanal Manual PARTNER TECH CORPORATION Before using the product, Please carefully read the operating instructions
NO.1 Specifications Features Description Processor Operating System Memory Flash Display Key Specification Magnetic Card IC card reader SAM card Expansion Slot USB RS232 Printer TI Cortex A8 AM3715,1GHz WinCE 6.0 Audio Vibration Battery Power Communication Interface(built-in) Secure Performance Specification Physical Specification Package Contents DDR2,2Gb(256M);NAND Flash,4GB(512M); 3.
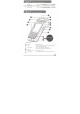
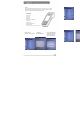
NO.2 Packaging / Packing List 1 MF=2351 1 piece 4 USB Line 2 Power Adapter 1 piece 5 Thermal Print Paper 3 AC Power Cord 1 piece 6 Rechargeable Battery NO.3 1 piece 1 roll(optional) 1 piece Product Description 1 Description: RFID RFID reading area; Cutter Cut paper, tear printer paper by tilting at about 45 degrees from left to right along the cutter Touch Pannel 3.
Description: Printer Cover The cover is with a pressing shaft. Open it for loading paper, cover it until locked after loading printer paper; Indicating Lamp Power and working status indication; Power Socket Power unit (standard:Φ3.
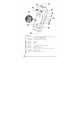
Camera & Flash Fingerprint Sensor Image recognition & Exposure Fingerprint reader (optional); 3.5mm standard interface; Phone Jack Function Key Definable; Micro USB USB2.0(OTG); Battery Cover The position of the battery to lock; Wrist Band Convenient operation and bring; Rubber Pad: Slippery and shock protection Magcard Reader: The magnetic stripe at the bottom and facing the device support bi-direction card swiping; NO.
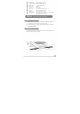
IC Card Read 1、 insert the IC card with the chip upward; IC Torn Paper 1、Hand and hold the end of the paper along the cutter from left to right around 45 degrees angle of the direction of the tear, the force should be quickly and evenly. Installation Of Paper 1、Open the paper bucket lid: Unlock the printer cover( ) by pulling the lever up; 2、Load the thermal paper after open the printer cover.
If this equipment does cause harmful interference to radio or television reception, which can be determined by turning the equipment off and on, the user is encouraged to try to correct the interference by one or more of the following measures: • Reorient or relocate the receiving antenna. • Increase the separation between the equipment and receiver. • Connect the equipment into an outlet on a circuit different from that to which the receiver is connected.
NO.5 The test program instruction Caution: The power supply input for this unit is 9.0V and not 12V or 5V. If you want to change to another power supply in place of the one in the package, you need to be cautious and check the output voltage and current. Content: 1.MSR test 2.ICC test 3.Print test 4.RIF test 5.Wireless,WCDMA test 6.Wifi test 7.Screen test 8.Other functional test 9.Vibration test 10.The one-dimensional bar code test Double-click the "MF-2351_appapi_test.exe: 1 .MSR test.
2. ICC test. Click“ICC”. Insert IC card, if you want to test IC command (ICC Command), click on "IC Check". If IC card chip does not damage or contact with normal card slot, you can see the following: As the test described above, the user can see the other effect. 3. Printer test. You can see the current version of the NK. Select the appropriate font size print and note that the paper is placed correctly.
4 . RIF test,include A card,B card and M1 card. click the button. If you want to test M1 function, the first , put M1 on the RF sensing area, Click on the "M1 Check "to check card , if non-access module is hardware or the card is not damaged, you can see the following: Each of M1 data is stored in the sector. Each sector has its own key .If appear the "Authority M1 Card Err", when you use the " M1 Read the Write ", I lustrate the key Authentication is not passed. It is normal. 5. Wireless, WCDMA test.
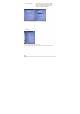
6. Wifi test. Firstly click network settings on the taskbar. Select "Wireless Info”, check the "Notify when new networks available” , connected to the network , enter the test program after the following effect appears: Click on the "power state" and finally the power is turned on again, then you can test the other features, click the button again to turn off wifi power. 7. Screen test. Test LCD Module.
8. Other functional test. You can see the results after the click of a button. 9 . Vibration test. Vibration testing can test motor is working properly or not. 10. The one-dimensional bar code test. Put the one-dimensional bar code on the location of about 5 cm from the scanning lamp, Screen will be prompted to read the one-dimensional bar code as shown above.
Tel:+886-2918-8500 Fax:+886-2915-3405 Partner Tech Corporation http://www.partner.com.