User Guide
Table of Contents Before starting .......................................................................................................................................................5 Charging ...........................................................................................................................................................................................................5 the battery Installing .......................................................................................
Disposal ...........................................................................................................................................................................................................29 of this product at the end of its life Declaration ...........................................................................................................................................................................................................30 of conformity Registered ...............
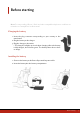
Before starting Note: For easy reading, iPhone®, iPad® and other compatible telephones or tablets are referred to as 'smartphones' in the manual. Charging the battery 1. Insert the plug converter corresponding to your country to the transformer. 2. Plug the battery to the charger. 3. Plug the charger to the mains. > The charger's led lights up in red when charging. Once the battery is fully charged, the led turns green. The battery takes about 1 hour to charge. Installing the battery 1.
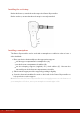
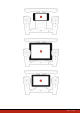
Installing the neck strap Before the first use, attach the neck strap to the Parrot Skycontroller. Before each use, ensure that the neck strap is correctly attached. Installing a smartphone The Parrot Skycontroller can be used with a smartphone or tablet in order to have a video feedback. 1. Place your device horizontally onto the appropriate support: use the upper compartment for smartphones (A); use the bottom compartment for tablets (B); use the adapting support (supplied) for 7-inch tablets (C).
Before starting 7
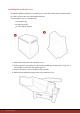
Installing the sunshade cover Install the foldable sunshade cover when you use the Parrot Skycontroller with a tablet in order to protect the screen from light reflection. The sunshade cover is constituted of: a lower part (A); an upper part (B); a 7-inch tablet support. 1. Unfold the lower part of the sunshade cover. 2. Fix the support or your tablet into the lower part with the elastic bands. If you use a 7-inch tablet, insert it into the tablet support. 3.
Note: You can use the foldable sunshade cover without the Parrot Skycontroller. Using FreeFlight 3 The FreeFlight 3 app enables you to: display the piloting screen, set the Parrot Skycontroller and the Parrot Bebop Drone, connect a Parrot Bebop Drone to the Parrot Skycontroller that are not paired by default, use the Drone Academy. For further information about FreeFlight 3, see the Parrot Bebop Drone user guide.
(or FPV glasses). > If the Parrot Skycontroller and the Parrot Bebop Drone are already paired, the video feedback appears. If they are not paired, see the Manual connection via screen with HDMI port section. To browse in the FreeFlight 3 from a HDMI screen, use the commands of the Parrot Skycontroller. For further information, see the Using HDMI screen section. Connecting to the Parrot Bebop Drone The Parrot Skycontroller automatically connects to the Parrot Bebop Drone it is sold with.
Note: If the FreeFlight 3 main screen does not display the Parrot Bebop Drone video feedback, press , then, select the Parrot Bebop Drone. Manual connection via screen with HDMI port 1. Switch the Parrot Skycontroller, the Parrot Bebop Drone and the screen (or First Person View glasses) on. 2. Plug the HDMI cable (or FPV glasses) on the HDMI port located on the left side of the Parrot Skycontroller. 3. Press Manager Wi-Fi. For further information about the use of FPV glasses, see Using FPV glasses. 4.
Piloting You can use the Parrot Skycontroller with or without video feedback. The video feedback enables you to access the FreeFlight 3 application. You can then change the Parrot Skycontroller and Parrot Bebop Drone settings. For further information, see the Parrot Bebop Drone user guide. Note: It is not possible to perform flips if you use the Parrot Skycontroller without smartphone.
# Description 1 Navigation in the Parrot Skycontroller application (with HDMI screen or FPV glasses only) 2 Taking photos and orienting the angle of the camera 3 Left joystick 4 Right joystick 5 Previous screen of the Parrot Skycontroller application (with HDMI screen or FPV glasses only) 6 Straightening up the Parrot Bebop Drone camera Main screen of the Parrot Skycontroller application (with HDMI screen or FPV glasses only) 7 Video record 8 Take off and landing 9 Return to starting poin
Piloting 12 Wi-Fi signal 13 Parrot Skycontroller battery level 14 Parrot Bebop Drone battery level
Orienting the Parrot Skycontroller For better performances and to keep the Parrot Bebop Drone under control: always point the Parrot Skycontroller at the Parrot Skycontroller. The radar scope is displayed on the piloting screen when FreeFlight 3 is launched. It enables to locate the Parrot Bebop Drone. Note: To display the radar scope correctly, ensure the Parrot Skycontroller is calibrated. For further information, see Calibration.
always keep the Parrot Bebop Drone in your line of sight. Orienting the antenna Steer the antenna towards the Parrot Bebop Drone to improve the Wi-Fi signal reception. To lock the antenna, turn the upper handwheel located at the back of the Parrot Skycontroller.
Movements Left joystick Fly upwards or downwards Yawning (rotating towards left or right) Right joystick Pitching (moving onwards or backwards) Rolling (turning towards left or right) Photos and videos Press the button (2) to take a picture. Press the button(7) to record a video or to stop the video recording. When the REC led is red, the Parrot Bebop Drone is recording. Note: The video mode is activated by default.
Return home Press (9) to make the Parrot Bebop Drone fly back towards: the last take off location, your smartphone location if the Parrot Skycontroller has received no GPS signal. If the Parrot Skycontroller altitude is below 10 m, it will reach an altitude of 10 m before returning to its starting point in order to avoid any obstacle.
Co-piloting The co-piloting mode enables the co-pilot to take control over the Parrot Bebop Drone at any time with a smartphone. The smartphone of the co-pilot must be connected to the Parrot Skycontroller. To do so, see Launching FreeFlight 3 on a smartphone. Note: The co-piloting mode can be activated from a smartphone only. To take control over the Parrot Bebop Drone, press on the top right of the piloting screen. > The Parrot Bebop Drone is piloted from the smartphone.
Using a HDMI screen Use a screen with a HDMI port (including FPV glasses) to navigate in the FreeFlight 3 application of the Parrot Skycontroller. FPV glasses enable you to fly the Parrot Bebop Drone with Head Tracking feature. Warning: If you use the Parrot Skycontroller with FPV glasses, always pilot the Parrot Skycontroller with a copilot. The copilot must keep the Parrot Skycontroller in his/her line of sight and have the smartphone connected to the Parrot Skycontroller.
> You can navigate through the AndroidTM operating system. Press the FreeFlight 3 icon to launch the application again.
Settings To open the settings screens via a smartphone: 1. Launch FreeFlight 3. For futher information, see Using FreeFlight 3. 2. Press Start > . To open the settings screens via a HDMI screen (including FPV glasses): 1. Plug the HDMI screen to the Parrot Skycontroller. > The piloting screen appears. 2. Press the joystick. > The settings screens appear. 3. To slide the screens, turn the joystick to the left or right.
1. Select the Joystick configuration screen. > If you use a tablet, the joystick configuration appears on one screen. If you use a smartphone, it appears on three consecutive screens. 2. Press the button or joystick that you wish to change. > The scrolling list of actions appears. 3. Press the action you wish to assign to the button or joystick. Note: You can assign the same function to several buttons. To reset the functions by default, press .
Pitch Flying forwards or backwards Camera tilt Tilting the camera upwards or downwards Camera pan Rotating the camera to the right or left Joysticks sensitivity To set the sensitivity of the joysticks, press . To change the setting mode, press Linear or Exponential. To change the sensitivity of both joysticks simultaneously, press To reset the default configuration, press . . Product name Select the Skycontroller settings screen.
To switch the Wi-Fi band (2.4 GHz or 5 Ghz), hold down (REC) and (Emergency landing) buttons for 5 seconds . To change the Wi-Fi bands via the FreeFlight 3 application: 1. Select the Skycontroller settings screen. 2. Press the band and the channel you wish. When the Wi-Fi signal is low, the Parrot Skycontroller makes a tone signal every 10 seconds.
Updating Update the Parrot Skycontroller via USB, by downloading the update file from our website. A computer and an USB flashdrive are necessary . For further information, see the Parrot Skycontroller update procedures.
General information The Parrot Skycontrolleris aimed to remotely fly the Parrot Bebop Drone and is not suitable for use by children under 14 years of age. REMINDER: The Parrot Bebop Drone is a model aircraft designed only for entertainment, and competitions between model aircraft. Fly responsibly. Do not fly your Parrot Bebop Drone over any populated area, such as beaches, others people’s backyards, heavily populated parks, or sports ovals where a game is in progress, over gathering of animals.
images on the Internet or any other medium. Do not circulate a degrading image or one which could undermine the reputation or dignity of an individual. The use of the Parrot Skycontroller for surveillance or espionage is strictly forbidden and could result in your prosecution under the law. Check that your use of the cameras on board the Parrot Skycontroller complies with the legal provisions on the protection of privacy. Battery Read the entire instruction sheet included with this battery.
approved by Parrot, in particular, the use of batteries not approved by Parrot ; defects caused by any reason other than a defect in material or workmanship the gradual power loss of the Parrot rechargeable battery (086x) over time, which does not constitute as a defect in material or workmanship, If upon technical tests being carried out any product is found non defective we reserve the right to return such product to the sender at the sender’s cost and to levy a charge to cover Parrot’s technical test fee
part of a specific recycling scheme. Declaration of conformity Parrot SA, 174 quai de Jemmapes, 75010 Paris, France, declare under their sole responsibility that the product described in this user guide complies with technical standards EN 301489-17, EN300328, EN71-1, EN71-2, EN71-3, EN62115 following the provision of the Radio Equipment, Telecommunication Equipment directive (1999/5/ EC R&TTE), and of the General Safety directive (2001/95/EC). http://www.parrot.