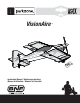
VisionAire Instruction Manual / Bedienungsanleitung Manuel d’utilisation / Manuale di Istruzioni ™
EN NOTICE All instructions, warranties and other collateral documents are subject to change at the sole discretion of Horizon Hobby, Inc. For up-to-date product literature, visit www.horizonhobby.com and click on the support tab for this product.
EN – Introduction – Welcome to the exciting world of 3D flight! Even if this isn’t your first 3D airplane, the ParkZone® VisionAire™ aircraft is going to be a fast favorite. Its awesome power-to-weight performance coupled with the incredible balance of stability and agility its AS3X® (Artificial Stabilization – 3-aXis) system makes possible will have you pushing the limits of your aerobatic abilities in no time. The light wing loading and forgiving slow speed characteristics help too.
EN Charging the Flight Battery Your VisionAire aircraft comes with a DC balancing charger and 3S Li-Po battery. You should only charge your battery with the included charger. Never leave the battery and charger unattended during the charge process. Failure to follow the instructions properly could result in a fire. When charging, ensure the battery is on a heat-resistant surface. Charge the flight battery while assembling the aircraft. Install the fully charged battery to perform control tests and binding.
EN Transmitter and Receiver Binding Binding is the process of programming the receiver to recognize the GUID (Globally Unique Identifier) code of a single specific transmitter. You need to ‘bind’ your chosen Spektrum™ DSM2®/DSMX® technology equipped aircraft transmitter to the receiver for proper operation (Please visit www.bindnfly.com for a complete list of compatible transmitters). CAUTION: When using a Futaba® transmitter with a Spektrum DSM module, you must reverse the throttle channel and rebind.
EN AS3X System Horizon Hobby has always made RC sport, scale and unique aircraft with the kind of performance experts appreciate. First used in Blade® ultra micro flybarless helicopters, MEMS sensor technology within the Artificial Stability - 3 aXis (AS3X) System has been specifically tuned for airplanes helping invisibly correct for turbulence, torque and tip stalls. Now the exclusive AS3X Stabilization system makes the leap from Ultra Micro aircraft to high performance parkflyers with the AR635 receiver.
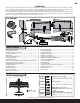
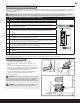
EN Installing Horizontal Tail 1. Slide the horizontal tail tube (A) into the hole in the rear of the fuselage. 2. Install the 2 piece (left and right) horizontal tail as shown. Ensure the control horn faces down. 3. Apply 8 pieces of tape (B) to the fuselage mounts (one on the top and bottom of each half of the horizontal tail). A 4. Attach the clevis to the elevator control horn (see instructions for clevis connection). 5. When needed, disassemble in reverse order.
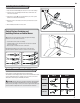
EN Installing SFG Technology® Wing Fences 1. Carefully apply the included tape (A) to the wing fence base. 2. Align and install the left and right (marked L and R) top and bottom wing fences (B) into the respective wing slots (C). The bottom fences have integrated plastic skids, as shown. C If desired, apply a small amount of thin CA (cyanoacrylate adhesive) to the fences and wings. A B Installing the Wings 1. Slide the wing tube (A) into the fuselage.
EN Transmitter Setup IMPORTANT: The AR635 receiver’s default setting is for 3D mode using the DX6i transmitter and above. If you choose to fly using another transmitter, you must refer to the “receiver manual” for instructions. For the best flight experience, we recommend flying your aircraft with the Dual Rate switched to high rate. However, if the control response is too great, low rate is still available.
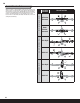
EN Control Direction Test 10 Up Elevator Command Down Elevator Command Aileron Elevator Transmitter command Stick Right Rudder Move the controls on the transmitter to make sure the aircraft control surfaces move correctly and in the proper direction. After performing the Control Test, correctly set the failsafe. Make sure the transmitter controls are at neutral and the throttle and throttle trim are in the low position, then rebind the model to your transmitter.
EN AS3X Control Direction Test The AS3X system will not activate until the throttle stick or trim is increased for the first time after the flight battery is connected. Once the AS3X is active, the control surfaces may move rapidly on the aircraft. This is normal. AS3X will remain active until the battery is disconnected. Aircraft movement AS3X Reaction Elevator Perform the Control Direction Test to ensure the aircraft responds correctly to your transmitter.
EN Flying Tips and Repairs Range Check your Radio System Landing Consult local laws and ordinances before choosing a flying location. For your first flights, set your transmitter timer or a stopwatch to 5 minutes. Adjust your timer for longer or shorter flights once you have flown the model. When the motor pulses, land the aircraft immediately and recharge the flight battery. It is not recommended to fly the battery to LVC. Perform a range check with your radio system.
EN Guidelines for Flying 3D Getting Started This aircraft and its AS3X system were designed together to help an intermediate pilot apply standard flying skills to the demands of 3D flying. The calmer the wind conditions, the easier it is to execute maneuvers. Enable the 3D setting in the AS3X system using the assigned channel 5/AUX switch on your transmitter. You may want to fly low airspeed, high rate maneuvers at an altitude that allows you space to escape into forward flight.
EN AMA National Model Aircraft Safety Code Effective January 1, 2011 A. GENERAL A model aircraft is a non-human-carrying aircraft capable of sustained flight in the atmosphere. It may not exceed limitations of this code and is intended exclusively for sport, recreation and/or competition. All model flights must be conducted in accordance with this safety code and any additional rules specific to the flying site. 1. Model aircraft will not be flown: (a) In a careless or reckless manner.
EN AS3X Troubleshooting Guide Problem Oscillation Possible Cause Flying over recommended airspeed Damaged propeller or spinner Imbalanced propeller Flight condition variations Motor vibration Trim change when flight mode is switched Incorrect response to the AS3X Control Direction Test. Solution Reduce air speed Replace propeller or spinner Balance the propeller. For more information, view John Redman’s propeller balancing video at www. horizonhobby.
EN Problem Aircraft will not connect (after binding) to transmitter Possible Cause Solution Transmitter too near aircraft during connecting process Move powered transmitter a few feet from aircraft, disconnect and reconnect flight battery to aircraft Aircraft or transmitter is too close to large metal object, wireless source or another transmitter Move aircraft and transmitter to another location and attempt connecting again Bind plug left installed in bind port Rebind transmitter to the aircraft and
EN copy of your original sales receipt must be included for warranty consideration. Be sure your name, address, and RMA number are clearly written on the outside of the shipping carton. NOTICE: Do not ship LiPo batteries to Horizon. If you have any issue with a LiPo battery, please contact the appropriate Horizon Product Support office. Warranty Requirements For Warranty consideration, you must include your original sales receipt verifying the proof-of-purchase date.
Parts Contact Information • Kontaktinformationen für Ersatzteile • Coordonnées pour obtenir des pièces détachées • Recapiti per i ricambi Country of Purchase Horizon Hobby Address Phone Number/Email Address United States of America Sales 4105 Fieldstone Rd Champaign, Illinois 61822 USA 800-338-4639 Sales@horizonhobby.com United Kingdom Horizon Hobby Limited Units 1-4 Ployters Rd Staple Tye Harlow, Essex CM18 7NS, United Kingdom +44 (0) 1279 641 097 sales@horizonhobby.co.
Optional Parts • Optionale Bauteile • Pièces optionnelles • Pezzi opzionali Part # | Nummer Numéro | Codice Description Beschreibung Description Descrizione EFLA250 2500mAh 3S 11.1V 30C LiPo, 12AWG EC3 by E-flite Park Flyer Tool Assortment, 5 pc E-flite 2500mAh 3S 11.1V 30C LiPo; 12AWG EC3 Park Flyer Werkzeugsortiment, 5 teilig Batterie Li-Po E-flite 11.
© 2012 Horizon Hobby, Inc. ParkZone, VisionAire, AS3X, E-flite, Blade, Celectra, EC3, DSM, DSM2, DSMX, Bind-N-Fly, ModelMatch and SFG Technology are trademarks or registered trademarks of Horizon Hobby, Inc. The Spektrum trademark is used with permission of Bachmann Industries, Inc. Futaba is a registered trademark of Futaba Denshi Kogyo Kabushiki Kaisha Corporation of Japan. All other trademarks, service marks and logos are property of their respective owners. www.parkzone.