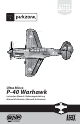
Ultra Micro P-40 Warhawk Instruction Manual / Bedienungsanleitung Manuel d’utilisation / Manuale di Istruzioni
NOTICE All instructions, warranties and other collateral documents are subject to change at the sole discretion of Horizon Hobby, Inc. For up-to-date product literature, visit www.horizonhobby.com and click on the support tab for this product.
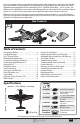
You’re just a battery charge away from one of the coolest warbird experiences you’ll ever have. Besides being a remarkably scale recreation of the legendary Flying Tigers fighter, the Ultra Micro Series P-40 Warhawk comes equipped with the revolutionary AS3X® (Artificial Stabilization – 3-aXis) System. The difference this stabilization system makes when flying indoors or out can be felt the second you take to the air. It’s as if you’re flying a large, finely tuned model that does exactly what you want it to.
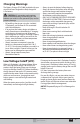
Charging the Battery Your aircraft comes with a 1S 3.7V DC Li-Po battery charger and 1S 3.7V 150mAh 25C Li-Po battery. Refer to the charging warnings. It is recommended to charge the battery pack while you are inspecting the aircraft. The flight battery will be required to confirm proper aircraft operation in future steps. Remove the cover on the bottom of the charger and install four of the included AA batteries, noting proper polarity. Replace the cover after the AA batteries are installed.
Charging Warnings The Battery Charger (EFLC1000) included with your aircraft has been designed to safely charge the Li-Po battery. CAUTION: All instructions and warnings must be followed exactly. Mishandling of Li-Po batteries can result in a fire, personal injury and/or property damage. • By handling, charging or using the included Li-Po battery, you assume all risks associated with lithium batteries. • If at any time the battery begins to balloon or swell, discontinue use immediately.
AS3X® System Delivers Breakthrough Performance Horizon Hobby has always made RC sport, scale and unique aircraft with the kind of performance experts appreciate. Now the exclusive Artificial Stability – 3 aXis (AS3X) system helps take performance expectations in ultra micro aircraft a quantum leap higher.
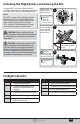
Installing the Flight Battery and Arming the ESC Arming the ESC also occurs after binding as throttle and previously described, but subsequent connection Lower throttle trim to of a flight battery requires the following steps. lowest settings. AS3X 1 The AS3X® system will not activate until the Power ON throttle stick or trim is increased for the first the Transmitter, then time. Once active, the control surfaces may wait 5 seconds move rapidly and noisily on the aircraft. This is normal.
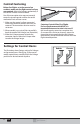
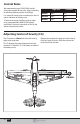
Control Centering Before first flights, or in the event of an accident, make sure the flight control surfaces are centered. Adjust the linkages mechanically if the control surfaces are not centered. Use of the transmitter trims may not correctly center the aircraft control surfaces due to the mechanical limits of linear servos. 1. Make sure the control surfaces are neutral when the transmitter controls and trims are centered. The transmitter sub-trim must be set to zero. 2.
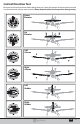
Control Direction Test Bind your aircraft and transmitter before doing these tests. Move the controls on the transmitter to make sure aircraft control surfaces move correctly. Always keep throttle at the low position during testing.
Control Rates We recommend using a DSM2/DSMX aircraft transmitter capable of dual rates. Adjust according to individual preferences after initial flight. It is normal for linear servos to make noise. Noise is not an indication of a faulty servo. To achieve the proper Low Rate settings when using a programmable DSM2/DSMX aircraft transmitter, set the low rate value to 70% for the aileron, elevator and rudder.
Motor Service CAUTION: DO NOT handle propeller parts while the flight battery is connected. Personal injury could result. Disassembly Inst al ove em l IMPORTANT: Removing tape or decals can remove paint from the fuselage. 3. Hold the prop shaft using needle-nose pliers or hemostats. 4. Turn the propeller counterclockwise (looking from the front of the model) to remove. Turn the propeller clockwise to install. 5. Carefully remove a damaged spinner and glue from the propeller. 6.
Flying Tips and Repairs Flying We recommend flying your P-40 Warhawk outside in no greater than moderate winds or inside in a large gymnasium. Always avoid flying near houses, trees, wires and buildings. You should also be careful to avoid flying in areas where there are many people, such as busy parks, schoolyards or soccer fields. Consult local laws and ordinances before choosing a location to fly your aircraft.
Removing and Installing Landing Gear To remove the factory installed landing gear: 1 1. Lift the back of the magnetic landing gear cover, then pull away from the vertical strut to remove. 2 2. Lift the end of the landing gear wire above the stop. 3. Gently pull the landing gear away from the fuselage and away from the clips. 3 Install in reverse order, making sure the end of the landing gear wire is inside the stop.
Post Flight Checklist 9 9 1. Disconnect the flight battery from the ESC (Required for safety and battery life). 2. Power OFF the transmitter. 3. Remove the flight battery from the aircraft. 4. Recharge the flight battery. 5. Store the flight battery apart from the aircraft and monitor the battery charge. 6. Make note of the flight conditions and flight plan results, planning for future flights.
Troubleshooting Guide (continued) Problem Possible Cause LED on receiver Transmitter is too near aircraft during flashes rapidly binding process and aircraft will not bind to transmitter (during binding) Bind switch or button was not held while transmitter was powered on LED on receiver flashes rapidly and aircraft will not respond to transmitter (after binding) Solution Power off transmitter, move transmitter a larger distance from aircraft, disconnect and reconnect flight battery to aircraft and follow bi
Limited Warranty What this Warranty Covers Horizon Hobby, Inc. (“Horizon”) warrants to the original purchaser that the product purchased (the “Product”) will be free from defects in materials and workmanship at the date of purchase.
NOTICE: Do not ship LiPo batteries to Horizon. If you have any issue with a LiPo battery, please contact the appropriate Horizon Product Support office. Warranty Requirements For Warranty consideration, you must include your original sales receipt verifying the proofof-purchase date. Provided warranty conditions have been met, your Product will be serviced or replaced free of charge. Service or replacement decisions are at the sole discretion of Horizon.
Compliance Information for the European Union Declaration of Conformity (in accordance with ISO/IEC 17050-1) No. HH2012110408 Product(s): PKZ Ultra-Micro P-40 Warhawk BNF Item Number(s): PKZU1980 Equipment class: 1 The object of declaration described above is in conformity with the requirements of the specifications listed below, following the provisions of the European R&TTE directive 1999/5/EC, EMC Directive 2004/108/EC and LVD Directive 2006/95/EC EN 301 489-1 V1.7.1: 2006 EN 301 489-17 V1.3.
Replacement Parts • Ersatzteile • Pièces de rechange • Pezzi di ricambio Part # • Nummer Description Numéro • Codice Beschreibung Description Descrizione Hélice 3 pales 110 x 80mmmm Elica 3 pale 110 x 80mm mm EFLUP11803B 110 x 80mm 3 Blade Propeller PKZU1908 Spinner (3): UM P-40 Warhawk 110 x 80mm 3 Blattpropeller Parkzone UltraMicro P-40 Warhawk: Spinner PKZU1967 Fuselage w/ Canopy: Ultra Micro P-40 Warhawk Parkzone UltraMicro P-40 Warhawk: Rumpf Fuselage avec verrière : UM P-40 Warhawk Fuso
Part # • Nummer Description Numéro • Codice Beschreibung Description Motor: Ultra Micro P-51, UM T-28 Gearbox (No Motor): Sukhoi, UM P-51 Parkzone Motor : Micro P51 PKZ3624 Motor and Gear Box: Ultra Micro P-51, SU26 XP Parkzone Motor mit Getriebe : Micro P51 Réducteur avec moteur : UM P-51,SU 26 XP EFL9054 Prop Shaft with gear (2) : Sukhoi Su-26m, Micro P-51 E-flite UltraMicro 4-Site Luftschraubenwelle mit Getriebe Arbre d’hélice avec réducteur (2) : Sukhoi Su-26m, Micro P-51 PKZ3616 PKZ3527 M
Parts Contact Information • Kontaktinformationen für Ersatzteile • Coordonnées (pièces) • Recapiti dei distributori Country of Purchase Horizon Hobby United States Sales United Kingdom Horizon Hobby Limited Germany 1 Horizon Hobby GmbH Christian-Junge-Straße 25337 Elmshorn, Germany France Horizon Hobby SAS 11 Rue Georges Charpak 77127 Lieusaint China Horizon Hobby – China Room 506, No. 97 Changshou Rd.
© 2012 Horizon Hobby, Inc. ParkZone, AS3X, Blade, E-flite, Celectra, DSM, DSM2, DSMX, Bind–N–Fly and ModelMatch are trademarks or registered trademarks of Horizon Hobby, Inc. The Spektrum trademark is used with permission of Bachmann Industries, Inc. Futaba is a registered trademark of Futaba Denshi Kogyo Kabushiki Kaisha Corporation of Japan. All other trademarks, service marks and logos are property of their respective owners. US D578,146. US 7,898,130. PRC ZL 200720069025.2. Other patents pending. www.