ArtiZan Instruction Manual / Bedienungsanleitung Manuel d’utilisation / Manuale di Istruzioni TM
EN NOTICE All instructions, warranties and other collateral documents are subject to change at the sole discretion of Horizon Hobby, Inc. For up-to-date product literature, visit www.horizonhobby.com and click on the support tab for this product.
EN Table of Contents Center of Gravity (CG) ......................................................................... 9 Control Direction Test .......................................................................... 9 AS3X Control Direction Test............................................................... 10 Flying Tips. ....................................................................................... 11 Motor Service ..............................................................................
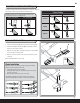
EN Battery Charging Refer to the charging warnings. It is recommended to charge the battery while you inspect the aircraft. The flight battery will be required to confirm proper aircraft operation in future steps. CAUTION: The balance connector must be inserted into the correct port of your charger prior to charging. Purchase optional 12V adapters (HBZ6513 or HBZ4747) to power your charger more conveniently.
EN Receiver Selection and Installation The Spektrum AR635 receiver is recommended for ths airplane. If you choose to install another receiver, ensure that it is at least a 6-channel full range (sport) receiver. Refer to your receiver manual for correct installation and operation instructions. 1. Remove the canopy from the fuselage. 2. Install your full range (sport) receiver in the fuselage using double-sided servo tape. 3.
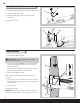
EN Landing Gear Installation B 1. Install the landing gear strut (A) with the strut raked to the rear as shown. A 2. Install the U-cover (B) on the fuselage. 3. Install the fairings (C, marked L and R) on the fuselage by using 4 screws (D). Disassemble in reverse order. C D Wing Installation 1. Slide the wing tube (A) into the fuselage. CAUTION: DO NOT crush or otherwise damage the wiring when attaching the wing to the fuselage. 2.
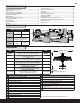
EN Control Horn and Servo Arm Settings The table to the right shows the factory settings for the control horns and servo arms. Fly the aircraft at factory settings before making changes. Factory Settings Horns After flying, you may choose to adjust the linkage positions for the desired control response. See the table below. More control throw Arms Less control throw Elevator Rudder Ailerons Horizontal Tail Installation B 1.
EN Transmitter Setup IMPORTANT: The AR635 receiver’s default setting is for Sport mode using the DX6i transmitter and above. If you choose to fly using another transmitter, you must refer to the “receiver manual” for instructions. A DSM2/DSMX four-channel (or better) transmitter with dual rates is required for flying this aircraft. The Spektrum™ DX4e, DX5e, DX6i, DX7s, DX8, DX9, DX10t, DX18 and JR® X9503, 11X or 12X transmitters may be used. The settings below are recommended starting settings.
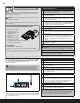
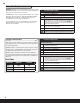
EN Center of Gravity (CG) The CG location is 76mm back from the leading edge of the wing at the root. For first flights install the recommended flight battery all the way forward, secured by the strap. (as shown) Aircraft CG and weight is based on an E-flite 11.1V 1800mAh 30C battery (EFLB18003S30) installed. 76mm 3 inches back from the leading edge of the wing at the root.
EN AS3X Control Direction Test The AS3X system will not activate until the throttle stick or trim is increased for the first time after the flight battery is connected. Once the AS3X is active, the control surfaces may move rapidly on the aircraft. This is normal. AS3X will remain active until the battery is disconnected. Rudder Aileron Gain Adjustment This aircraft and receiver were rigorously tuned for various flight conditions. On rare occasions, you might still see oscillation.
EN Flying Tips NOTICE: If a crash is imminent, reduce the throttle and trim fully. Failure to do so could result in extra damage to the airframe, as well as damage to the ESC and motor. Consult local laws and ordinances before choosing a flying location. Range Check your Radio System After final assembly, range check the radio system with the aircraft. Refer to your specific transmitter instruction manual. Oscillation NOTICE: Crash damage is not covered under warranty.
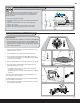
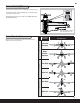
EN Motor Service Disassembly Assembly CAUTION: Always disconnect the flight battery from the aircraft before removing the propeller. 1. Remove the screw (A) and spinner (B) from the collet (C). 2. Remove the spinner nut (D), propeller (E), backplate (F) and collet from the motor shaft (H). You will need a tool to turn the spinner nut. 3. Remove the 2 screws (I) from the cowling (J). Carefully remove the cowling from the fuselage. Paint may keep the cowling attached to the fuselage. 4.
EN Troubleshooting Guide Problem Aircraft will not respond to throttle but responds to other controls Extra propeller noise or extra vibration Possible Cause Throttle not at lowest position or throttle trim too high Solution Reset controls with throttle stick and throttle trim at lowest setting Throttle servo travel is lower than 100% Make sure throttle servo travel is 100% or greater Throttle channel is reversed Motor disconnected from ESC Damaged propeller and spinner, collet or motor Reverse throt
EN Limited Warranty What this Warranty Covers Horizon Hobby, Inc. (“Horizon”) warrants to the original purchaser that the product purchased (the “Product”) will be free from defects in materials and workmanship at the date of purchase.
EN Warranty and Service Contact Information Country of Purchase Horizon Hobby Horizon Service Center (Repairs and Repair Requests) United States of America Horizon Product Support (Product Technical Assistance) Sales United Kingdom Germany France China Service/Parts/Sales: Horizon Hobby Limited Horizon Technischer Service Sales: Horizon Hobby GmbH Service/Parts/Sales: Horizon Hobby SAS Service/Parts/Sales: Horizon Hobby – China Phone Number/Email Address servicecenter.horizonhobby.
Replacement Parts • Ersatzteile • Pièces de rechange • Pezzi di ricambio Part # | Nummer Numéro | Codice Description Beschreibung PKZ6908 Spinner: ArtiZan Description Descrizione Spinner: ArtiZan Cône : ArtiZan Ogiva: ArtiZan Set del carrello di atterraggio: ArtiZan PKZ6903 Landing gear set: ArtiZan Fahrwerk-Set: ArtiZan Jeu de train d'atterrissage principal : ArtiZan PKZ6925 Horizontal Stab: ArtiZan Höhenleitwerk: ArtiZan Stabilisateur : ArtiZan Stabilizzatore orizzontale: ArtiZan PKZ691
Optional Parts • Optionale Bauteile • Pièces optionnelles • Pezzi opzionali Part # | Nummer Numéro | Codice Description Beschreibung Description Descrizione EFLA250 Park Flyer Tool Assortment, 5 pc E-flite Park Flyer Werkzeugsortiment; 5 teilig Assortiment d'outils park flyer, 5pc Park Flyer assortimento attrezzi, 5 pc EFLAEC302 EC3 Battery Connector (2) E-flite EC3 Akkukabel, Buchse (2) Prises EC3 coté batterie (2) Connettore batteria EFLAEC303 ite EC3 Kabelsatz, Stecker/ EC3 Device/Battery Co
© 2014 Horizon Hobby, Inc. ParkZone, ArtiZan, E-flite, Celectra, EC3, DSM, DSM2, DSMX, Z-Foam, Bind-N-Fly, the BNF logo, Plug-N-Play and ModelMatch are trademarks or registered trademarks of Horizon Hobby, Inc. The Spektrum trademark is used with permission of Bachmann Industries, Inc. Futaba is a registered trademark of Futaba Denshi Kogyo Kabushiki Kaisha Corporation of Japan. All other trademarks, service marks and logos are property of their respective owners. www.parkzone.