
Operation Manual


PAT 20-Li A1
GB
│
IE
│
19 ■
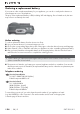
Attaching/disconnecting the battery
pack to/from the appliance
Inserting the battery pack:
♦ Allow the battery pack
to click into place in
the appliance.
Removing the battery pack:
♦ Press the release button
and remove the
battery pack .
Checking the battery charge level
♦ Press the battery charge level button to
check the status of the battery (see also main
diagram).
The status will be shown on the battery display
LED as follows:
♦ RED/ORANGE/GREEN = maximum charge
RED/ORANGE = medium charge
RED = low charge – charge the battery
Filling the magazine shaft
Remove the battery before carrying out any
work on the power tool (e.g. maintenance,
changing tools, etc.) as well as during the trans-
port and storage of the power tool.
Unintentional activation of the trigger can result in
injury.
♦ Remove the battery pack
from the appliance.
♦ Turn the appliance around.
♦ Press the release
together (see fig. B).
♦ Pull the magazine slider
backwards
(see fig. B).
♦ Fill the magazine shaft
with staples or nails
(see fig. C).
NOTE
► Ensure the correct position for the nails
(see main diagram, face plate
on the
appliance).
♦ After filling, push the release
into the maga-
zine shaft as far as the stop until it clicks into
place.
NOTE
► The fill level indicator
shows whether the
magazine contains staples.
Setting the impact force
NOTE
► Select the lowest impact force sufficient for
stapling. Take into account the length of the
staples or nails you are using as well as hard-
ness of the material you are working with.
Increasing the impact force:
♦ Turn the impact force control
clockwise.
Reducing the impact force:
♦ Turn the impact force control
anticlockwise.
Operation
Switch on
♦ Press the tacker nose onto the location on
the material that you want to staple until it is
pushed in a few millimetres.
♦ Press the trigger
.
Switching on the LED work light
♦ Press the button for the LED work light to illu-
minate your workspace in unfavourable lighting
conditions.