
User's Manual


M7X and M7R Page 5-13 Maintenance
Back to Menu
Replacing a Fan
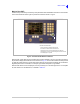
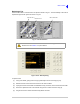
Three fans are fitted on a transceiver’s rear panel as shown in Fig 5-7. The serviceability of each fan is
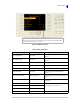
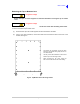
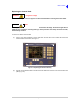
reported through the BIT system as shown in Fig 5-8.
Fig 5-7 Fan Identification
Fig 5-8 Fans – BIT Reporting
To replace a fan:
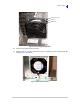
(1) Using a thin blade, gently prise the finger guard away from the fan’s body (Fig 5-9).
(2) Release the four screws that secure the fan to the radio’s chassis.
(3) Unplug the fan from the chassis mounted Molex 4-way connector; remove the fan from the radio.
(4) Secure the replacement fan to the chassis using the four screws removed in step (2).
(5) Plug the fan into the chassis mounted 4-way Molex connector.
Heat Sink Fan 1
Heat Sink Fan 2
Main Chassis Fan
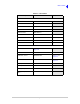
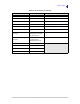
Note that Heat Sink Fan 1 and Heat Sink Fan 2 differ in type from the Main
Chassis Fan. See
Table 5-1 for part numbers.