
User's Manual

M7X and M7R Page 4-10 Installation
Back to Menu
Changing the Configuration
Ensure the input ac and dc supplies are disconnected before removing the top cover.
This equipment contains devices sensitive to electrostatic discharge. Precautions applicable
to handling such equipment, including wearing a static protection wrist strap connected to
earth, should always be taken.
To change the radio’s current antenna configuration:
(1) Place the radio on a suitable work surface and ensure that the input ac and dc supplies are
disconnected from the radio.
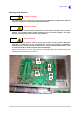
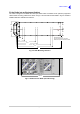
(2) Using a Torx T20 screwdriver, remove and retain the 30 M4 x 6 mm screws (part number
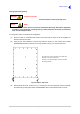
36T65340060) that secure the top cover to the chassis; see Fig 4-6. Remove the cover.
Fig 4-6 Radio’s Top Cover
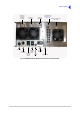
(3) Identify the RF PA cover, shown in Fig 4-7, and using a Torx T10 screwdriver, remove and retain
the 26 securing screws (part number 36T46330060). Remove and retain the RF PA cover.
WARNING Dangerous Voltage
Caution ESDs
The radio’s top cover is secured to the chassis using
thirty M4 x 6 mm Torx head screws.
Use only a Torx T20 screwdriver to remove and refit
the securing screws.