
User's Guide


Page 5
Back to Transceiver
Main Page
Setting Up and Operation
Introduction
Setting up the transceiver involves selecting various parameters using the Virtual Front Panel (VFP),
through a Multi-Access Remote Control (MARC) system, from a T6 controller, or from the transceiver’s
front panel. The transceiver can be configured for remote or local use.
Table 11 on page 35 details the functions and parameters that can be set from all these sources.
The rest of this document details how to configure the transceiver from the front panel, and how to
operate the radio in local mode.
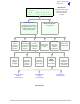
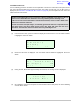
Selecting most of the transceiver's operational settings is carried out using the front panel Scroll/Select
switch and the LCD (see the illustration below). No attempt to set up the transceiver should be made until
the transceiver has been installed as per the installation procedures given in the Installation section.
Normal Operation
During normal operation, the LCD displays the Main screen. This screen shows the operating frequency,
the channel number (if the channel store facility is used), the carrier offset (if used), and displays a
graphical representation of output power when the transceiver is keyed. If the transceiver has been set
to Standby mode, which is shown by the front panel Standby Indicator being lit, the LCD is blanked.
Using the Scroll/Select Switch
The Scroll/Select switch (referred to throughout this section as the ‘Switch’) is used to leave the Main
screen and display the Control screen (see page 8). Further use of the Switch displays various selection
menus and allows the required parameters to be set. The switch has three actions: it can be turned
clockwise, anti-clockwise, or momentarily pushed in.
READY
ALARM
TRANSMIT
STANDBY
SCROLL/
SELECT
HEADSET/
MICROPHONE/
DIAGNOSTICS
REFERENCE
F r e q 1 1 8 .0 0 0 M H z
C h 1 0 0 + 7 . 3 k H z
P w r
Scroll SwitchLCD
M o d e A M V o i c e 1
RECEIVE