
User's Guide


Page 25
Back to Transceiver
Main Page
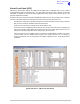
(6) Download the radio’s profile as shown on the VFP screen to either the radio, or to a file.
To download into the radio, select Radio > Send > All
or, Radio > Send > Settings
or, Radio > Send > Channel
To download to a file, select File > Send > All
or, File > Send > Settings
or, File > Send > Channel
or, File > Send > BIT
(7) Check that after downloading to a radio, no invalid parameters are returned (such parameters
are displayed as red text). If there are invalid parameters, amend them and then repeat the
download.
(8) When there is no further requirement for using the VFP, exit the VFP software and disconnect
the radio from the PC.
To Initiate a BIT Test
(1) Using a radio to PC serial interconnection lead, Park Air part number 17E12600001, connect the
radio’s front panel Headset/Microphone/Diagnostics connector to the PC’s Com Port 1 or Com
Port 2 (note which Com Port is used).
(2) Run up the VFP software and check that a blank VFP screen is displayed.
(3) At the Menu Bar, click on Serial Port and select either Com 1 or Com 2. The selection must
correspond to the port used to connect to the radio.
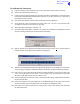
(4) At the Menu Bar select Radio > Test.
(5) An interruptive BIT test now takes place. The results are displayed in the BIT window.
(6) If there is no further requirement for using the VFP, exit the VFP software and disconnect the
radio from the PC.
During an interruptive BIT test, the transceiver radiates modulated carrier waves at the set
power. Users should therefore obtain the necessary authority before initiating a test.
If the test is to be carried out with the antenna disconnected, ensure a load is fitted to the
transceiver's antenna connector.
In order to test the line input stages, an internally generated 1 kHz tone is injected into the
line input circuit. Any other audio present on the line input will cause the test to be
inaccurate. Therefore the transceiver must not be keyed during the test.