
User`s guide


Managing Virtual Environments 36
To receive a full description on all sections on this page, refer to the Parallels
Virtual Automation Administrator's Guide, see the Managing Virtual Environment -->
Managing Virtual Machines section.
When finished, click Next to define the hardware settings, or click Create to apply the
default hardware settings and create the virtual machine.
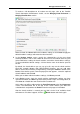
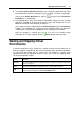
4 In the Hardware Settings screen, specify the characteristics of the new virtual
machine hardware, such as the number of virtual CPUs, the amount of the Physical
Server RAM to be used by the virtual machine, and various virtual devices settings.
To view and edit the default settings, click the device name in the device panel to
the left.
By default, the virtual devices you can set up in this step are the virtual machine
hard disk, network adapter and CD/DVD-ROM. However, you can add more
devices to the virtual machine configuration by clicking the Add Device button at the
bottom of the devices panel. From the pop-up list that appears, select the required
virtual hardware and click Add.
When you are done with the hardware settings, click Next to proceed.
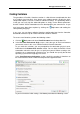
5 In the Review screen, check the virtual machine configuration settings you have
specified and either click Back to go back to the previous steps and change them, or
click Create to schedule the new virtual machine creation task.
At this point, you will be redirected to the Virtual Environments tab of the Infrastructure
screen. The information bar at the top of the screen informs you about the
scheduled task and provides the Details link to the task progress information.
After the virtual machine is created, you can find it in the list of available virtual
environments. If it doesn't appear, click the
Refresh button and check again.