
User guide


Configuring Virtual Machine 211
The files with the extensions, for which you set the associations will be opened with the
application you specified. If you specified a Windows application, the file will be opened with
it, no matter if the virtual machine is stopped or running. If the virtual machine is running, the
file will open in Single Window mode. If the virtual machine is stopped, it will automatically
start, open the file with the associated application and switch to Coherence mode.
If you want to revert to your previous file extension associations, you can either temporary
disable your custom associations configuration or set the associations to default:
To temporary disable the configuration you created with SmartSelect, open the Shared
Applications tab (page 169) of Configuration Editor and deselect the Enable SmartSelect
option. In this case, you can always enable the configuration by selecting the option.
To set the associations to default and delete your custom configuration, choose SmartSelect
-> Set to Default from the Applications menu. In this case, you won't be able to access your
SmartSelect configuration and will have to create it anew next time you want to use
SmartSelect.
When you uninstall Parallels Desktop, SmartSelect associations continue to exist. To restore the
default associations, you need to delete these files simultaneously with Parallels Desktop. To do
this, select Remove SmartSelect file associations when uninstalling Parallels Desktop.
Using Shared Profile
Parallels Desktop provides close integration between your Mac OS and Windows guest OS.
Now you can access certain Mac Home folders directly from Windows and vice versa.
Note. To enable Shared Profile, you must share all Mac disks or at least your Mac Home folder.
You can do this on the Shared Folders tab.
The following Windows folders are redirected to your Mac folders:
Windows Desktop to Mac Desktop
My Documents to Documents
My Pictures to Pictures
My Music to Music
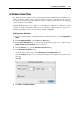
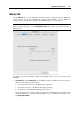
To enable Shared Profile
1 Open the virtual machine configuration in Configuration Editor.
2 Click the Shared Profile tab and select Enable.
The Shared Profile options become active, and you can configure them.
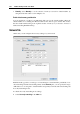
3 Select the necessary options from the list and clear the ones you don’t need.
You can use
Mac Desktop as Desktop in Windows
Mac Documents as My Documents in Windows
Mac Pictures as My Pictures in Windows
Mac Music as My Music in Windows