
User`s guide

90
Use Windows on Your Mac
Set Up a Network Printer
You can install a network printer directly into Windows.
Before installing a network printer in Windows, make sure that:
• Your Mac can access the Internet.
• Windows is configured to work in either the Shared networking mode or Bridged networking
mode and can access the Internet too.
• The user account in Windows has permission to access the network printer.
• You know the printer IP address.
After that, you can log in to Windows and install a network printer.
In Windows
Before adding a network printer in Windows, download and install an appropriate printer driver. For
detailed information on installing the printer driver, refer to the printer manufacturer documentation.
To add a network printer in Windows 7 or Windows Vista:
1 Open the Windows Start menu and select Control Panel.
2 In the Control Panel window, select Hardware and Sound and click Add a printer in the
Devices and Printers section (Printers in Windows Vista). The Add Printer wizard opens.
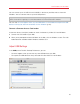
3 In the first window, click Add a network, wireless or Bluetooth printer.
4 In the next window, click The printer that I want isn't listed.
5 In the Find a printer by name or TCP/IP address window, select Add a printer using a
TCP/IP address or hostname and click Next.
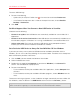
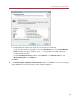
6 In the Type a printer hostname or IP address window, do the following:
1. Select TCP/IP Device from the Device type menu.
2. Specify the printer IP address in the Hostname or IP address field.
3. Clear the Query the printer and automatically select the driver to use option if it is
selected.
4. When ready, click Next.