
User`s guide

146
Advanced Topics
Parallels Tools for Windows
Important: To take advantage of much of the functionality Parallels Desktop offers, Parallels Tools must
be installed.
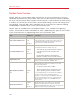
Parallels Tools can be installed in the following Windows guest operating systems:
• Windows 7
• Windows Server 2008
• Windows Vista
• Windows XP
• Windows Server 2003
• Windows 2000
Installing Parallels Tools
If you chose Express Installation when you first installed Windows, Parallels Tools were installed
automatically after the installation.
If you didn't choose Express Installation, do the following to install Parallels Tools:
1 Start Windows (p. 41).
2 When Windows boots up, choose Install Parallels Tools from the Virtual Machine menu.
Note: After you choose Install Parallels Tools in Windows 7 and Windows Vista, User Access Control
(UAC) may ask you whether to allow or deny the Parallels Tools installation. In this case, you need to
allow the installation.
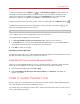
3 In the Welcome window, click Install to start the Parallels Tools installation or wait for 8
seconds and it will start automatically.
4 When the installation is complete, click Reboot to restart the virtual machine or wait for 8
seconds and it will be rebooted automatically.
If the Parallels Tools installation does not start automatically after you choose Install Parallels
Tools (for example, because the CD/DVD autorun is disabled), you can install them manually:
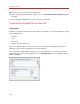
1 Log in to the Windows guest operating system and mount the Parallels Tools ISO image by
doing the following:
• Right-click the CD/DVD drive icon in the virtual machine's status bar and choose Connect
Image.
• In the Finder window, go to the hard disk folder (normally named "Macintosh HD"), select
the /Library/Parallels/Tools/ folder, select the prl-tools-win.iso file, and
click Open.