
User`s guide


Setting Up a Virtual Machine 72
Importing Data from Boot Camp to a New Virtual Machine
Parallels Desktop allows you to import the Boot Camp data to Parallels virtual machines. In
such virtual machines, the Boot Camp data becomes available on .hdd images. As a result, such
a virtual machine is in no way connected to the Boot Camp partition and it can be paused,
compressed, and have snapshots.
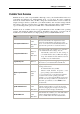
To create such a virtual machine, follow these steps:
1 Select a Boot Camp-based virtual machine and choose Import Boot Camp from the File
menu. Or you can right-click this virtual machine in the Parallels Virtual Machines list (p. 33)
and choose I
mport Boot Camp from the context menu.
Note: This virtual machine must be shut down.
2 Click Import.
3 In the next step, locate where you want to store your new virtual machine and click Choose.
4 Wait while the Boot Camp data is being imported to the virtual machine. After that, you will
be able to use the newly created virtual machine in Parallels Desktop.
Note: You will be able to work with the original Boot Camp virtual machine as well.
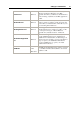
Using Boot Camp as Data Disk
To use the Boot Camp Windows partition as a data disk, add it as a hard disk to an existing
Windows XP, Windows Vista, or Windows 7 virtual machine. The Windows operating system
will automatically recognize it as a new disk. For detailed information on adding hard disks to
Virtual Machine Configuration, see Adding and Removing Devices (p. 215).
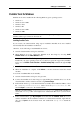
Moving Data from PC to a Virtual
Machine
With the help of Parallels Transporter that is included in the Parallels Desktop software, you can
transfer the whole of your PC to a Parallels virtual machine on your Mac using a network
connection, an external storage device, or a Parallels USB cable.
To transfer your PC to a virtual machine:
1 Install Parallels Transporter Agent on your source PC. The installation files for Parallels
Transporter Agent can be found on the Parallels Desktop disc or at the Parallels website.
2 Open Parallels Transporter Agent on the source PC.
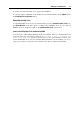
3 Go to your Mac and open Parallels Transporter by choosing Import from the File menu or
from the menu that appears when you click the arrow button
in the virtual machines list.
4 Follow the assistant that will help you choose the most convenient migration scenario and
will guide you through the migration process.
For detailed instructions, please refer to Parallels Transporter Help.