
User`s guide


Using the Boot Camp Partition in a Virtual Machine 258
Creating a Virtual Machine for the
Boot Camp Partition
To create a new virtual machine for using the Boot Camp Windows partition, do the following:
1 Boot into Mac OS X.
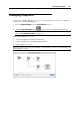
2 Start Parallels Desktop, and launch New Virtual Machine Assistant by clicking New in the
File menu.
3 In the Operating System Detection window, select the Boot Camp Partition option, and click
Continue.
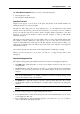
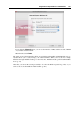
4 In this step, define the main parameters for your virtual machine:
Name. Indicate the name to be assigned to the virtual machine. By default, the virtual
machine gets the name of the operating system that you selected to be installed in this
virtual machine. If a virtual machine with this name already exists, you will be prompted
to specify another name. The name must not exceed 50 characters.
Let other Mac users access this virtual machine. Select this option if you want to share
this virtual machine with other users of your Mac. In this case the virtual machine file
(PVM file) will be saved in the /Users/Shared folder on your Mac.
Location. In this field, specify the virtual machine files location.
Sharing. Use this field to configure access to the disks and folders on the physical
computer from inside the virtual machine. After the virtual machine creation, you can
edit these settings in the Shared Folders pane (p. 180) of Virtual Machine Configuration.
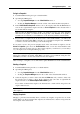
Note: If your Boot Camp is divided into several partitions, only the bootable partition will
be added to the virtual machine configuration. If you want to add the other partitions, you
should add them as separate virtual hard disks (p. 220) to Virtual Machine Configuration.
For detailed information, see Boot Camp Configurations (p. 260).