
User`s guide


Configuring a Virtual Machine 225
Creating a New Partition in Windows
To create a new partition on the unallocated space of your virtual hard disk, you can use Disk
Management, a Windows build-in utility for partitioning hard disks. The steps below provide
instructions on partitioning the added space in Windows XP. For other Windows operating
systems, the procedure will be very similar to this one.
To create a new partition on Windows XP
1 Start the virtual machine that uses the enlarged virtual disk.
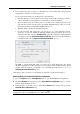
2 To start the Disk Management utility, choose Control Panel from the Start menu. Double-
click Administrative Tools and open Computer Management. In the Storage section, select
Disk Management
or
choose Run from the Start menu and type:
diskmgmt.msc
Click OK.
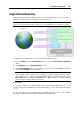
3 In the Disk Management window, right-click Unallocated Capacity and choose New Partition
from the shortcut menu.
4 In the New Partition wizard Introduction window, click Next.
5 In the Select Partition Type window, select Primary partition and click Next.
6 Specify the partition size and click Next.
7 Assign a drive letter for the new partition and click Next.
8 In the Format partition window, select Format partition with the following settings. Set File
system to NTFS and Allocation unit size to Default. Type the volume name in the Volume label
field and click Next.
9 Carefully review the settings and click Finish to start formatting.
When the operation is completed, the new volume appears in the Computer Management window
and in My Computer.