
User`s guide


Installing Parallels Desktop 19
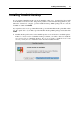
In the pop-up dialog, click Agree if you agree with the terms and conditions of the license
agreement.
5 In the Customer Experience Program window, read about the Parallels Customer Experience
program and click Continue.
In the pop-up dialog, click Yes if you want to participate in the program. If you don't want to
participate, click No.
Note: If you choose not to participate, you may join the program later using the Feedback
pane (p. 70) of Parallels Desktop Preferences.
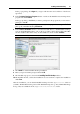
6 In the Select a Destination window, select the hard disk where to install Parallels Desktop.
You can install Parallels Desktop only on the boot volume, that is the hard disk where Mac
OS X is installed. Other disks, if any, are unavailable for selection. Click Continue.
Note: If you have only one volume on your Mac, this step is omitted.
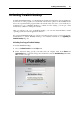
7 Click Install to start the Parallels Desktop installation.
8 Enter your password when prompted and click OK.
9 The installation progress is shown in the Installing Parallels Desktop window.
10 The Installer informs you that the installation was successful. To complete the installation,
click Close.
After the installation, you can launch Parallels Desktop from the Applications folder on
your Mac. The Parallels Desktop add-ons like Parallels Transporter (p. 263) and Parallels Image
Tool (p. 268) are available from the /Applications/Parallels/ folder.