
User`s guide


Integrating Mac OS X and Your Virtual Machine 166
Browsing Virtual Hard Disks in
Finder
For easy access to the files of your virtual machines, you can mount their hard disks in Mac OS
X Finder together with other disks and storage devices.
If you want your virtual hard disks to be mounted to the Mac OS X desktop when the virtual
machine is running, you should perform the following actions:
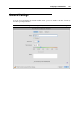
1 Open the Shared Folders pane (p. 180) of the Virtual Machine Configuration dialog and
enable the Mount virtual disks to Mac OS X desktop option.
Note: To be able to edit the settings on the Shared Folders pane, you should have Parallels
Tools (p. 98) installed in the virtual machine and the Isolate Mac from Windows option
disabled in the Security pane (p. 179).
2 Open the Finder Preferences, click General on the toolbar and select the Connected servers
option in the list of items displayed on the desktop.
If you want to manage the virtual machine content without starting the virtual machine, you can
mount the virtual hard disks manually using Parallels Mounter (p. 267):
1 Right-click the virtual machine file (PVM), and choose Open with > Parallels Mounter from
the shortcut menu. By default, virtual machines' bundles are stored in the
/Users/<Username>/Documents/Parallels/ folder or the /Users/Shared
folder.
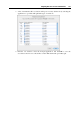
2 To view and work with the contents of a mounted volume, select the volume's icon in the
sidebar of the Finder window.
Note: If you copy files to a Windows virtual machine using Parallels Mounter, you need to
log in to Windows as an administrator to be able to open them inside the virtual machine.
3 To unmount the volume, click the Eject button next to the volume's name in the sidebar.
Note: You can use Parallels Mounter to mount volumes associated with third-party (VMware,
VirtualBox, Virtual PC) virtual machines as well.