
User`s guide


Installing Parallels Desktop 29
Removing Parallels Desktop
Uninstalling Parallels Desktop does not delete any files that have been created using Parallels
Desktop, such as configuration files, virtual hard disks, floppy .fdd images, and serial or
parallel port output files.
In Windows
Note: You must have power user or administrator rights to uninstall Parallels Desktop in a
Windows primary operating system.
The procedure may be slightly different in different Windows versions. To remove Parallels
Desktop follow these steps:
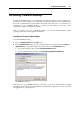
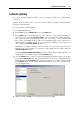
1 Open the Windows Start menu, select Control Panel, select Add /Remove Programs, and then
select Parallels Desktop.
2 Click the Remove button to begin uninstalling.
3 Click Yes when prompted: "Are you sure you want to remove Parallels
Desktop from your computer?"
If you purchased the program from the Parallels Online store
(http://www.parallels.com/en/buyonline
) or downloaded a trial version, you can also remove
Parallels Desktop with the help of the ParallelsDesktop-4.0.xxxx.xxxxxx.exe file.
Just locate this file and open it. The wizard will lead you through the process of deinstallation.
In Linux
Note: To uninstall Parallels Desktop in a Linux primary operating system you need the root
privileges.
To uninstall Parallels Desktop in Linux:
1 Launch a terminal.
2 To gain the root privileges, enter the following command:
su
Enter the password for the root account when prompted.
3 Locate the parallels-desktop-4.0.xxxx.xxxxxx.run file that you used during
the Parallels Desktop installation and issue the next command:
sh parallels-desktop-4.0.xxxx.xxxxxx.run
4 The Parallels Desktop Installation wizard starts. In the welcome screen, click Next.
5 In the Upgrade Components screen, click the Remove button.
6 When the uninstallation is completed, the Parallels Desktop Uninstalation completed screen
appears. Click the Exit button to close the wizard.