
Data Sheet


Step 11: Rims
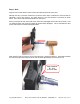
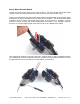
Place the main rim over the valve stem, being sure to line up the stem notch as shown below. Push it
down tight so that the rim is well seated into the rubber tire.
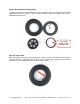
The aluminum wheel kit uses #4-40 x ½” long flat head bolts which screw directly into tapped holes on
the aluminum Main Rim section.
The HDPE wheel kit uses the #4-40 x 1” long screws and acorn nuts that fit into a recess on the plastic
Main Rim section. Think of them as miniature “lug nuts” that hold your wheel together.
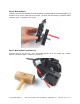
Put a screw or bolt (depending on which kit you have) into each of the holes in the inner rim. Then,
place the inner rim on the tire as shown, aligning the bolts or screws with the holes in the main rim.
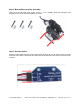
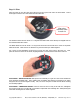
Secure Rims - Aluminum Version: Best practice for assembly is to get all of the screws started into
their respective threaded holes. Then, tighten each one slightly and slowly go around the circle, which
brings the two rim sections together evenly. Also, be sure to not pinch or bind the tube while screwing
the assembly together.
Secure Rims – HDPE Plastic Version: Insert an acorn nut into its cavity in the main rim, and tighten
the screw from the inner rim side with a screwdriver. Repeat with the remaining nuts. Avoid pinching the
tube while screwing the two halves together.
Align valve
stem with notch
in main rim
Copyright © Parallax Inc. Motor Mount and Wheel Kit -AL(#228962) –MP(#28963) v1.1 1/21/2015 Page 9 of 13