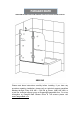
PARAGON BATH SHOWER DOOR/ BATH TUB SCREEN INSTALLATION INSTRUCTIONS SBS02-W ………………………………………………………………………………………… Please read these instructions carefully before installing. If you have any questions regarding installation, please call our technical support specialists Monday through Friday 9:00 AM – 5:00 PM at Phone: (888) 895-1989, or e-mail our technical support group at Support@Paragonbath.com. For more information on Paragon Bath Shower Doors & Tub screens please visit www.ParagonBath.
Installing Preparations 1. After opening the carton, please read the instructions carefully, examine boxes and packages for shipping damage. If the unit has been damaged, has a finishing defect, or has missing parts, please contact our customer support department within 3 business days of the delivery date. Please note that Paragon Bath will not replace any damaged products or missing parts free of charge after 3 business days or if the product has been installed.
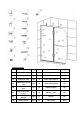
Component list No. Name Q’ty No.
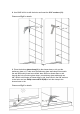
ST4*25 09 Φ1/4” anchor 2pcs 19 10 Φ5/16” anchor 3pcs 20 Hinge 2pcs WARM TIPS 01: Open the packaging carefully and inspect all the necessary parts using detailed diagram and component list in your manual as a reference. Before discarding the carton, check for small hardware bags that tend to fall to the bottom of the box. If any parts are damaged or missing, please contact us for replacement. 02: Retain these installation instructions for future use if in need. INSTALLATION STEPS: 1.
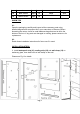
2. Use 5/16” drill bit to drill the holes and insert the 5/16” anchors (12). Please see Fig 2 for details Fig 2 3. Place the bottom glass clamp(11) to the shower base or tub, put the stationary glass on it, make sure the stationary glass wall clamp holes match the wall holes which have been drilled. draw holes on shower base or tub through the hole of bottom glass clamp.
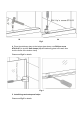
03 04 Fig 3 4. Place the stationary glass to the bottom glass clamp, use Philip’s screw ST6*40 (07) to lock the wall clamps (18) and stationary glass to the wall, then lock the screw of the bottom clamp. Please see Fig 4 for details Fig 4 5.
Fig 5 Warm tips: This stainless steel hinge comes with the positioning functions, with a solid bearing in the hinge middle. In order to let door open and close smoothly, the waterproof strips need to be cut in advance according to the hinge design. Please see Fig 5 for details. 6. Install moving glass. Place the moving glass (16) to the shower base or tub, make the hinge cut area match to the hinges then lock the hinge screws.
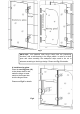
7. Install glass shelf 7.1 Fix the glass shelf clamp A (13) to the stationary glass 7.2 Fix the glass shelf clamp B (14) to the wall. (in this way, it’s better to snap the clamp B to the glass shelf first and push the glass shelf (12) to the clamp A which have installed on stationary glass, then make the glass shelf touch to the wall, adjust the level to get best result and pull the glass shelf out, then draw holes on the clamp B. 7.
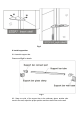
Fig 8 8. Install support bar 8.1 Assemble support bar Please see Fig 9 for details Fig 9 8.2. Snap one side of the support bar to the stationary glass, another side touch to the wall, adjust the proper position and then draw holes on the wall.
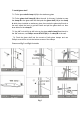
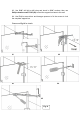
8.3. Use 5/16” drill bit to drill holes and knock in 5/16” anchors, then use Philip’s head screw ST4*25 (08) to fixed the support bar base to the wall. 8.4. Use Philip’s screw driver and hexagon spanner to fix the screws to lock the complete support bar. Please see Fig 10 for details 01 02 03 04 05 9.
Handles have been assembled before shipment, you just need to disassemble and install according to the handle holes on the moving glass. Please see Fig 11 for details Fig 11 10. Install sealing strip (02). Install sealing strip on moving glass bottom to get better sealing result.
11. Apply the sealant on any necessary places to prevent water leakage.
Product Maintenance To ensure long lasting life for your shower door/bath tub screen, please clean the dust or stains use non-abrasive sprays or cream based cleaners. Never use abrasive cleansers, metal brushes or scrapers that could scratch or dull the surface. To ensure a long lasting hardware finish, wipe off the metal parts after each use with a soft cloth. Do not use abrasive cleaners or cleaning products containing ammonia, bleach or acid.
WARANTY INFORMATION This is Paragon Bath LLC exclusive written warranty effective August 8, 2014 This warranty extends only to the original owner/end-user for household use only and is not transferable to a subsequent owner. This warranty applies only to Paragon Bath LLC products purchased from an authorized dealer and installed in United States or Canada. Proof of purchase (original sales receipt) must be provided with all warranty claims.
material, including but not limited to tiles, marble, contract, negligence, strict liability in tort, or warranty of any kind) for any indirect, special, incidental, consequential, or exemplary damages (including but not limited to lost profits). Paragon Bath LLC is not responsible for installation, removal or reinstallation costs of any product requiring warranty services. Improper modification or alteration of any Paragon Bath LLC products will void the warranty.
building code restrictions on installation or use and any such compliance is excluded from this warranty. Paragon Bath LLC reserves the right to modify this warranty at any time - such warranty modification will not alter warranty applicable at the time of sale of the products in question. Product must be registered within 30 days from time of purchase at www.ParagonBath.com WARRANTY Paragon Bath LLC.