
User's Manual


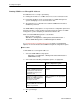

Table Of Contents
- Contents
- About This Guide
- About the FrameSaver DSL Unit
- User Interface and Basic Operation
- Configuration Procedures
- Configuration Options
- Overview
- Using the Easy Install Feature
- Setting Up So the Router Can Receive RIP
- Entering System Information and Setting the System Clock
- Configuration Option Tables
- Configuring the Overall System
- Configuring the Physical Interfaces
- Configuring Frame Relay for the Data Port
- Configuring ATM for the Network Interface
- Configuring Circuit and DLCI Records
- Configuring PVC Connections
- Setting Up Management and Communication Options
- Configuring Node IP Information
- Configuring Management PVCs
- Configuring General SNMP Management
- Configuring Telnet and/or FTP Session Support
- Configuring SNMP NMS Security
- Configuring SNMP Traps
- Configuring the Ethernet Port
- Configuring the Communication Port
- Configuring the COM Port to Support an External Modem
- Security and Logins
- Operation and Maintenance
- FTP Operation
- Troubleshooting
- Setting Up OpenLane for FrameSaver Devices
- Setting Up Network Health for FrameSaver Devices
- Menu Hierarchy
- SNMP MIBs and Traps, and RMON Alarm Defaults
- Connectors, Cables, and Pin Assignments
- Technical Specifications
- Equipment List
- Index

Security and Logins
5-11
9783-A2-GB20-00
July 2000
See
Configuring SNMP NMS Security
in Chapter 4,
Configuration Options,
for
more information about SNMP NMS Security configuration options.
Creating a Login
A login is required if security is enabled. (Security is enabled by the configuration
options Login Required for the communication port, modem port, and Telnet
Login Required or FTP Login Required for a Telnet or FTP Session.
) Up to six
login ID/password combinations can be created using ASCII text, and each login
must have a specified access level. Logins must be unique and they are
case-sensitive.
" Procedure
To create a login record:
1. Select Administer Logins.
Main Menu
→
Control
→
Administer Logins
2. Select New, and set the following configuration options, as appropriate.
In the field . . .
Enter the . . .
Login ID ID of 1 to 10 characters.
Password Password from 1 to 10 characters.
Re-enter password Password again to verify that you entered the
correct password into the device.
Access Level Access level: 1, 2, or 3.
H Level-1 – User can add, change, and
display configuration options, save, and
perform device testing.
H Level-2 – User can monitor and perform
diagnostics, display status and
configuration option information.
H Level-3 – User can only monitor and
display status and configuration screens.
CAUTION: Make sure at least one login is set
up for Level-1 access or you may be
inadvertently locked out.
NOTE:
See
Resetting the Unit and Restoring Communication
in Chapter 8,
Troubleshooting
, should you be locked out inadvertently.
3. S
ave your changes.
When Save is complete, the cursor is repositioned at the Login ID field, ready
for another entry.