
User's Manual


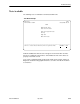


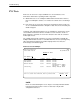

Table Of Contents
- Contents
- About This Guide
- About the FrameSaver DSL Unit
- User Interface and Basic Operation
- Configuration Procedures
- Configuration Options
- Overview
- Using the Easy Install Feature
- Setting Up So the Router Can Receive RIP
- Entering System Information and Setting the System Clock
- Configuration Option Tables
- Configuring the Overall System
- Configuring the Physical Interfaces
- Configuring Frame Relay for the Data Port
- Configuring ATM for the Network Interface
- Configuring Circuit and DLCI Records
- Configuring PVC Connections
- Setting Up Management and Communication Options
- Configuring Node IP Information
- Configuring Management PVCs
- Configuring General SNMP Management
- Configuring Telnet and/or FTP Session Support
- Configuring SNMP NMS Security
- Configuring SNMP Traps
- Configuring the Ethernet Port
- Configuring the Communication Port
- Configuring the COM Port to Support an External Modem
- Security and Logins
- Operation and Maintenance
- FTP Operation
- Troubleshooting
- Setting Up OpenLane for FrameSaver Devices
- Setting Up Network Health for FrameSaver Devices
- Menu Hierarchy
- SNMP MIBs and Traps, and RMON Alarm Defaults
- Connectors, Cables, and Pin Assignments
- Technical Specifications
- Equipment List
- Index

Troubleshooting
8-17
9783-A2-GB20-00
July 2000
" Procedure
To start and stop a loopback or a set-pattern test:
1. Follow this menu selection sequence:
Main Menu
→
Test
2. Select an interface and test (e.g., Network or Data Port PVC Tests) and
press Enter.
The selected test screen appears. Start appears in the Command column.
Inactive appears in the Status column.
3. Select the Port number and press Enter.
4. Select the DLCI number and press Enter if a PVC test has been selected.
The cursor is positioned at Start in the Command column of the first available
test. Start is highlighted.
5. Highlight the Start command for the test you want to start and press Enter.
Stop now appears and is highlighted, and the status of the test changes to
Active.
6. Press Enter to stop the test.
Start reappears and the status of the test changes back to Inactive.
7. View the length of time that the test has been running in the Result column.
Aborting All Tests
Use the Abort All Tests selection from the Test menu to abort all tests running on
all interfaces, with exception to DTE-initiated loopbacks. To abort individual tests
that are active, see
Starting and Stopping a Test
.
" Procedure
To abort all tests on all interfaces:
1. Follow this menu selection sequence:
Main Menu
→
Test
2. Select Abort All Tests and press Enter.
Command Complete appears when all tests on all interfaces have been
stopped.
NOTE:
Abort All Tests does not interrupt DTE-initiated loopbacks.