
Installation Guide


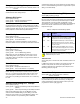
Table Of Contents
- Introduction
- About Magellan and this Manual
- Conventions
- Specifications
- Quick Setup
- Installation
- AC Power
- Backup Battery Pack
- Telephone Line Connections
- Programmable Outputs (PGMs)
- Hardwire Zone Connections
- WinLoad Connection
- UIP-256 Universal In-Field Programmer Connection
- X10 Transmitter Connection
- Connecting a Paradox Memory Key (PMC-3)
- Location and Mounting
- Connecting the Radio Antenna
- Programming Methods
- WinLoad Installer Upload/Download Software
- Programming Using the Built-in Keypad
- Programming Using a Paradox Memory Key
- User Codes
- User Code Length
- Installer Code
- Maintenance Code
- System Master Code
- Duress Code
- Zone Programming
- Zone Programming Overview
- Zone Definitions
- Zone Options
- Zones 15 and 16 become Hardwire Zones
- EOL (End-Of-Line) Zones
- Wireless Programming
- Assigning Wireless Zone Transmitters
- Assigning Wireless Doorbells to the Console
- Deleting Assigned Wireless Transmitters
- Viewing Wireless Transmitter Signal Strength
- Assigning Remote Controls
- Programming the Remote Control’s Buttons
- Arming and Disarming
- Regular Arming Switches to Stay Arming
- Regular Arming Switches to Force Arming
- Stay Arming Switches to Force Arming
- Timed Auto-Arming
- No Movement Auto-Arming
- Auto-Arming Options
- One-Touch Arming
- Exit Delay
- Bell Squawk on Arm/Disarm with Remote Control
- No Exit Delay when Arming with Remote Control
- Exit Delay Termination
- Follow Zone Switches to Entry Delay 2
- Closing Delinquency Timer
- Alarm Options
- Bell Cut-off Timer
- Wireless Transmitter Supervision Options
- Tamper Recognition Options
- Check-in Supervision Options
- Panic Alarms
- Reporting and Dialer Settings
- Report Codes
- Console Telephone Numbers
- Console Account Number
- Reporting Formats
- Event Call Direction
- Delay Between Dialing Attempts
- Alternate Dial Option
- Force Dial Option
- Dialing Method
- Pulse Ratio
- Switch to Pulse Dialing on 5th Attempt
- Telephone Line Monitoring (TLM)
- Recent Close Delay
- Auto-Test Report
- Power Failure Report Delay
- Disarm Reporting Options
- Zone Restore Report Options
- Programmable Outputs
- PGM Activation Event
- PGM Deactivation Event
- PGM Delay
- PGM Normal State
- PGM X10 Option
- System Settings
- Software Reset
- Installer Lock
- Console Tamper Supervision
- Console Audible Trouble Warning
- FM Tuner Option
- Daylight Savings Time
- AC Power Failure Warning
- The Trouble Display
- WinLoad Software Settings
- Panel Answer Options
- Panel Identifier
- PC Password
- PC Telephone Number
- Call Back Feature
- Appendix 1: Ademco Contact ID Report Code List
- Index

22 Reference & Installation Manual
Alarm Options
Bell Cut-off Timer
Section [063]: 001 to 255 minutes; 000 = Disabled; Default = 4
minutes
After an audible alarm, the siren will stop upon disarming of the
system or when the Bell Cut-Off timer has elapsed, whichever
comes first.
Wireless Transmitter Supervision Options
Section [094]: Options [6] and [7]
This feature determines how the Magellan console will react to a
Supervision Loss trouble. Table 5 shows the different
supervision loss combinations available and how the system will
react when armed or disarmed.
Table 5: Wireless Transmitter Supervision Options
Supervision Bypass Options
Section [094]: Option [8]
Option [8] OFF =No Supervision Loss if detected on a Bypassed
Zone (default)
Option [8] ON =Generate Supervision Loss if detected on a
Bypassed Zone
• When option [8] is OFF, the Wireless Transmitter
Supervision Options (page 22) will follow the zone's bypass
definition. This means the console will not perform any
action if a Supervision Loss occurs on a bypassed zone.
• When option [8] is ON, the Wireless Transmitter Supervision
Options (page 22) will ignore the bypass definition. This
means the console will generate an incident as per the set
Wireless Transmitter Supervision Option if a supervision
loss occurs on a bypassed zone.
Tamper Recognition Options
Section [094]: Options [3] and [4]
This feature determines how the Magellan console will react to a
zone tamper. Table 6 shows the different tamper recognition
combinations available and how the system will react when
armed or disarmed.
Table 6: Tamper Recognition Options
Tamper Bypass Options
Section [094]: Option [5]
Option [5] OFF =Ignore any tampers detected on a bypassed
zone (default)
Option [5] ON = Generate tamper if detected on a bypassed
zone
• When option [5] is ON, the Tamper Recognition feature
(page 22) will ignore the zone’s bypass definition. This
means the console will generate an incident as per the set
Tamper Recognition option if a tamper occurs on a
bypassed zone.
• When option [5] is OFF, the Tamper Recognition feature
(page 22) will follow the zone's bypass definition. This
means the console will ignore any tampers that occur on a
bypassed zone.
Check-in Supervision Options
Section [103]: Options [1] to [8]; Zones 1 to 8; Default: All ON
Section [104]: Options [1] to [8]; Zones 9 to 16; Default: All ON
If enabled, Magellan can wait for each of its assigned wireless
transmitters to send a status signal within a specified time (see
Check-in Supervision Time on page 23) to confirm their
Options Description
[6] [7]
OFF OFF Wireless transmitter supervision disabled
OFF ON Trouble only (default)
System armed or disarmed: If a supervision loss
occurs on a zone, the console will display a trouble on
the LCD screen and send a report to the central
monitoring station.
ON OFF Audible alarm when armed
System armed:
If
a supervision loss occurs on a zone,
the console will follow the zone's Alarm Types setting
(see page 15).
System disarmed: If a supervision loss occurs on a
zone, the console will display a trouble on the LCD
screen.
ON ON Audible alarm
System armed: If a supervision loss occurs on a zone,
the console will follow the zone's Alarm Types setting
(see page 15).
System disarmed: It functions the same as Trouble
Only setting, except it will also generate an audible
alarm.
Options Description
[3] [4]
OFF OFF Tamper recognition disabled (default)
OFF ON Trouble only
System armed or disarmed: If a tamper wiring failure
occurs on a zone, the console will follow the zone's
Alarm Types setting (see page 15) and send a report
to the central monitoring station.
ON OFF Audible alarm when armed
System armed:
If
a tamper failure occurs on a zone,
the console will follow the zone's Alarm Types setting
(see page 15).
System disarmed: If a tamper failure occurs on a
zone, the console will follow the zone's Alarm Types
setting (see page 15) and send a report to the central
monitoring station.
ON ON Audible alarm
System armed: If a tamper failure occurs on a zone,
the console will follow the zone's Alarm Types setting
(see page 15).
System disarmed: It functions the same as Trouble
Only setting, except it will also generate an audible
alarm.