
User's Manual
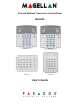
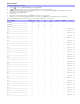


Table Of Contents
- Basic Operations
- Programming Access Codes
- System Master Code (Default: 123456)
- Master Codes
- Duress Code
- Programming Access Codes
- 2. Enter your [system master code] or either [master code].
- 3. The [] key will flash. When a zone LED or zone key is lit (not flashing), the user is already programmed.
- 4. Select a user by entering a 2-digit user number (i.e. [0]+[9] for user 9) or use the scroll keys and then press [enter]. For the MG10LEDV/H, press the key corresponding to the user number (i.e. [9] for user 9).
- 5. Enter a new 4- or 6-digit [access code].
- 6. Confirm the code.
- 7. Press a button on the designated remote or press [enter] to skip if there is no remote to program.
- 8. (Not available for non-partitioned system) Press [1] and/or [2] to assign the user to a partition. Press [enter], the menu will now jump to the next available user, if you choose to continue.
- 2. Enter your [system master code] or either [master code].
- 3. Select a user by entering a 2-digit user number (i.e. [0]+[9] for user 9). For the MG10LEDV/H, enter a 1-digit user number (i.e. [9] for user 9).
- 4. Press the [sleep] key until you hear the confirmation beep.
- Regular Arming
- Sleep Arming
- Stay Arming
- One-Touch Arming
- Auto-Arming
- Timed Auto Arming
- 2. Enter [master code].
- 3. Press the [byp] key. The [byp] key will flash to indicate you are in the System Options menu.
- 4. Press key [1] to set partition 1, or press key [2] to set partition 2.
- 5. Enter the desired time for auto arm (24 hour clock, e.g. 18:30).
- 6. Press key [1] to regular arm, key [2] to sleep arm, or key [3] to stay arm the partition.
- No Movement Auto Arming
- Timed Auto Arming
- Disarming & Deactivating an Alarm
- 2. Press [off] + enter [access code].
- 3. If you have access to both partitions (see Partitioning on page 3): Press the key corresponding to the desired partition ([1] or [2]). For both partitions, press the other key after the confirmation beep.
- Manual Bypass Programming
- 2. Enter your [access code] (see the note below). The [byp] key will flash.
- 3. Illuminate the number(s) corresponding to the zone(s) you want to bypass by entering the two-digit zone number (i.e. zone 3 = 03). Solid on = Zone open, Flash = Zone bypass, Off = Zone closed, not bypassed.
- 4. Press the [enter] key to save and exit.
- Bypass Recall Feature
- Display Mode
- Alarm Display
- Fire Alarms
- Panic Alarms
- Programming Chime Zones
- Keypad Muting
- Keypad Backlight
- PGM Keys (Programmable Outputs)
- Power Save Mode
- Trouble Display
- 2. Read the corresponding explanation of the trouble from the Trouble List below. If no repair instructions are given, call your monitoring station for repairs.
- 3. Press the [clear] key to exit.
- Trouble List
- 2. Enter the hour and minutes. If the hour is between 01 and 12, you will need to select [1] for 24Hr format, [2] for AM, and [3] for PM setting. If the hour is above 12, the system will automatically select the 24Hr format.
- 3. Enter the year (4 digits).
- 4. Enter the month (2 digits).
- 5. Enter the day (2 digits). You have now set the Time & Date. Press [clear] to exit.
- Quick Function Keys
- Testing & Maintenance
- System Checklist
- Master Quick Menu MG5000
- Overview
- User
- PGMs
- PGM Utility Keys
- System Timers
- Other Information
- Access Codes
- 2. The [] key will flash. When a zone LED or zone key is lit (not flashing), the user is already programmed.
- 3. Select a user by entering a 2-digit user number (i.e. [0]+[9] for user 9) or use the scroll keys and then press [enter]. For the MG10LEDV/H, press the key corresponding to the user number (i.e. [9] for user 9).
- 4. Enter a new 4- or 6-digit [access code].
- 5. Confirm the code.
- 6. Press a button on the designated remote or press [enter] to skip if there is no remote to program.
- 7. (Partitioned system only) Press [1] and/or [2] to assign the user to a partition. Press [enter], the menu will now jump to the next available user.

Magellan 3
Partitioning
Your Magellan system is equipped with a partitioning feature that can divide your alarm system into two distinct areas identified as
Partition 1 and Partition 2. Partitioning can be used in installations where shared security systems are more practical, such as a
home office or warehouse building. When partitioned, each zone, each user code and many of your system's features can be
assigned to either Partition 1, Partition 2, or both partitions.
If the system is not partitioned, all zones, user codes, and features will be recognized as belonging to Partition 1.
[TBL] Trouble display
ON = Trouble(s) occurring
[MEM] Alarm memory display
ON = Alarm(s) occurred
[BYP] Bypass programming
ON = Zone(s) bypassed
Zone Display:
The numbers [1] to [32] correspond to zones 1 to 32 respectively.
Open or entry delay zones are illuminated, and flash in alarm.
Figure 1: MG32LED (32-zone LED Keypad Module)
Partition 1 Status Partition 2 Status
Off Light (red):
On = Disarmed
Off = System armed
Fast Flash = Disarmed system in alarm
(e.g. 24hr. zone)
AC Light
On = Power on
Off = Power off
= Press once + [
MASTER
CODE] for Quick Menu
Programming
FUTURE USE
Arm (red), Sleep (yel), Stay (grn):
On = Partition armed
Off = Partition disarmed
Flash = Exit Delay
Fast Flash* = Exit Delay (final 10 sec.)
Fast Flash* = Partition in alarm
* Audible Indicators:
Continuous beep = Alarm
Variable beep = Fire alarm
Intermittent beep = Beginning of exit delay
Fast beep = Final 10 sec. of exit delay
[TBL] Trouble display
ON = Trouble(s) occurring
[MEM] Alarm memory display
ON = Alarm(s) occurred
[BYP] Bypass programming
ON = Zone(s) bypassed
Zone Display:
The numbers [1] to [32] correspond to zones 1 to 32 respectively.
Open or entry delay zones are illuminated, and flash in alarm.
Figure 3: MG32LRF (32-zone Wireless LED Keypad Module)
Partition 1 Status Partition 2 Status
Off Light (red):
ON = Disarmed
OFF = System armed
Fast Flash = Disarmed system in alarm
(e.g. 24hr. zone)
Power and RX/TX Light
ON = Power on
OFF = Power off
FLASH = Communication failure
with panel/keypad not
learned
FAST
FLASH = Transmission/reception in
progress
= Press once + [
MASTER
CODE] for Quick Menu
Programming
lnfo Key
Refresh display to see all open zones (see
Display Mode on page 9)
Arm (red), Sleep (yel), Stay (grn):
On = Partition armed
Off = Partition disarmed
Flash = Exit Delay
Fast Flash* = Exit Delay (final 10 sec.)
Fast Flash* = Partition in alarm
* Audible Indicators:
Continuous beep = Alarm,
Variable beep = Fire alarm
Intermittent beep = Beginning of exit delay
Fast beep = Final 10 sec. of exit delay
FUTURE USE