
User's Manual
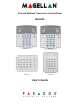
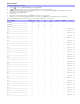
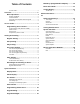


Table Of Contents
- Basic Operations
- Programming Access Codes
- System Master Code (Default: 123456)
- Master Codes
- Duress Code
- Programming Access Codes
- 2. Enter your [system master code] or either [master code].
- 3. The [] key will flash. When a zone LED or zone key is lit (not flashing), the user is already programmed.
- 4. Select a user by entering a 2-digit user number (i.e. [0]+[9] for user 9) or use the scroll keys and then press [enter]. For the MG10LEDV/H, press the key corresponding to the user number (i.e. [9] for user 9).
- 5. Enter a new 4- or 6-digit [access code].
- 6. Confirm the code.
- 7. Press a button on the designated remote or press [enter] to skip if there is no remote to program.
- 8. (Not available for non-partitioned system) Press [1] and/or [2] to assign the user to a partition. Press [enter], the menu will now jump to the next available user, if you choose to continue.
- 2. Enter your [system master code] or either [master code].
- 3. Select a user by entering a 2-digit user number (i.e. [0]+[9] for user 9). For the MG10LEDV/H, enter a 1-digit user number (i.e. [9] for user 9).
- 4. Press the [sleep] key until you hear the confirmation beep.
- Regular Arming
- Sleep Arming
- Stay Arming
- One-Touch Arming
- Auto-Arming
- Timed Auto Arming
- 2. Enter [master code].
- 3. Press the [byp] key. The [byp] key will flash to indicate you are in the System Options menu.
- 4. Press key [1] to set partition 1, or press key [2] to set partition 2.
- 5. Enter the desired time for auto arm (24 hour clock, e.g. 18:30).
- 6. Press key [1] to regular arm, key [2] to sleep arm, or key [3] to stay arm the partition.
- No Movement Auto Arming
- Timed Auto Arming
- Disarming & Deactivating an Alarm
- 2. Press [off] + enter [access code].
- 3. If you have access to both partitions (see Partitioning on page 3): Press the key corresponding to the desired partition ([1] or [2]). For both partitions, press the other key after the confirmation beep.
- Manual Bypass Programming
- 2. Enter your [access code] (see the note below). The [byp] key will flash.
- 3. Illuminate the number(s) corresponding to the zone(s) you want to bypass by entering the two-digit zone number (i.e. zone 3 = 03). Solid on = Zone open, Flash = Zone bypass, Off = Zone closed, not bypassed.
- 4. Press the [enter] key to save and exit.
- Bypass Recall Feature
- Display Mode
- Alarm Display
- Fire Alarms
- Panic Alarms
- Programming Chime Zones
- Keypad Muting
- Keypad Backlight
- PGM Keys (Programmable Outputs)
- Power Save Mode
- Trouble Display
- 2. Read the corresponding explanation of the trouble from the Trouble List below. If no repair instructions are given, call your monitoring station for repairs.
- 3. Press the [clear] key to exit.
- Trouble List
- 2. Enter the hour and minutes. If the hour is between 01 and 12, you will need to select [1] for 24Hr format, [2] for AM, and [3] for PM setting. If the hour is above 12, the system will automatically select the 24Hr format.
- 3. Enter the year (4 digits).
- 4. Enter the month (2 digits).
- 5. Enter the day (2 digits). You have now set the Time & Date. Press [clear] to exit.
- Quick Function Keys
- Testing & Maintenance
- System Checklist
- Master Quick Menu MG5000
- Overview
- User
- PGMs
- PGM Utility Keys
- System Timers
- Other Information
- Access Codes
- 2. The [] key will flash. When a zone LED or zone key is lit (not flashing), the user is already programmed.
- 3. Select a user by entering a 2-digit user number (i.e. [0]+[9] for user 9) or use the scroll keys and then press [enter]. For the MG10LEDV/H, press the key corresponding to the user number (i.e. [9] for user 9).
- 4. Enter a new 4- or 6-digit [access code].
- 5. Confirm the code.
- 6. Press a button on the designated remote or press [enter] to skip if there is no remote to program.
- 7. (Partitioned system only) Press [1] and/or [2] to assign the user to a partition. Press [enter], the menu will now jump to the next available user.

Access Codes
For security reasons, write only the user’s name and not his or her access code. 4-Digit Codes N 6-Digit Codes N
How do I program Access Codes?
1. Press the [] key. Enter your [SYSTEM MASTER CODE] or either [MASTER CODE].
2. The [] key will flash. When a zone LED or zone key is lit (not flashing), the user is already programmed.
3. Select a user by entering a 2-digit user number (i.e. [0]+[9] for user 9) or use the scroll keys and then press [
ENTER]. For the MG10LEDV/H, press the key
corresponding to the user number (i.e. [9] for user 9).
4. Enter a new 4- or 6-digit [
ACCESS CODE].
5. Confirm the code.
6. Press a button on the designated remote or press [
ENTER] to skip if there is no remote to program.
7. (Partitioned system only) Press [1] and/or [2] to assign the user to a partition. Press [
ENTER], the menu will now jump to the next available user.
User # and Name Partition 1 or 2 Byp Stay Force Arm Only PGM Only Duress
001: Master_______________________________ 1 & 2
>>>
002: Master1______________________________ 1
>>>
003: Master2______________________________ 2
>>>
004:_____________________________________ ____ NNNNNDuress: Y N N N
005:______________________________________ ____ NNNNNDuress: Y N N N
006:______________________________________ ____ NNNNNDuress: Y N N N
007:______________________________________ ____ NNNNNDuress: Y N N N
008:______________________________________ ____ NNNNNDuress: Y N N N
009:______________________________________ ____ NNNNNDuress: Y N N N
010:______________________________________ ____ NNNNNDuress: Y N N N
011:_______________________________________ ____ NNNNNDuress: Y N N N
012:______________________________________ ____ NNNNNDuress: Y N N N
013:______________________________________ ____ NNNNNDuress: Y N N N
014:______________________________________ ____ NNNNNDuress: Y N N N
015:______________________________________ ____ NNNNNDuress: Y N N N
016:______________________________________ ____ NNNNNDuress: Y N N N
017:______________________________________ ____ NNNNNDuress: Y N N N
018:______________________________________ ____ NNNNNDuress: Y N N N
019:______________________________________ ____ NNNNNDuress: Y N N N
020:______________________________________ ____ NNNNNDuress: Y N N
N
021:______________________________________ ____ NNNNNDuress: Y N N N
022:______________________________________ ____ NNNNNDuress: Y N N N
023:______________________________________ ____ NNNNNDuress: Y N N N
024:______________________________________ ____ NNNNNDuress: Y N N N
025:______________________________________ ____ NNNNNDuress: Y N N N
026:______________________________________ ____ NNNNNDuress: Y N N N
027:______________________________________ ____ NNNNNDuress: Y N N N
028:______________________________________ ____ NNNNNDuress: Y N N N
029:______________________________________ ____ NNNNNDuress: Y N N N
030:______________________________________ ____ NNNNNDuress: Y N N N
031:______________________________________ ____ NNNNNDuress: Y N N N
032:______________________________________ ____ NNNNNDuress: Y N N N