
User Guide


101
that is involved in the combat. If you choose
not to watch, or are busy doing something else-
where in the world, the combat will proceed as
normal and you will receive a second message
when it has concluded, indicating the outcome
of the battle and any casualties sustained by ei-
ther side. For this section of the manual, we’ll
assume that you’ve chosen to watch, so when
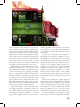
your army is selected, you will see a field com-
bat display at the bottom left of your screen.
Although land combat simulates an entire
multi-day campaign for the province dur-
ing which many smaller engagements occur;
we felt it would be more appealing to display
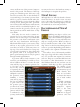
this on a single field of battle. The display is
divided in half horizontally, with the invad-
ing army at the top and the defenders at the
bottom. When the two armies first take to the
field, their regiments are deployed in opposing
lines. If there are many regiments involved on a
side, the lines may be several ranks deep.
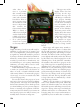
Each small square on the field represents
a possible position for a regiment. These posi-
tions will be filled by your regiments with “X”
indicating an infantry regiment, “/” indicat-
ing a cavalry regiment, and a dot represents an
artillery regiment. You can hover your mouse
over each box to see exactly which regiment it
is, as well as its combat characteristics and cur-
rent morale.
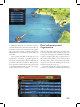
At the top and bottom of the display are
the shields of each nation, making it easy to
tell which side of the field you are on. Beside
each shield is the name of the general who com-
mands that side of the battle. A general confers
bonuses to his regiments during combat, so it
is usually a very bad idea to engage in combat
without one unless you are certain that your
regiment will greatly outnumber or outper-
form the enemy. There will be some symbols
below the leader’s name which are special com-
bat modifiers which we’ll explain in the next
section.
Below those symbols is a graphic display of
the overall morale of each army. The individual
regiments’ morale are combined to give an idea
of the overall willingness of the army to fight.
As morale is lost, the bar will become increas-
ingly red; should it drop too low, the entire
army will disengage from combat and retreat.
To the extreme right of the display is a sum-
mary of the total forces remaining on each side.