
Instructions for Use


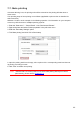
Table Of Contents
- Preface
- Legal Notice
- Safety Precautions
- Precautions
- Legal Information
- Table of Contents
- 1. Before Using the Printer
- 2. Paper and Print Media
- 3. Driver installation and uninstallation
- 4. Wired network setup (applicable to wired network models)
- 5. Wireless network setup (applicable to Wi-Fi models)
- 6. Web server
- 7. Print
- 8. Mobile Print
- 9. General Settings
- 10. Routine Maintenance
- 11. Troubleshooting
- 12. Menu Structure
- 13. Product Specifications

60
7.7. Mute printing
If the Mute Printing is set, the printing noise will be reduced but the printing will slow down to
some extent.
The operating steps of mute printing are as follows (applicable to printers that are installed via
USB connection)
Windows 7 is taken as the example in the following operation. The information on your computer
screen may differ because of multiple operating systems.
1. Enter the “Start menu” – “Control Panel” –view “Devices and Printers”.
2. Right click printer and select “Printer properties” in the pull-down menu.
3. Enter the “Secondary Settings” option.
4. Tick “Mute printing” and click “Ok” to finish setup.
5. Open the printing work from the App, select a printer of the corresponding model and then set
up printing according to needs.
6. Click “Print” to realize mute printing.
Note:
• Printers with LCD control panel can be set to mute printing with keys on control
panel directly, please refer to Chapter 9.1.4.