P2200W/P2500W Serial Printers FAQ: ......................................................................................................... 4 ① Installation Issues:................................................................................................................................. 4 1. How to set up my Pantum P2500W Series Printer to a Wireless Network easily by one click installation? ( applicable to Wi-Fi or network models)......................................................................
9. How to check the printer’s serial number location: ....................................................................... 33 10. Why the printout is not clearly and a little whitish which one I just bought? .............................. 34 11. What’s the meaning of status displayed by LED indicator?? ........................................................ 34 ③ Papers Issues: ................................................................................................................................
1. Is it possible to close the ‘Auto sleeping time’? .......................................................................... 51 2. What is my P2200/P2500 series Printer Specifications? ................................................................ 53 ⑦ Normal Printer Issues: ........................................................................................................................... 54 1. How to get the printer to print darker under Windows? .............................................
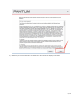
P2200W/P2500W Serial Printers FAQ: ① Installation Issues: 1. How to set up my Pantum P2500W Series Printer to a Wireless Network easily by one click installation? ( applicable to Wi-Fi or network models) Here is the installation step: 1) Double-click on the Auto run file and then select “I agree” in the agreement.
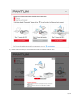
2) Select way 3: “Connect with wifi” and attention to the instructions display in the video.
3) Please make sure that pc is connected with router via network cable or wi-Fi 6 / 79
4) Please connect PC with printer via USB cable to configure printer Wi-Fi 5) After installation is finished, “Installation Complete” interface will pop out, you can select to “print test page” or “Done”.
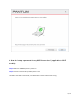
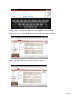
2. How do I setup a password for my WI-FI Connection? ( applicable to Wi-Fi models) Step1: Make sure P2500W printer is power on. Step2: Connect to Printer AP by mobile phone or PC. The SSID is start with” Pantum-AP”, and follow with number and character string.
Step3: Visit the Printer Web page via browser, Printer default address is 192.168.223.1 Step4: Enter the printer web page, choose “Log in” Tap. Step5: Input default user name: admin, Default password:000000. And Login.
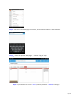
Step6: Select “settings” Tap wireless settings wireless Hot spot. Then set wireless Parameter Authentication either WPA or WPA2. Step7: Set the password in the tap, then click “apply “.
Step8: Disconnect equipment and printer, when reconnect them, it should input the password as step 7 setting. Remark Here is the way to recover factory default setting in case customer forgets the password: 1) Turn off the printer power switch. 2) Press the “cancel / continue” button until the printer turn on and enter standby mode.
3. Where can I download the soft wares and drivers for my printer P2500W? Here is the Download Link: http://global.pantum.com/global/drive/2500w/ Step1: Please log in our website: http://global.pantum.
Step3: Please enter your model of your printer in the blank, the picture will be shown as below: Step4: Please click the P2500W in the below picture: Step5: At last, please chose your system and “download “at the below of page, it will be done.
4. How to solve the wireless Connection Failed when it showed "The printer cannot connect to any wireless network with the wireless credentials provided"? Reason1: It is inconsistent with the network name, safe mode and password. Solution: It needs to enter the corresponding name, mode and password of internet. Please don’t select “Enter SSID Manually” when you install the driver and select the corresponding internet SSID and safe mode. And then please enter your internet password to configure it.
Reason2: The IP of printer and PC are not under the same router. Solution: Please check with your configuration page to confirm the IP address (Press the "continue/cancel" button for 4 seconds, then it can print). And please change your IP address the same with your configuration page 5. What’s the WIFI default password of printer’s wireless hotspot? The WIFI default password is “12345678” 6. How to Close WIFI Hotpot Setting? Step1: Log in the IP addresses 192.168.223.
Step2: Chose “Setting” in the below picture Step3: Chose “wireless Hotpot” at the left column.
Step4: Chose “Close” to apply and it will be done.
7. How to install the Printer with hostname? Step1: Select ” Wireless network connection.” at the first step. Step2: Select below option and click “next”. Step3: Select below option and click “next”.
26.
Step5: Click “Next’ after established the wireless connection.
How to check your hostname of printer? Please print the network configuration page from printer and then you will see it as below : Step7: it will be done after several minutes. 8.
9. When I connect the printer with PC by WI-FI, Why it need more than 5 minutes from I send the order until it finally print out? Step1: Reset the printer a) Turn off the printer power switch. b) Press the “cancel / continue” button until the printer turn on and enter standby mode. (It will take 5 seconds with pressing the button) Step2: Re-install the driver again.
10. How to connect the printer under Mac system with cable Setting Guide? Step1: Connect your printer and your laptop with a USB cable. Step2: Click the “System Preferences”-“Pinter & Scanners” Step3: Make sure the printer you need to use is the Default printer. Step4: Select the document and start to print 11.
Step 1: Print WiFi Configuration Information Pages , Press the "continue/cancel" button for 4 seconds , checking the Device Name in the NCI. Step 2: According the SSID Name, connect your Laptop with this WIFI.
Step 3: Select the document you want to print and click” Command” +”P” Button. Step 4: Setting the Print parameter then click “Print” and finished.
12. How to print wirelessly with Mac- Under same Network Environment? Step 1: Print WiFi Configuration Information Pages , Press the "continue/cancel" button for 4 seconds Step 2: According to the ‘Device Name’ from Step 1, connect the Laptop to this WIFI.
Step 3: Open the Safari or others browser.
Step 4: Input the IP Address in the Bar, according the Step 1, and Login in (The default account is: admin and the default password is: 000000). Step 5: Select the WIFI you want to connect, input the Password, and click ’Apply’. Step 6: Connect your laptop to the WIFI which the printer have connect, and finished printing.
② Cartridge Issues: 1. How do I replace or install a cartridge? Pull out the seal on the new toner cartridge firstly, and gently shake it for 5 – 6 times , then remove the protective cover , install the toner cartridge in the printer until hearing a “click” sound.
2. How do I check the amount of toner left in my cartridge? Press “continue /cancel” button on interface for 3 seconds to print out configuration page, and there is the information. 3. How do I check how many pages I have printed so far? Press “continue /cancel” button on interface for 3 seconds to print out configuration page, and there is the information.
4. What are the cartridge models for P2500 series printer? 1600 standard Page Yield: PA/PB/PC-210/211 (“A, B, C “models depend on countries) 1000 standard Page Yield: PA/PB/PC-210S (“A, B, C “models depend on countries) 5. How about the standard page yield of toner PA/PB/PC-210? The Toner PA/PB/PC-210 page yield is 1600 pages, that is according ISO 19752 standard measure by print 5% coverage document. So when the printer coverage is higher, the page can print should be less. 6.
7. What does the Blinking Lights notifications mean in P2500 Printer? 1, the first LED is indicating paper and WIFI status, the second LED is indicate printer and toner cartridge status; 2, Green light means normal, Red light means error, orange (just the second LED has) mean toner low or empty. 8.
9.
10. Why the printout is not clearly and a little whitish which one I just bought? Take out the cartridge, hold the handle of the cartridge and gently shake around 5 to 6 times, so as to make the toner evenly distributed inside the cartridge. 11.
LED2 Status Indication Indication of LED1 and LED2 Combination Status 35 / 79
③ Papers Issues: 1. How can I clear any paper jam? Step1: Paper Jam in the Feed Port, Gently pull the jammed paper straight out. Step2: Paper Jam around fuser unit the Printer, Open the upper fuser guide to decrease the pressure of compression spring, Pull the jammed paper out of the fuser unit. Step3: Paper jam inside the printer.
Solution:Remove excess paper from the tray. 2) The print media is loaded incorrectly: Solution: Please correctly load the print media. 3) The print media is beyond the usage specification range. Solution: Please use the print media within the specification range. 3. What kinds of paper can I use in my Pantum P2500W series printer? 4.
Step2: Select “printing preferences” after double left click your printer. Step3: Select “how many pages you want to print in one page” in the Layout.
5.
Please change the it to “ Letter(8.5x11 inch) in the printing preferences Step2: Please change to ‘letter size’ In the printing document also.
6. How to adjust envelope type in the printing document? Step1: Please double click your model of your printer in the ‘Devices and Printers’ Step2: Firstly, please change the paper size to “DL Env (110*220mm) in the printing preferences .Secondly, change the paper type to “envelope in the printing preferences.
Step3: Please change to ‘letter size’ in the printing document also.
1. Does my Pantum Printer works on Windows Mobile? No, our printer did not compatible with Windows Mobile. 2. Is my printer Mac compatible? What are the versions that it is compatible with? Yes, Mac 10.6/10.7/10.8/10/9/10.10/10.11/10.12/10.13 3. Is my printer Linux compatible? What are the versions that it is compatible with? Yes, Ubuntu 12.04/ 14.04/ 16.04/ 18.04 4.
8. Is my printer compatible with Linux Debian 9 system? No, our printer did not compatible with Linux Debian 9. ⑤ Mobile Printing Issues: 1. How do I take a mobile print out from Android? Download APP on Android device Switch on printer setting print. hot spot Running Pantum APP are applicable to Android OS 4.4-8.0 2. How do I take a mobile print out from IOS? Solution 1) : IOS has print app by itself, so it just need to connect the printer and print.
Solution 1) Download the “Pantum App” Application Step1: Download the APP from www.pantum.
Step4: Open the ”PANTUM” application , click “ Add a printer” button at the top of interface, then s add the printer. Step5: Select the file and print it.
Solution 2) Download the ” Mopria ” application . Step1: Download and install Mopria Print Service plugin to the mobile device from “Google Play" Step2: Turn on the printer Step3: Connect to the printer hot spot Step4: Click Settings on the main screen, choose Print, and have Mopria Print Service set to on.
Step5: Start the application Step6: Select the document, click on the upper right corner, and click Print.
Step7: Select the printer, click Print. 4. How to check the Pantum app version in Android system Guide? Step1: Please open the pantum app and click “More” in red circle.
Step2: Please click on the “version” in red circle , then the version will show as below: 50 / 79
⑥ General Settings Issues: 1. Is it possible to close the ‘Auto sleeping time’? We cannot close it completely. But we can change the sleeping mode from 1min to 60mins.
Note: When the printer is in dormant status, you can wake it up just by pressing any button or sending print task.
2.
⑦ Normal Printer Issues: 1. How to get the printer to print darker under Windows? It will be changed in the printer’s proprieties------“Layout”-----“Effect”--“Dark” 2. How to get the printer to print darker under Mac? Step1: Click "Print" of the “file” Step2: Click the “Show Deatils” as shown below.
Step3: Chose “Media & Quality” in the option, select from “Draft-Normal- Best” per your request.
3.
Step3: Please chose” adds a local printer or network printer with manual settings” and chose “Next”, it will be shown as below: 57 / 79
Step4: Please chose “Use an existing port” and select “Next”, it will be shown as below: Step5: Please chose ‘have disked” and click “Next”, it will be shown as below: Step6: Please chose “browse” when the windows pop up, it will be shown as below: 58 / 79
Step7: Please chose the “INF file” in the installation package and then chose “Next” it will be done. Step8: It will be finish to installation automatically after you pull up the printer’s USB cable.
4. How to “add a printer “by manually under Mac? Step1: At first, please follow up the instruction of the CD-ROM to install the driver with USB that is under the MAC system. Step2: After installed the driver, please chose the Printer icon in PC and log in. Step3: Click “+” to add the printer. Step4: Please choose the corresponding model from installed printer when pop up the dialog box. Then chose the corresponding printer’s driver which installed on PC. (It is needed to be the same with printer model.
Remark: If the internet needs to set up manually. You can chose to IP modified at the forth step. Modify the IP address need to match to the IP agreement. Here is the printer’s name without modifications. Please chose the corresponding driver which installed on PC.(it is need to be the same with printer model.) Step5: After chose to save, it will be finished to install the internet printing.
5. How to do Duplex Printing on Windows system? Please change your printer’s properties as below steps. Step1: Please chose the model of your printer in “device and printer” Step2: Double left click the printer-printer’s properties –preferences Step3: Please choose ‘Long Edge ” or “Short Edge” in duplex printing.
6. How to cancel the “duplex printing” under Windows? Please change your printer’s properties as below steps. Step1: Please chose the model of your printer in “device and printer” Step2: Double left click the printer-printer’s properties –preferences Step3: Please choose ‘NONE” in duplex printing.
7. How to cancel a printing job in the queue? Regarding the issue about your printer, please kindly check with below steps, you need to end the printing job in the printing queue: Step1: Please double click your model of your printer in the ‘printer and device”, the picture will be shown as below: Step2: Please right click the printing task that you want to stop. It will be shown as below: Step3:Please chose “cancel”, it will stop printing job. 8.
1, Print environment: when the temperature becomes much lower, the humidity will be much higher, so the vapor will get heavy. Due to the temperature difference and moist, the water vapor will produce accordingly. Usually, we suggest the printing temperature is 10-32℃, Humidity (RH) is 20%80%, and it will work fine. 2, Paper status: the paper status when dry or moist will also influence strongly the printing vapor.
Step2: Click "Properties" of the printer Step3: Please check your original port in the port and keep it in mind 66 / 79
Step4: Please change your original port to “FILE:Print to File”. Step5: Please choose any file you want to print and save it on the ‘Desktop’ as “123.
Step6: Please find the ‘123.prn” file on the desktop and send it to us. Step7: change your port back to your original port as Step 3 11. How to do when it shown “0x000000709” Error? Reason: 1. The compatibility issue about Windows system 2. When both of windows and XP sharing the same network, and the XP as the main host will be led to this problem. Solution A: Step1: Select “Manage” in the “This PC”. Step2: Select “windows firewall” and right click to “run” it.
Solution B: Step1: Select “Manage” in the “This PC”. Step2: Select “Print Spooler” and right click to “run” it. Restart your computer after you run the windows firewall.
Step3: Please enter “win+ R” and open “operation” window, please enter the IP address which is from the sharing this printer’s XP computer and then press “Enter” Step4: please Right click “connect” in the listed printer. It will be installed the driver directly.
Step5: After done all above steps, you will see the connected printer in the “ Devices and printers” 12. How to change the printing port is available when it showed” Printing port is on used”? "Printer cannot be configured because printing port is on used." it may cause by PC port is abnormal. We suggest that you can check with below steps: Step1: Change to another PC port then reconnects to the printer and re-install the driver.
13. How to download the User Manual Successfully? Here are two options for you to download the user manual for the printer’s Option A) Please check the user manual in the CD-ROM. Step1: Open your CD-ROM file and double click “Auto run”. Step2: Click ‘User Guide’ at the left corner of the installation interface.
Option B) Please download the user manual from our official website. Step1: Please log in the website: http://global.pantum.com/global/. Step2: Enter your model of your printer in the blank of the below picture Step3: Select the model of your printer.
Step4: Chose the corresponding language you are using which stat to download the user manual. 14. How to register for printer warranty on-line? Step1: Register your account in the website: https://service.global.pantum.com/user/login/register.
Step2: Log in your account with password: Step3: Please chose “Product Registration”, the picture will be shown as below: 75 / 79
Step4: At last, you can register for your printer at the below of page, it will be done. 15.
16. Why the printer could not print the horizontal line in the page when printed out? Step1: Open the protecting cover of the LSU using the screwdriver.
Step2: Pull out the cable and reinsert it again.( The connecting of the LSU's cable and outlet has something wrong ,so the transmitted signal is abnormal.) 17.
Step2: then select the “Two-Sided” option and then try to print it.