
User's Manual


www.mycricket.com
Installation and Setup
6 Installation and Setup
This chapter will guide you through the installation and setup process for Cricket 3G Broadband. Before getting started, you should become familiar with the documentation
that came with your wireless device.
GETTING STARTED WIN
Follow these steps to install Cricket 3G Broadband:
1. Turn on your computer and close all applications.
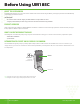
2. Insert the UM185C into the USB port.
3. If set up does not automatically start:
a. Click the Start Button
b. Choose My Computer
c. Find and double click on the drive icon (Cricket 3G broadband) that represents the data card.
d. Run the Start.exe file in the Windows Cricket 3G broadband folder to begin the installation
4. Follow the steps in the next section.
GETTING STARTED MAC
Follow these steps to install Cricket 3G Broadband:
1. Turn on your computer and close all applications.
2. Insert the UM185C into the USB port.
3. Find and double click on the drive icon that represents the data card.
4. Find and run the Cricket 3G Broadband icon in the MAC Cricket 3G broadband folder.
5. Double click the Cricket 3G Broadband icon to begin the installation.
6. Follow the steps in the next section.
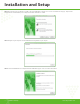
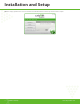
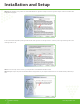
THE CRICKET 3G BROADBAND SETUP PROGRAM WIN
STEP 1: In the “Cricket 3G Broadband – License Agreement” screen, you will see the program user license Agreement. In order to install and use this product, you must agree
with the terms of this agreement. Select “I agree” then click the “Next” button to continue. If you do not agree with this agreement, click the “Cancel” button to exit.
Installation and Setup