
User Manual


51
LCD(128X128), VGA(640X480).
Note: this option will not appear in ‘Frame Capture’ mode.
Self Timer: select 5 Secs or 10 Secs. When the selected time has
lapsed, a photo will be taken.
Flash: On/Off.
Multi-Shot : select multi shot number you want. 4/6/9
Note: This option will appear in ‘Multi Capture’ mode.
Frame : selects the frame.(10 frames)
Note: this option will appear in ‘Frame Capture’ mode.
Effect: Applies an effect to the picture.
Normal/Sepia/Solarization/Monochrome/Line Drawing/ Negative
/Embossing
(‘Effect’ cannot be set in VGA mode.)
Display Icons : On/Off
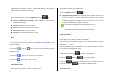
2) The Single or Frame Capture mode
Press the [Options] Soft key [
] in the Capture mode to select the
following the information which will be applied to the image.
Delete: Deletes the photo which is saved automatically.
Set As:
1. Wallpaper – Adds a photo to ‘Wallpaper’ in ‘Display’. The photo is
set as the background image of the main screen.
2. Address Book– Assigns a specific photo image to Address Book
Back to Preview: Returns to the camera preview screen.
Rename & Move: Move to rename a photo.
(For further details about renaming a photo, see Basic Functions Menu 7.)
Go to Album: Moves to the Photo Album.
Press the [Send] Soft key [
] to transmit the photo with the
Multimedia Message.
6.2 Take a Video
6.2.1 Video shot
1. Select ‘Menu->5.Multimedia->1.Camera->2.Take a Video’ in the menu
in sequence
* Tip: Size of the video image is fixed to LCD (128X128).
Press and hold camera key to enter into the video recording mode
2. Push in on joystick [
[
[
]
]
]
to record in the current preview..
Press the Side [
Up / Down] key to zoom in/out of the image.
Press [
] key to return to the camera preview screen.
Push in on joystick [
] to stop recording.
3. If you Push in on joystick
[
[
[
]
]
]
,
,
,
you can select an album to save the