Welcome USER MANUAL PG-C120 Thank you for choosing a Pantech PG-C120 and welcome to the wireless mobile communications with the PG-C120, our dual-band GSM mobile phone. Pantech is delighted to introduce this brand new portable phone which will always keep you connected to your network. This user manual explains in detail its unique features and how to use them. Note: Some of the contents in this User Manual could vary from actual features of your phone.
Specification 1. Display z 5. Power Management (Performance) Battery Type Standard (Li-ion) Single Candy-bar 65,536 STN LCD z 1.5” LCD z Supports up to 65,536 colors within 128 x 128 pixels z 6 lines for text in basic mode with 16-pixel font z Two Soft keys ([ z List and grid menu ], [ ]), and 5-way joystick 2. Melody Yamaha 40 poly(SMF) / 16poly (SMAF) sound 3. Camera VGA CMOS built-in Camera.
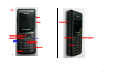
Views Camera Earpiece Joy Stick 4-way Menu Navigation (Message Write New, IM, Address Book List, My Stuff) DiaI key Call Accept Volume up/down Left Soft key(Menu) Right Soft key(Camera) Power On/Off Cancel/Back/Text Clear/Edit Exit Key Voicemail Alphanumeric Key Silent Mode z 3
z Quick & Easy Keys Functions Performs the functions shown at the bottom line of the display (Soft Keys). Joystick Scrolls through the menu options in Menu mode. In standby mode, Push to Left: My Stuff menu Up: Message Write New menu Right: IM Down: Address Book list Push in joystick ~ 4 on Launches the MEdia Net directly if pressed in standby mode. Selects menu function or stores user input information, such as names, SIM memory. Also used for confirmation (OK key).
Safety Precautions Boarding an Aircraft - Please select "Flight Mode On” (‘Menu>9.Settings>4. Phone>3.Flight Using a phone while driving is prohibited. Mode’) or turn your phone off when you are boarding an aircraft. The Please check local laws and regulations with regard to the prohibition of electronic wave emitted from your phone may affect the electronic phone usage while driving, and comply with them. navigation device in the aircraft.
Access Code change a disabled PIN1 code. The PUK2 code is required to unblock and change a disabled PIN2 code. If the codes are not supplied with the SIM The following section describes various security codes. card, contact the operator whose SIM card is in your phone for the codes. You can change the following codes: lock code(9. Settings>6. Security>4. PIN1 code (4 to 8 digits) Change Password), PIN1 code(9. Settings>6. Security>2.
3.4 Menu Tree Delete Call Logs 3.4.1 Missed Calls 3.4.2 Received Calls 1 IM 3.4.3 Dialed Calls 2 Messaging 3.4.4 All Calls 2.1 3.5 Call Time 2.1.1 Text Message 3.5.1 Last Call 2.1.2 Multimedia Message 3.5.2 Received Calls 2.2 Inbox 3.5.3 Dialed Calls 2.3 Sent 3.5.4 Total Calls 2.4 Outbox 3.5.5 Reset Call Times 2.5 Draft 2.6 Browser Message 3.6 GPRS Info 3.6.1 Current Info 2.6.1 Inbox 3.6.2 Last Info 2.6.2 Receive 3.6.3 Total Info 2.7 Templates 2.8 Settings 2.
5 6 7 Cingular Mall 7.4.2 Calendar 5.1 Shop Tones 7.4.3 Memo 5.2 Shop Games 7.4.4 Voice Memo 5.3 Shop Graphics 7.4.5 World Time 5.4 Shop Multimedia 7.4.6 Calculator 5.5 Shop Applications 7.4.7 Converter 5.6 MEdia Net Home 7.4.8 Stopwatch Camera 6.1 Take a Photo 6.2 Take a Video 6.3 Photo Album 8.1 Name Search 6.4 Video Gallery 8.2 Add Entry 6.5 Settings 8.3 Speed Dial 6.5.1 Image Size 8.4 Groups 6.5.2 Shutter Sound 8.5 Memory in Use 6.5.3 Self Timer 8.
.1.5 Backlight 9.2 9.5.6 Fixed Dialing Audio 9.5.7 Change PIN2 9.2.1 Shop Tones 9.5.8 Network Barring* 9.2.2 Ringtone 9.5.9 Closed User Group* 9.2.3 Volume 9.6 Software Version 9.2.4 Alert Tones 9.7 Reset 9.2.5 Key Tone 9.8 TTY 9.2.6 Sound Effects 9.3 Call 9.8.1 Setting 9.9 Network* 9.3.1 Call Forward 9.9.1 Search Now 9.3.2 Answer Type 9.9.2 Default Set-up 9.3.3 Auto Redial 9.3.4 Call Waiting 9.3.5 Caller ID * this menu depends on SIM. 9.3.6 Auto Emergency Dialing 9.4 Phone 9.4.
Table of Contents 2.6 Speed-dialing from Entry 2.7 Making an Emergency Call Ⅰ. Getting Started 3. Answering a Call 1 Package Contents 3.1 Answering a Call 2 Display 3.2 Viewing Missed Calls 3 SIM Card 3.3 Rejecting a Call 4 Using the battery 3.4 Adjusting the Calling Volume II. New Functions 4. Calling Options 4.1 Switching the Microphone off (Mute) 1. OTA Settings Service 4.2 Holding a Call 2. DRM/ Forward Lock 4.3 Answering a Second Call 4.4 Making a Call III. Basic Functions 4.
3.2 Received Calls 7. Entering Text 3.3 Dialed Calls 7.1 Input Mode 3.4 Delete Call Logs 7.2 Changing Text Input Mode 3.5 Call Time 7.3 Using T9 Mode 3.6 GPRS Info 7.4 Using ABC Mode 7.5 Using 123 Mode 7.6 Using Symbol Mode 4. MEdia Net 4.1 MEdia Net Home 4.2 Bookmarks IV. Applications 4.3 Http:// 4.4 Profiles 1. IM 4.5 Cache 4.6 Security Certifications 2. Messages 4.7 Version 2.1 Write New 2.2 Inbox 5. Cingular Mall 2.3 Outbox 5.1 Shop Tones 2.4 Draft 5.2 Shop Games 2.5 Sent 5.
6.3 Photo Album 9.3 Call 6.4 Video Gallery 9.4 Phone 6.5 Settings 9.5 Network 9.6 Security 7. My Stuff 9.7 Software Version 7.1 Games & Apps 9.8 Reset 7.2 Audio 9.9 TTY 7.3 Graphics 7.4 Tools 7.5 Memory Status Appendix Check List Performance and safety 8. Address Book 8.1 Name Search 8.2 Add Entry 8.3 Speed Dial 8.4 Group Setting 8.5 Memory In Use 8.6 Delete All 8.7 Copy All 8.8 My Phone Number 8.9 Memory Info 8.10 Service Numbers 9. Settings 9.1 Display 9.
Ⅰ. Getting Started 1. Package Contents 1. Package Contents 2. Display 3. SIM Card 4. Using the battery Phone Battery Travel Charger User’s Manual ※ The contents can be vary by regions.
2. Display (그림 수정필요) You have a new voice mail. WAP is connected. This phone has 2 displays (internal and external), and icons on the top of the display indicate the phone status. 2.1 Internal Display Icons Area Text and Graphic Area You have a new message. If the inbox list is full, the icon will look like . When GPRS service is available, the icon is displayed.
You can use several menus even though the folder is closed. Selecting Functions and Options. The phone provides several customized functions, which are arranged in The following section describes the external display screen and easy-to- menus and sub-menus. You can access these functions using the two control external menus and their functions. Soft keys ([ ], [ ]) and push in on joystick. The menu related to a specific function allows you to view and change its Side Up settings.
To avoid memory corruption of your SIM card, always switch off your phone before removing or inserting your SIM card. 3.2 Installing/Removing the SIM card 1. Remove the battery from the unit. 2. If the SIM slot is empty, insert the SIM card into the slot. 3. If you want to remove the SIM card, push the SIM card in the arrow direction as shown in the picture.
4. Using the battery 4.1 Installing the battery 4.3 Charging the battery z This phone uses a Li-ion battery. Make sure to use an authorised battery and charger only. For more details, please Put the contacts of the battery into the hole located at the bottom of the unit, as shown in the picture below. inquire at your nearest dealer. z You can use the phone during battery recharging.
Tip car in summer or winter, may reduce the capacity and life of the battery. Your phone is powered by a Lithium Ion (Li-ion) battery. Always keep the battery within normal temperatures. You can use the following Li-ion battery types for your phone. (Contact - Do not earth the battery. Earthing may occur when the battery is in your local dealer for more information.) contact with a conductive object. An earthed phone may also damage the battery.
II. New Functions 1. OTA Settings Service 1.1 WAP/ OTA Provisioning 1. OTA Settings Service In order to use the WAP Browser, you need to have proper connection 2. DRM/ Forward Lock settings on your phone. You may add or edit the WAP Profile manually, or receive its settings information sent as a type of configuration message by a operator and/or a service provider. At the latter case, those WAP setting information received should be automatically stored on the phone.
III. Basic Functions 1 Switching the Phone On or Off 1. Switching the Phone On or Off 1.1 Switching the Phone On 2. Making a Call 3. Answering a Call ① Press the [ ] key until the phone switches on. ② If the phone requests you to input a PIN, enter the PIN and push in 4. Calling Options 5. Using the Headset on joystick. (For further details, see Applications Menu 9.6) Your phone starts to search for an available network and the current date and time will appear on the internal and external displays.
2. Making a Call The phone stores up to 30 dialed, received or missed calls chronologically. The last call is saved in the first position. If the same number was dialed more than once, only the latest occurrence will be 2.1 Making a Call saved. Enter the area code and the phone number to make a call in standby ① mode, and press the [ Press the [ ] key to see the call log list aligned dialed, chronologically. ] key. ② Press the [Side Down/Side Up] key or Push Up/Down the joystick to select a number.
② Select a number from ‘Name Search’. Enter ③ Press the [ ] key for dialing. (For further details, see Applications Menu 8) 2.5 Making an International Call ① Press and hold the [ ] key for the international prefix until the ‘+’ character appears on the display or enter the outgoing national code following after 011. (If network supported.) ② Enter the country code, area code and phone number you want to make a call to. ③ Press the [ ] key. 2.
3. Answering a Call the joystick. ③ 3.1 Answering a Call Press the [ ] key to call the missed call. When you receive a call, the phone rings (or vibrates) and the screen will display the name or the number of the caller (If the network supports the Press the [ function and you have subscribed to it.). message. ] or [ ] key to close the missed call notification If the caller can be identified, the caller’s phone number or name will be displayed if it is stored in your entry. 3.
① Enter the phone number that you want to dial or look it up in Address Book entry. 4.1 Switching the Microphone Off (Mute) You can temporarily switch your phone’s microphone off so that the ② Press the key to dial the second call. The first call is automatically put on hold. person you are talking to on the phone cannot hear you. For example, you may wish to say something to another person in the room but do not want the person calling to hear you.
④ To end the current call, press the [ ] key. The call on hold is automatically reconnected to you. 4.6 Using DTMF Tones You can turn the DTMF key tones off or on during a call. When the [DTMF Off] option is selected, your phone does not transmit the key tones. It allows you to press keys without hearing key tones 4.4 Making a Call You can make another call while having a call in progress. To make new during a call.
④ To write a new message, select the ‘Write New’ submenu. ⑤ Push in on joystick. Upon organising a multi-party call, you may view the people and their (For further details, see Applications Menu 2.1.) status in Multiparty by pushing left/right joystick. An icon indicates either Far Multiparty or Far Hold. During a call, only Text Messages can be sent. Multimedia Messages cannot be sent, but can only be saved.
Removing One Participant z To answer a call, press the button when you receive a call ① Press the [Options] Soft key and select the [Exclude] option. z To complete a call, press and hold the button when you have ② Push up/down joystick to highlight a participant and push in on finished a call. joystick. The call ends with that participant, but you can continue to talk with other participants. ③ Complete the multi-party call by closing the folder or pressing the [ ] key. 4.
6. Selecting Menu Functions Key Soft 6.1 Entering into Menu Functions Key Soft key [ ] [Push left/right joystick] key [Push up/down joystick] key [Push in on joystick] key Side up/down key Function Goes to the main menu in standby mode. Moves within the main menu. Searches for the sub-menu. Moves within the main menu. Goes to the sub-menu. Goes to the MEdia Net Home menu in standby mode Moves the cursor upwards or downwards in the menu.
You can input the special characters, such as a period mark or currency 7. Entering Text units in this mode. 7.1 Input Mode On many occasions you need to input text while you are using your phone, (e.g., storing a name in the Address Book, writing a new message, creating your greeting or scheduling events on your Calendar). The available text input modes include. T9 mode (Predictive mode) You can input a letter using only one keystroke.
To move the cursor to the left or right within the text, push left/right 7.2 Changing Text Input Mode joystick. And also, to move the cursor to the up or down among the lines, When you are in the area where you can input the text, the text input push up/down joystick. mode indicator will be displayed at the bottom of the display. Note: By pressing the [Side Up/Down] key, the cursor can be moved very quickly to the beginning or the end of the text. Example: Entering a memo.
Press and [ ] hold Deletes all characters and moves the cursor to the beginning of the input screen. 7.4 Using ABC Mode 7.3 Using T9 Mode When typing in ABC(Multi-tap) mode, press the key labelled with the target letter: - Press the key once for the first letter. - Press twice for the second letter. In the T9(Predictive) alphabet Editor, each word is composed completely Example: To display the letter “C”, quickly press the [ as you input the text. times.
There are three cases: 7.5 Using 123 Mode - Lower case (no indicator) - Initial capital ( ) - Capital lock ( ) [English] KEY 1 2 3 4 5 6 7 8 9 0 Characters in displayed order . , - ? ! ' @ : 1 a b c 2 d e f 3 g h i 4 j k l 5 m n o 6 p q r s 7 t u v 8 w x y z 9 Space 0 The number mode allows you to enter numbers into the text. Press the key corresponding to the digit you want to enter. 7.6 Using Symbol Mode The symbol mode allows you to enter symbols into your text.
Ⅲ. Applications 1. IM 1. IM 2. Messaging Instant Messenger(IM) allows you to send and receive short, simple 3. Recent Calls messages that are delivered immediately. 4. MEdia Net 5. Cingular Mall Start Instant Messenger 6. Camera (1) Select ‘Menu>1.IM’. 7. My Stuff (2) Highlight your established IM application and press [Select] Soft key 8. Address Book 9. Settings [ ] or push in on joystick. (3) Enter your Logon ID and your Password and select Sign On.
Service (Message supporting presentation of various media types, such To send a Text Message by phone, you must obtain the number of the as full color images and polyphonic ringtones). SMS center from your service provider. Voice mails are also available. Voice mail Note: These features are available only if your service provider’s network If you are busy or in a situation whereby you can’t answer a call when supports it. Contact your service provider for more information.
number of messages saved in the Outbox. settings. Even if “Save to” in the Text Message settings is set to “SIM”, received messages will be saved in the phone memory if SIM capacity is You can save up to 30 messages in the phone’s memory, but if some received messages will be saved in the SIM if the phone’s memory messages are saved in the SIM, the messages will be appear in the capacity is full. In the case of the Inbox, up to 50 received messages can list.
to use the following options. When you push up/down joystick to select an item and push in on joystick to use the following option; Add template: Obtains the template message from the (1-1) Press the [Options] Soft key [ ] to use the following options. Templates Send to E-mail: Sends the E-mail to the recipient. Save: Saves messages in the phone memory Language: English, Spanish and French. The selected [1] Add Subject Adds the subject.
the image when the image list appears. (For further details, see display automatically scrolls to the next slide page after the Applications Menu 7.3 ) specified time. [6] Add/Edit Subject [3] Add Sound Adds a sound to the Sound Box. Push in on joystick to select the sound when the sound list appears. (For further details, see Applications Menu 7.2) Adds or edits the subject (‘Add Subject’ if subject exists. ‘Edit Subject’ if subject does not exist.
(2-2-3) Editing sound Select ‘Menu>2. Messaging >2. Inbox’ and push in on joystick. [1] Replace Sound Replaces the selected sound with with a different selected Select Inbox and push in on joystick to display the received messages sound. one by one. Press the [Reply] Soft key at the bottom right corner to write a new message. (3) Sending and saving a message. When you finish creating the message, You can receive a Multimedia Message notification through the network push in on joystick.
select one of the following options. Press the [Edit] Soft key at the bottom right corner to Edit and send Callback: Calls the message sender Forward: Sends the received message to another recipient. Delete: Deletes the selected message. Select [Options] Soft key on the bottom of the message list to select one Delete All Read Messages: Deletes all read messages received. of the following options. Delete All: Deletes all messages in the Inbox.
Select ‘Menu>2. Messaging >5.Draft’ and push in on joystick. The message to be saved before sending will be saved in the Drafts. 2.6.2 Receive Sets up Browser Message receiving. Press the [Options] Soft key [ ] at the left of Total Message List to select the following menu. This icon will appear when the user receives a new message. 2.6.2.1 When the user receives an SI (Service Indication) message Delete: Deletes the message. Delete All: Deletes all messages in Draft.
Off 2.7 Templates - Do not accept messages. Silent - When the user receives a Browser Message, it will be saved to the Select ‘Menu>2. Messaging >6 Templates’. Inbox without an alert. - The Browser Message icon will be displayed on the idle screen. 2.6.2.2 When the user receives an SL (Service Load) message Select a text template menu and press the [Options] Soft key [ at the left for associated options.
- or Predictive mode (T9 mode). - Profiles : You can set up Multimedia Messages profile settings. Save messages : If set as on, the messages sent will be stored - Delivery Reports : When this option is set to [On], the network informs you whether or not your message has been delivered in the [Sent]. successfully 2.8.2 Text Message - Read Reports : When this option is set to [On], the recipient’s Select ‘Menu>2. Messaging >8.Settings>2.
3. Recent Calls Edit : Edits selected Number. Save Number: If the selected number is not saved on the SIM or the phone, this option will be shown. Saves the selected Number to the SIM or the phone. Delete : Deletes the selected Number. ‘Menu>3. Recent Calls’. Delete All: Deletes all missed call records from the list. This function displays missed calls, received calls, and dialed calls.
Select ‘Menu>3. Recent Calls >4.Delete Call Logs’. Press the [Message] Soft key [ ] to; - Sends a message to the person that called you It deletes the missed, received or dialed calls, or deletes all the call records with ‘All Calls’. Press the [Yes] Soft key [ 3.3 Dialed Calls ] or [No] Soft key [ ] to execute or cancel this function. Select ‘Menu>3.Call Logs>3.Dialed Calls’ Displays the dialed calls list accompanied by the time and date of a 3.
connected. - Clear Logs: Clears the log related to GPRS.
4. MEdia Net Note: This feature will not be available if the manufacturer provides a 4.1 MEdia Net Home default bookmark. You can access the Internet with a WAP (Wireless Application Protocol) Go: Goes to the related site. browser. That means you can connect to the Internet any time and anywhere if the 4.3 Http:// service area is within the coverage of your network.
- - - GSM Settings: This menu allows you to set the GSM network - Access Point (APN): It stands for Access Point Name. Pushing proxy, and has the following sub-menus: in on joystick lets you enter the edit mode to change this item. Proxy (HTTP Mode): Pushing in on joystick allows you to - Login ID: Pushing in on joystick lets you enter the edit mode to access the s submenus such as IP Address and IP Port. change this item.
(recently visited WAP pages). 4.6 Security Certifications Pushes in on joystick lets you can see the saved security certificate. 4.7 Version This function is for viewing the software version of the WAP browser.
5. Cingular Mall 5.6 MEdia Net Home 5.1 Shop Tones You can access the Internet with a WAP (Wireless Application Protocol) Select ‘Menu> 5. Cingular Mall > 1. Shop Tones’ browser. Selecting this menu launches the web browser to Cingular’s That means you can connect to the Internet any time and anywhere if the Tones menu. service area is within the coverage of your network. 5.2 Shop Games Selecting this menu connects the phone to the network and loads the Select ‘Menu> 5. Cingular Mall > 2.
6. Camera (현재 C120 Camera flip book 나오지 않음. 현 재상태는 C300매뉴얼 기준에서 PG1400 매뉴얼에 있는 Video 기능을 추가만 한 상태) preview when the image size is the LCD. And push left/right joystick to control the brightness of 7 levels. 4. The phone saves the image automatically when the user pushes in You can take a photo in various ways using the built-in camera. The photo can be saved and sent with a Multimedia Message. on joystick. Press [ ] key to return to the camera preview screen.
LCD(128X128), VGA(640X480). Note: this option will not appear in ‘Frame Capture’ mode. Back to Preview: Returns to the camera preview screen. Rename & Move: Move to rename a photo. (For further details about renaming a photo, see Basic Functions Menu 7.) Self Timer: select 5 Secs or 10 Secs. When the selected time has Go to Album: Moves to the Photo Album. lapsed, a photo will be taken. Flash: On/Off. Multi-Shot : select multi shot number you want.
video. When ‘Auto Save’ is selected from the camera setting, the set 2. Press the [New] Soft key to add an album to Photo Albums. name and album will be automatically saved without any Save Option You can add up to 7 albums. (including the default album ‘My Photos’) screen. (For further details about making directory name, see Basic Functions Press the [ video images. ] key to return to the Preview screen without saving Menu 7.) .
1. Wallpaper – Adds a photo to ‘Wallpaper’ in ‘Display’. The photo is the selected album set as the background image of the main screen. - New : Add a album 2. Address Book– Assigns a specific photo image to Address Book - Rename : Rename a album. Entry. - Delete : Deletes a album. Rename & Move: Move to rename a photo.
Rename: Renames a video file Delete: Deletes a video file Delete All: Deletes all video files in the album. File Info: Views the information on a photo 6.5 Settings Changes the default camera option value. - Image Size: Size of the image to be shot, LCD (128X128), QVGA (360X240) and VGA (640X480). - Shutter Sound: Shutter(Basic sound)/Smile/321/Off - Self Timer: select 5 Secs or 10 Secs.
7. My Stuff VM Version Shows the JAVA version which the built-in Java VM (Virtual 7.1 Games & Apps Machine) supports 7.1.1 Shop Games Selecting this menu launches the web browser to the Cingular’s Arcade menu. 7.2 Audio 7.2.1 Shop Tones Selecting this menu launches the web browser to Cingular’s 7.1.2 Games Tones menu. Select ‘Menu>7. My Stuff> 1.Games & Apps’ in the menu to view the Java Game 7.2.2 Audio List stored in your phone. Plays back sound in your phone or edits information.
is available only for a non-forward locked sound.) Graphics menu. Set as Ringtone Sets the selected sound as a preferred Ringtone. 7.3.2 Graphics Rename You can view or edit the image or information recorded in your phone in Renames a Sound this menu. (for further details about renaming a file, see Basic Functions Menu The image formats supported here are “JPEG, GIF, BMP, WBMP and 7) PNG” Delete 1. Select ‘Menu>7. My Stuff>3.
set as the background image of the main screen.(For further details about Options, see Applications Menu 9.1) Select ‘Menu>7.My Stuff>4. Tools >1.Alarm’. Rename You can set up to 5 alarms (Once you set the ‘Wake-Up Call On’, then an Renames a image icon appears on the display.) (for further details about rename a file, see Basic Functions Menu 7) Delete Deletes a image 7.4.1.1 To set an alarm Delete All Deletes all Sounds in the list of image. Select ‘Menu>7.My Stuff>4. Tools >1.
display the Monthly View. Press the [AM]/[PM] Soft key [ ] to select AM or PM time format for setup. Press the [New] Soft key [ 7.4.2 Calendar Press the [Options] Soft key [ ] to add a new event. ] to; Go to Date: Moves to the set date. Select ‘Menu>7.My Stuff>4. Tools >2.Calendar’. Go to Today: Moves to today for selection. The Calendar helps you to manage your schedule.
Delete: Deletes an event. Delete All: Deletes all events. Edit: Retrieve existing memos, edit existing memos, and push in on joystick to save modified memos * Tip: Push in on joystick and [Edit] Soft key [ 7.4.2.3 Event View & Edit ] to return to the editing screen. Shows the registered schedule by item and edits the schedule or creates a new schedule. (For further details about using editor, Basic Functions Menu 7.) Create New Event (by View & Edit) 7.4.
* Tip: When the memory is full, the “Not Enough Memory” message will This function informs you of world time. appear and you will return to the menu. Press the [Options] Soft key [ In the Voice Memo list, Press the [Options] Soft key [ ] to; ] to: Daylight-saving On/Off: The Daylight-saving function fits the time of the countries in summer who enforce Summer Time. Select Send as Multimedia Message.: Attach AMR file, and Sends as Daylight-saving from the Options menu for setup.
Press the [Reset] Soft key [ Select ‘Menu>7.My Stuff > 4.Tools > 7.Converter’. ] to initialise all. Converter converts a figure between different units i.e. Length, Area, 7.4.9 SIM Tool Kit Volume, Weight, and Temperature. Select an item from Length, Area, Volume, Weight, or Temperature. Push down joystick to move to the next line, push left/right joystick to This menu depends on SIM and the network services. select a target unit, and press the number keys to input numbers.
8. Address Book Forward Contact Info: Sends the information of the person selected in the ‘View Names’ list in the form of business card. You can store your personal Entries, which can be added or deleted at any time. You can save up to 800 Entries on the phone memory. Entries 8.2 Add Entry that can be stored on SIM depend upon the SIM’s storage capacity. Select ‘Menu>8.Address Book >2.Add Entry’.
2. Press the [Side Up/Down] key or push up/down joystick to choose a Default Groups: No Group, Family, Friends, Business, and VIP person. 3. Push in on joystick to save an item in the Speed Dial list. 4. If you want to remove a particular item in the speed dial list, move the cursor to the item and press the Soft key [ ] to; Remove: Remove an item. Press the [Options] Soft key [ ] to; Group Ringtones : Set a Group, Melody, Picture. Rename : Renames a group in the user defined group.
8.8 My Phone Number pushing up/down joystick key and press the [ Select ‘Menu>8.Address Book >8. My Phone Number’. The number for My Phone Number can vary depending on the SIM. Press the [Options] Soft key [ ] to: Add: Adds an Own Number. Delete: Deletes an Own Number. Press the [Edit] Soft key [ ] to edits an Own Number. 8.9 Memory Info Select ‘Menu>8.Address Book >9.Memory Info’.
9. Settings You can type up your own greeting phrase to be shown on start up or 9.1 Display Idle screen.(For further details about using editor, see Basic Functions Menu 7) Select ‘Menu>9.Settings>1.Display’. You can change the appearance of the internal LCD display. 9.1.4 Contrast Select ‘Menu>9.Settings>1.Display>4.Contrast’. 9.1.1 Shop Graphics Selecting this menu launches the web browser to Cingular’s You can adjust the LCD contrast to one level of Level 1 ~ Level 8. Graphic menu.
You can select the preferred alert melody, its volume and reminder period needs. when you have new messages. 9.2.1 Shop Tones Selecting this menu launches the web browser to the Cingular’s - Alerting: Push left/right joystick to select one out of Off, Once, Every 2 Mins and Every 5 Mins. Tone menu. 9.2.2 Ringtone - Ring Volume: Controls the volume in 8 levels. - Sound: Push left/right joystick to set Message Alert Tone to Bell1, Bell2, Bell3. Select ‘Menu>9.Settings>2.Audio >2.Ringtone’.
9.3 Call except the [ ] key and the [Reject] Soft key. Select ‘Menu>9.Settings>3.Call’. 9.3.3 Auto Redial 9.3.1 Call Forward Select ‘Menu>9.Settings>3.Call>3.Auto Redial’. Select ‘Menu>9.Settings>3..Call>1.Call Forward’. This function automatically redials the number the call is made to. You can divert a receiving call to another phone number with this menu. - On: Sets up Auto Redial. It’s one of network services, so please contact your service provider to - Off: Cancels Auto Redial.
Please ask the network provider. You can set up Time, Time Format and Date, Date Format. 9.3.6 Auto Emergency Dialing If you select on for ‘Automatic’, time and data is updated automatically. Select ‘Menu>9.Settings>3.Call>6. Auto Emergency Dialing’. 9.4.3 Flight Mode Select ‘Menu>9.Settings>4. Phone>3.Flight Mode’. If this menu is on, you can make an emergency call by pressing and Once you select "Flight Mode On", you cannot call and receive call.
locked screen, you can only use the Soft2 [Unlock] key to turn on the Changes the PIN number. LCD backlight. You can change the PIN number only when the phone is set for PIN Enable. 9.5 Security Set ‘Menu>9.Settings>5.Security’. 9.5.3 Phone Lock The security settings enable you to restrict the use of your phone to other Once selected, this option locks your phone until you input the right people and types of calls of your choice.
- On - Off name and press [ - Fixed Dial List: Displays the numbers recorded in the Fixed This service is dependent on the SIM. Dialing list. Press the [Options] Soft key [ ] to see the CUG name list as you input. ] to: Delete: Deletes the preset CUG Identifier. 9.5.7 Change PIN2 Edit: Edits the CUG Identifier. You can change the PIN2 number. Add: Adds the CUG Identifier. 9.5.
TTY(also known as a TDD or Test Telephone) is a telecommunications device that allows people who are deaf or hard of hearing, or who have speech or language disabilities, to communicate via a telephone. Your phone is compatible with select TTY devices which have an internal CTM. Please check with the manufacturer of your TTY device for connectivity information and to ensure that the TTY device supports digital wireless transmission. 9.9 Network Select ‘Menu>9.Settings>9.Network’. 9.9.
VI.
1. Check List undergrounds where the signal strength is poor, move toward a window or go out open area. If you still cannot make a connection, contact the nearest If you experience any problem while using your mobile phone, please refer service centre. to the following checklist. If the problem still persists, contact your dealer or nearest service centre. When audio quality is poor: End a call and try again. When the “Insert SIM Card” message appears: Make sure the SIM card is correctly installed.
2. Performance and safety When you are unable to charge the battery: This may be the result of one of the following cases. The following list shows how to maintain your mobile phone, together with 1. Your charger may be out of order. Contact your nearest dealer. precautions to take. 2. You may be attempting to use the phone in an overly hot/cold - Keep your mobile phone and its accessories out of the reach of children. temperature. Try changing the charging environment.
3.Glossary received across a mobile telephone network. GPRS guarantees continuous To help you understand the main technical terms and abbreviations used in connection to the Internet for mobile phone and computer users. It is based this booklet and take full advantage of the features of your mobile phone, on the Global System for Mobile Communication (GSM) circuit-switched here are a few definitions. mobile phone connections and the Short Message Service (SMS).
Voice Mail SIM (Subscriber Identification Module) Computerised answering service that automatically answers your calls Card containing a chip with all the information required to operate the when you are not available, plays a greeting (optionally in your own voice) phone (network and memory information, as well as the subscriber’s and records a message. personal data).
interference in a residential installation. This equipment generates, uses conjunction with any other antenna or transmitter. and can radiate radio frequency energy and, if not installed and used in accordance with the instructions, may cause harmful interference to radio Health and Safety Information FCC communications. However, there is no guarantee that interference will not This EUT has been shown to be capable of compliance for localized occur in a particular installation.