5 2%6 53%2 '5)$% WWW PANTECH COM WWW SUDANI SD
PS-300_060602.indd 1 User Guide PS-300 2006.6.
WELCOME Thank you for choosing the up-to-date PS-300, our new model, developed by top researchers to support the CDMA2000 1X system through Qualcomm-manufactured MSM6025 chips and CDMA technologies. This product allows for high speed communication services, data & fax services, and a GUI animation menu. T9 input mode makes it much easier to enter text. Other proven technologies include: • Full graphic display of 5 text input line, 1 soft key line and 1 icon line with variable font size.
TABLE OF CONTENTS PHONE INFO. .................................................................................. 34 MAKING AN EMERGENCY CALL .............................................. 35 EMERGENCY NUMBER IN LOCK MODE ......................................... 35 EMERGENCY NUMBER USING ANY AVAILABLE SYSTEM ............ 36 CHAPTER 3. MEMORY FUNCTION ............................ 37 STORING A PHONE NUMBER .................................................... 38 ENTERING LETTERS, NUMBERS & SYMBOLS ...........
TABLE OF CONTENTS EVENT .......................................................................................... 78 SETTING ....................................................................................... 78 RINGER ........................................................................................ 79 ALARM ............................................................................................ 79 SETTING ......................................................................................
CHAPTER 1 TABLE OF CONTENTS CHAPTER 6. PACKET DATA SERVICE ............................. 111 DATA SERVICE CONFIGURATION AND INSTALLATION .................. 112 SETTING UP PC.................................................................................. 113 INSTALL MODEM ON YOUR PC ................................................... 113 MODEM CONNECTION ................................................................. 115 DIAL-UP NETWORKING ...............................................................
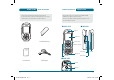
BEFORE USING INSIDE THE PACKAGE This package should include all items pictured below. If any are missing or different, immediately phone book the retailer where you purchased the cellular telephone. HANDSET DESCRIPTION BEFORE USING This cellular telephone is a dual mode (800MHz CDMA) CDMA2000 1X digital cellular telephone. The PS-300 90g (without battery) And the dimensions are 10.9cm X 4.65cm X 1.96cm.
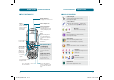
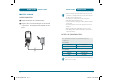
BEFORE USING HANDSET DESCRIPTION H THE FUNCTION KEYS BEFORE USING DISPLAY INDICATORS H DISPLAY INDICATORS Signal Strength Display Indicators See page 13 for a list of icons. Current signal strength: the more lines, the stronger the signal. Service Indicator Text & Graphic area Menu (Left Soft Key) Press to access the menu or function displayed on bottom line. Indicates call is in progress, indicates the phone cannot receive a signal from the system.
BEFORE USING DISPLAY INDICATORS Etiquette Mode Phone will vibrate when call is received. Roaming Phone is out of home area. BATTERY USAGE BEFORE USING H BATTERY INSTALLATION As shown in the picture below, put the mold locators of the battery into the holes located in the bottom of the unit. Insert the mold locator of the battery into the hole located in the bottom of the unit. 1X Phone is in the 1X service area. Earphone Headset is connected. Voice privacy Phone is in voice privacy mode.
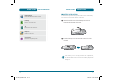
BEFORE USING BATTERY USAGE H BATTERY CHARGING POWER CONNECTION Plug the AC Charger into a standard outlet. Plug the other end of the AC Charger into the bottom of your phone. The battery must be installed on to the phone. BATTERY USAGE BEFORE USING • When you charge the battery with the phone power off, you will see a charging status screen. You cannot operate the phone until it is powered on. • The battery is not charged at the time of purchase. • Fully charge the battery before use.
BEFORE USING BATTERY HANDLING INFORMATION H DO’s • Only use the battery and charger approved by the manufac turer. • Only use the battery for its original purpose. • Try to keep batteries in a temperature between 41ºF (5ºC ) and 95ºF (35ºC). • If the battery is stored in temperatures above or below the recommended range, give it time to warm up or cool down before using. • Completely drain the battery before recharging. It may take one to four days to completely drain.
CHAPTER 2 MEMO BASIC OPERATION This chapter addresses and explains the basic features of your cellular telephone including: TURNING THE PHONE ON / OFF BASIC OPERATION CHAPTER 2 ACCESSING THE MENU MENU SUMMARY BASIC FUNCTIONS DURING A CALL MAKING AN EMERGENCY CALL 20 PS-300_060602.indd 20-21 2006.6.
BASIC OPERATION TURNING THE PHONE ON / OFF H TURNING THE PHONE ON Press and hold tone sounds. , until Logo appears and the ACCESSING THE MENU BASIC OPERATION Your phone can be customized via the menu. Each function can be accessed by scrolling with the Navigation key or by pressing the number that corresponds with the menu item. To access the menu in the idle mode, press [MENU]. • To search through the menu in numerical order, press down. • To select a logo, refer to page 63 for more details.
BASIC OPERATION MENU SUMMARY MENU SUMMARY BASIC OPERATION H Left softkey tree - Menu MAIN MENU 1. Phone Book 2ND DEPTH 1.1 Add Name 1.2 Find 1.3 Groups 3RD DEPTH 4TH DEPTH 3. Call History 1.1.1 Phone 1.1.2 UIM 1.2.1 By Name 1.2.2 By Number 1.2.3 By Group No Group Family Relatives Friends Business Colleagues School Club VIP Others 1.4 Speed Dial 1.5 Phone book Copy 1.5.1 Phone to UIM 1.5.2 UIM to Phone 1.5.3 Settings 2. Messages 2.1 Write 2.2 Inbox 2.3 Outbox 2.4 Voice Mail 2.5 Drafts 2.
BASIC OPERATION MAIN MENU 2ND DEPTH MENU SUMMARY 3RD DEPTH 6.2 Phone 6.2.1 Data Settings 6.3 Security 6.2.2 Slide Alert 6.2.3 Phone Info. 6.3.1 Phone Lock 6.3.2 Change code 6.3.3 UIM 6.3.4 Restrict 6.3.5 Emergency Numbers 6.3.6 Delete All 6.3.7 Reset Phone 7. Organizer 7.1 Scheduler 7.2 Alarm 7.3 Memo 4TH DEPTH 6.2.1.1 Receive Mode 6.2.1.2 Data Speed 6.2.1.3 Port 6.3.3.1 UIM Lock 6.3.3.2 PIN Code Change 6.3.4.1 Phone Book 6.3.4.2 Call History 6.3.4.3 Outgoing Call 6.3.4.4 Messages 6.3.4.
BASIC OPERATION BASIC FUNCTIONS H MAKING A CALL H PAUSE FEATURE Enter a phone number. To modify the phone number you have entered : • To delete one digit at a time press . . • To delete the entire number, press and hold Pauses are used for automated systems (i.e., voice mail, calling cards). Insert a pause after a phone number then enter another group of numbers. The second set of numbers is dialed automatically after the pause. This feature is useful for dialing into systems that require a code.
BASIC OPERATION BASIC FUNCTIONS BASIC FUNCTIONS BASIC OPERATION H CALLER ID FUNCTION H ETIQUETTE MODE Identifies caller by displaying their phone number. If the caller’s name and number are already stored in your Phone books, they both will appear. Mutes key tones and activates the vibration mode to alert you of an incoming call or message. The caller ID is stored in the Calls.
BASIC OPERATION DURING A CALL To display menu options during a call, press [OPTIONS]. BASIC OPERATION DURING A CALL H MESSAGES Enables you to send a message (SMS) during a call. (Refer to page 97 for more details.) H MUTE (UNMUTE) The caller cannot hear you or any sounds from your side but you can still hear them. Press Press [OPTIONS] [OPTIONS] . . H PHONE BOOK • To deactivate, press [OPTIONS] . • The phone will automatically unmute in Emergency Call or Callback mode.
BASIC OPERATION DURING A CALL H VOICE PRIVACY Enhances voice privacy during a call. Press [OPTIONS] . MAKING AN EMERGENCY CALL BASIC OPERATION The Emergency Call feature puts your phone in the Emergency Call Mode when you dial the preprogrammed emergency numbers, 120, 666, 999. It also operates in the lock mode and out of the service area. Emergency Number H EMERGENCY NUMBER IN LOCK MODE H PHONE INFO. Enables you to view hardware version or software version while on a call.
MAKING AN EMERGENCY CALL CHAPTER 3 BASIC OPERATION H EMERGENCY NUMBER USING ANY AVAILABLE SYSTEM The 120, 666, 999 call service is available even in the lock mode. Enter Emergency number and press . The call connects. • The phone returns to the Lock Mode. • While the phone is in the emergency mode, the phone can receive an incoming call from any available system. However it can't make a call.
MEMORY FUNCTION STORING A PHONE NUMBER The Phone books stores up to 500 entries. STORING A PHONE NUMBER MEMORY FUNCTION • Office • Pager • Others • E-mail Select “Phone” or “UIM”. • Ringer. Choose “New” or “Existing”. to select. Press • Secret : Lock, Unlock. • Photo The Phone # will appear next to a list of icons. The name of the icon is displayed above the list. Use the Navigation key to choose the type of # you’re to select. adding, as indicated by the icon.
MEMORY FUNCTION ENTERING LETTERS, NUMBERS & SYMBOLS The input mode (Alpha editor) will be automatically activated when necessary to enter letters and numbers. As shown below, there are 4 available modes. Standard input Mode(Abc, Arabic), T9 input mode(T9 Abc, T9 Arabic), Numeric mode(NUM), Symbol mode(Symbols). The input mode indicator appears on the upper right of the display when letters and numbers are entered.
ENTERING LETTERS, NUMBERS & SYMBOLS MEMORY FUNCTION H STANDARD INPUT MODE ENTERING LETTERS, NUMBERS & SYMBOLS MEMORY FUNCTION Arabic There are two modes in standard input mode : Abc mode, Arabic mode. Use the digit keys to enter letters, numbers and characters.
MEMORY FUNCTION ENTERING LETTERS, NUMBERS & SYMBOLS To change the input mode, press [Abc]. To enter a space, press . The cursor will automatically move to the next column. Repeat until letters are entered. To delete one digit, press [CLEAR]. To delete the entire entry, press and hold To change from lowercase to uppercase, press [CLEAR]. . Select Abc mode, by pressing [Abc]. When you select this mode, the Abc icon appears as a visual confirmation.
MEMORY FUNCTION ENTERING LETTERS, NUMBERS & SYMBOLS ENTERING LETTERS, NUMBERS & SYMBOLS H T9 INPUT MODE H NUMERIC MODE There are standard input mode : Abc mode. The T9 input mode incorporates a built-in-dictionary to determine a word based on the entered characters. A word can be entered more quickly by pressing a key once per character. Allows you to enter numbers. Select the T9 Abc mode by pressing [Abc]. H SYMBOL MODE Allows you to enter symbols. .
ENTERING LETTERS, NUMBERS & SYMBOLS CHAPTER 4 MEMORY FUNCTION H SPEED DIAL In idle mode, calls can be placed to numbers stored in speed dial by pressing & holding the location number on the key pad. For a 2-digit location number, press the first number, then press and hold the second number. You can setting up speed dial entries from saved in your phone’s memory. CHAPTER 4 MENU FUNCTION • If a phone number is already assigned to the location, press [OPTIONS] and [BACK].
MENU FUNCTION PHONE BOOK H ADD NAME MENU FUNCTION PHONE BOOK 3.1 To save the entry, press . 3.2 To return to the previous page, press Adds a new entry. [BACK]. H FIND Retrieves an entry by name and calls by simply pressing . You can review all the entries stored in your phone book list or find an entry quickly by entering a name or its character string. PHONE To add a new entry to the phone’s memory.
MENU FUNCTION PHONE BOOK BY NUMBER Press BY GROUP You can search for the data of saved in your phone’s memory. [MENU] , , . The list of phone numbers saved in your phone book will be displayed in numeric order. Enter the phone number or scroll through the list with the Navigation Key. The name associated with that number will be displayed at the bottom of the screen. All matching entries will be displayed. Highlight an to edit the entry. entry. Press [OPTIONS] to 1. Edit, 2.Send Message.
MENU FUNCTION PHONE BOOK PHONE BOOK MENU FUNCTION H GROUP GROUP RINGER Phone entries into groups. Existing groups include No Group, Family, Relatives, Friends, Business, Colleagues, School, Club, VIP, Others. Select an existing group name with the Navigation Key. Press [OPTIONS] to select “Default”, “Change”. Select a ring. RENAME Press to save it. Select an existing group name with the Navigation Key. Press [EDIT] to select “Rename”. Input a new group name. Press to save it.
MENU FUNCTION PHONE BOOK CALL HISTORY MENU FUNCTION H PHONEBOOK COPY H MISSED Allows you to copy the number to another location, either Phone or UIM. Display information about the 30 most recently missed calls. Place a call to a missed call number by simply pressing . PHONE TO UIM To see a list of the 30 most recent missed calls, [MENU] , . Press If the number is already stored in your phone book, name and num appears. If the number is not stored, only the phone number appears.
MENU FUNCTION CALL HISTORY CALL HISTORY MENU FUNCTION H RECEIVED H DIALLED Displays information about the 30 most recently Received calls. Place a call to a incoming call number by simply pressing . Displays information about the 30 most recently Dialled calls. Place a call to a outgoing call number by simply pressing . To see a list of the 30 most recent Received calls, Press [MENU] , . If the number is already stored in your phone book, name and num appears.
MENU FUNCTION CALL HISTORY H CALL DURATION In this menu, shows details about the call, such as the number or name, if available, the time and date it was dialled, last call, or all calls. ALL DIALLED CALLS PROFILES MENU FUNCTION Customizes your cellular telephone and optimizes performance through a variety of settings. H PROFILES The phone provides you five profiles, which have a set of features to control (General/Outdoor/Meeting/Silent/Vibrate Only/Profile 1/ Profile 2).
MENU FUNCTION PROFILES Messages : Sets the tone of the text message. (Tone 1~5) Voce mail : Sets the tone of the voice mail. (Tone 1~5) Ringer Volume : Sets the volume of the ringtone. (Mute/Level1~5) Key Volume : Sets the volume of the keytone. (Off,Level1~5) Earpiece Volume : Adjusts the volume of earpiece. (Level1~5) - during a call Speaker Volume : Adjusts the speaker volume of the speaker mode. (Level1~5) - during a call Speaker Mode : Sets the speaker mode.
MENU FUNCTION DISPLAY DISPLAY MENU FUNCTION H LANGUAGE POWER OFF Selects the language in which letters are displayed on screen. Press [MENU] , , . Select Default to choose a pre-installed display, display, or Downloads or Saved to Phone to choose a display you have downloaded to your phone. To save it, press • Arabic • English . H BANNER RECEIVED CALL To input a personal greeting: Press [MENU] , , .
MENU FUNCTION DISPLAY H CONTRAST MENU FUNCTION SETTINGS H CALL To adjust the display contrast: Use , or , to select a contrast level. • CONTRAST LEVEL : 1~5 H BACKLIGHT Backlights the display for easy viewing in dark places. Select “Backlight” then select the duration with the Navigation Key and press . • LCD : 7 Secs / 15 Secs / 30 Secs / 60 Secs / Always On • KEYPAD : 7 Secs / 15 Secs / 30 Secs / 60 Secs / Always On / Always Off 66 PS-300_060602.
MENU FUNCTION SETTINGS MENU FUNCTION SETTINGS ANSWER MODE VOICE PRIVACY To select an answer mode: The voice Privacy feature encrypts the voice channel so that no one can eavesdrop on your phone conversations. Press [MENU] , , . Press Press and select “Send Key”, “Any Key”or “Slide Open” with the navigation key. • Send key : Press only send key to answer a call. • Any Key : Press any key to answer an incoming call except “CLR”, “END Key” and “OK Key”.
MENU FUNCTION SETTINGS TONE LENGTH SIGNAL FADE ALERT To adjust tone length: Press [MENU] MENU FUNCTION SETTINGS Press , , . Select “Normal” or “Long” with the Navigation Key then press to save it. [MENU] , , “Signal Fade Alert”. Select “On” or “Off” with the Navigation Key then to save it. press H PHONE CONNECT ALERT Set the phone to beep when an outgoing call is connected to the system. Press [MENU] , , . Select “On” or “Off” with the Navigation Key then to save it.
MENU FUNCTION SETTINGS MENU FUNCTION SETTINGS SLIDE ALERT PHONE LOCK use this menu to select the tone that the phone sounds when you open or close the phone. Prevents the phone from being used without entering the password first. Press Press [MENU] , , . Select “On” or “Off” with the Navigation Key then to save it. press [MENU] , , then enter “Password”. The default password is the last 4 digits of your phone number.
MENU FUNCTION SETTINGS UIM SETTINGS MENU FUNCTION CALL HISTORY Blocks access to call history. UIM LOCK Blocks access to UIM card. Press [MENU] , , then enter “Password”. , then select “Enable PIN” or “Disable Press PIN” with the Navigation Key and press . Press [MENU] , , then enter “Password”. Press , then select “Allow” or “Restrict” with the Navigation Key and press . • Allow : Allow access to call history. • Restrict : Restrict access to call history. PIN CODE CHANGE Change the pincode.
MENU FUNCTION SETTINGS MENU FUNCTION SETTINGS CAMERA DELETE ALL Blocks access to camera. Clears all phone book, downloads, and photo gallery entries. Press [MENU] , , then enter “Password”. Press , then select “Allow” or “Restrict” with the Navigation Key and press . • Allow : Allow access to camera. • Restrict : Restrict access to camera. Press [MENU] , , then enter “Password”. The default password is the last 4 digits of your phone number. Press .
MENU FUNCTION ORGANISER ORGANISER MENU FUNCTION H SCHEDULER RINGER Sets a scheduled plan and reminds you of that plan. To set a Ringer, press [OPTIONS], then select “Default” or “Change” using the Navigation Key. To save it press . • Default : To set default ringer type. • Change : To set custom ringer type. ADD EVENT Press [MENU] , . Move the Navigation Key left, right, up or down to choose a date in the calendar then press . To select plan options, press the Navigation Key downwards.
MENU FUNCTION ORGANISER MENU FUNCTION ORGANISER SETTING RINGER Use the Navigation Key to select a setting for the alarm (Once, Daily, Mon-Fri, Weekly, Monthly, Off ). To set a “Ringer” press [OPTIONS], then select “Default” or “Change” with Navigation Key. To save it press . • • • • • Off Once : Enter a date. Daily : Select a time. Mon - Fri Weekly : Select “Monday”, “Tuesday”, “Wednesday”, “Thursday”, “Friday”, “Saturday”, “Sunday”. • Monthly : Select 1 ~31.
MENU FUNCTION ORGANISER LIST H CALCULATOR To view a saved memo: To access the calculator: Press [MENU] , , . The list of all memos, in saved order, is displayed. Select a notes then press . To add a new memo, press [OPTIONS], “Add New”. To delete a memos, press [OPTIONS], “Delete”. To delete all memos, press [OPTIONS], “Delete All”. The selected notes will appear. To edit it, press [OPTIONS], select “Edit” and input a new text memo. To save, press MENU FUNCTION ORGANISER .
MENU FUNCTION ORGANISER MENU FUNCTION ORGANISER H STOPWATCH H WORLD CLOCK Simultaneously times up to six different events. To operate the Chronometer: To display the time and date in pre-programmed cities: Press Press [MENU] , To measure a time period: 1. To start the stop watch, press [START]. 2. To pause it, press [STOP]. 3. To resume it press , to return to the previous page, press [BACK]. To time up to Five events at once: 1. To start, press [START]. 2.
MENU FUNCTION ORGANISER H SNAKE CAMERA H TAKE PHOTO Press Press MENU FUNCTION [MENU] , to take a photo and save it. . QUALITY H ICARUS Press [CAMERA KEY] and then [OPTIONS] . Select one of the following options: Press [MENU] , . • High/Normal/Low RESOLUTION Press [CAMERA KEY] . then [OPTIONS] and Select one of the following options: • 160X120/320X240/640X480 Resolution works to 128X128 in case of Frame mode setting. 86 PS-300_060602.indd 86-87 87 2006.6.
MENU FUNCTION CAMERA CAMERA MULTI SHOT Press [CAMERA KEY] MENU FUNCTION FRAMES and then [OPTIONS] Press [CAMERA KEY] . and then [OPTIONS] . Select one of the following options: FLASH • Off/2/3/4/5 Press [CAMERA KEY] TIMER Press [CAMERA KEY] and then [OPTIONS] . • Off/On and then [OPTIONS] . Select one of the following options: H ALBUM TAKE PHOTO • Off/5 Secs/10 Secs CONTRAST Press [CAMERA KEY] and then [OPTIONS] .
MENU FUNCTION CAMERA CAMERA SET WALLPAPER H SETTINGS To set for Standby, Power On, Power Off, Received Call and Dialled Call image. DATE & TIME Press [CAMERA KEY] . then [OPTIONS] , and Press SET PHONEBOOK Press [CAMERA KEY] . then [OPTIONS] MENU FUNCTION , and DELETE [CAMERA KEY] , . Select “Show” or “Hide” then press to save it. SHUTTER SOUND To delete a picture. Press [CAMERA KEY] . then [OPTIONS] Press , .
CHAPTER 5 MEMO VOICE MAIL AND TEXT MESSAGE This chapter addresses Voice Mail and Text Messaging or Picture message functions including: WHEN A NEW MESSAGE ARRIVES WRITE INBOX OUTBOX VOICE MAIL DRAFTS TEMPLATES DELETE ALL SETTINGS MSG. GROUP VOICE MAIL AND TEXT MESSAGE CHAPTER 5 MSG COPY 92 PS-300_060602.indd 92-93 2006.6.
VOICE MAIL AND TEXT MESSAGE VOICE MAIL AND TEXT MESSAGE Under “Message”, input a new TEXT message and press . (Please refer to page 40 for more details on entering letters, numbers and symbols.) H TEXT MESSAGE TEXT MESSAGE • By pressing [OPTIONS], in the message input screen you can choose from the following: 1. Insert Template : Insert Templates. 2. Save to Templates : Save Templates. The display appears when a new message arrives. To display the message, press [READ].
VOICE MAIL AND TEXT MESSAGE VOICE MAIL AND TEXT MESSAGE Input any text message to go along with the forwarded message, then press . H INBOX To send the text message, press [OPTIONS], then select “Send” then press . Press [MENU] , or press , . Select a “Phone” or “UIM”. Select a message then press . The message is displayed. To delete a message, press [Delete]. Press SAVE TO TEMPLATES To save the text message to templates, select "Save to Templates".
VOICE MAIL AND TEXT MESSAGE COPY TO UIM To copy the messages, select "COPY TO UIM". You can copy the messages stored on the phone’s memory to the UIM card or UIM card to the phone’s memory. DELETE To delete this message, select “Delete”. “Delete This Message?” will be displayed. VOICE MAIL AND TEXT MESSAGE H OUTBOX Manages sent text messages or messages waiting to be sent. Press [MENU] , or press , . Select a message, then press . The text message is displayed. Press [OPTIONS].
VOICE MAIL AND TEXT MESSAGE VOICE MAIL AND TEXT MESSAGE LOCK & UNLOCK H DRAFTS To lock or unlock the text message, select “Lock & Unlock”. Draft Folder contains any draft messages or saved messages. If message composition is interrupted by a voice call or other interrupting event, the text of the current composition is automatically saved to the draft folder. Select “Lock” to lock the message or “Unlock” to unlock the message, then press . DELETE To delete this message, select “Delete”.
VOICE MAIL AND TEXT MESSAGE VOICE MAIL AND TEXT MESSAGE H TEMPLATES H SETTINGS Manages messaging features through various features. Press [MENU] , or press , . Select a message from the list. Press [OPTIONS]. To add a new template message, select “Add New”. To edit the template message you have selected, select “Edit”. To delete the saved template message, select “Delete”. H DELETE ALL SAVE SENT MSG Press press [MENU] , , , , or .
VOICE MAIL AND TEXT MESSAGE VOICE MAIL AND TEXT MESSAGE SIGNATURE DELIVERY ACK When this option is checked, you can attach your name, phone number, a simple memo, or tag line as a signature. When this option is checked, the network informs you whether or not your message has been delivered. Press press Press press [MENU] , , , , or . [MENU] , , , , or . Select “On” or “Off” with the Navigation Key and press . Select “On” or “Off” with the Navigation Key and press .
VOICE MAIL AND TEXT MESSAGE H MSG. GROUP STORAGE Press press VOICE MAIL AND TEXT MESSAGE [MENU] , , , , or . Allows the user to five group, each group in a directory can have up to 10 phone numbers. The user can add, change, and delete Msg. Group. Select “UIM” or “Phone” with the Navigation key and press . ADD NEW MSG. GROUP To add a new group, press [MENU] A maximum of five groups is allowed. Press . , [OPTIONS] then select “1. Add Group”. Input a new group name. Press to save it.
VOICE MAIL AND TEXT MESSAGE VOICE MAIL AND TEXT MESSAGE CHANGE MSG. GROUP NAME DELETE MSG. GROUP Press [MENU] . , Select an existing group name. Press [MENU] . , Select the group name to be delete. Press Press [OPTIONS] then select “2. Rename”. Input a new group name. Press to save it. There is a 16-letter limit. SEND MESSAGE [OPTIONS] then select “4. Delete”. DELETE ALL Press [MENU] . , Select the group name to be delete. Press [OPTIONS] then select “5.Delete All”.
CHAPTER 6 VOICE MAIL AND TEXT MESSAGE H MSG COPY Allows you to copy the message to another location, either Phone or UIM. CHAPTER 6 Press [MENU] , , . You can copy all of the messages stored on the phone’s memory to the UIM card. PACKET DATA SERVICE UIM TO PHONE Press [MENU] , , . You can copy all of the messages stored on the UIM card to the phone’s memory. Abstract: This Document is described in based on MS-WINDOWS 2000 Professional.
PACKET DATA SERVICE H DATA SERVICE CONFIGURATION AND INSTALLATION PACKET DATA SERVICE H SETTING UP PC Before getting started with Data Services, you must have PC setup as appropriate, otherwise do the following on MS-WINDOWS 2000. INSTALL MODEM ON YOUR PC Select “Start e Settings e Control Panel e Phone And Modem Options” Figure 1. PS-300 – PC connection for data service As shown in the figure above, connect the USB port of the PS-300 to the PC COM# with the USB cable.
PACKET DATA SERVICE PACKET DATA SERVICE MODEM CONNECTION Connect PS-300 to PC using USB cable as shown in the figure 1. Open Control Panel and Double click “Network and Dial-up Connections” icon. Go to “Advanced” tab, set “Extra initialization commands” with “AT+CRM=150”. Double click “Make New Connection” icon and do the following steps. 3.1 Click “Next” button. 114 PS-300_060602.indd 114-115 115 2006.6.
PACKET DATA SERVICE 3.2 Select “Dial-up to private network” option and click “Next” button. PACKET DATA SERVICE 3.3 Enter any arbitrary number in “Telephone number” and click “Next”. 3.3 If you have more than one dial-up device on your computer, select the device that is connected to PS-300 with USB Cable. (Curitel Packet Service (COM#)) 116 PS-300_060602.indd 116-117 117 2006.6.
PACKET DATA SERVICE 3.4 Click “Finish” when the setup is completed. PACKET DATA SERVICE Enter “User name” and “Password” as appropriate. Enter any arbitrary number in “Phone Number”. Click “Connect”. DIAL-UP NETWORKING Go to “Start” e “Settings” e “Control Panel” e “Network and Dial-up Connections”. Double click “Dial-up Connection” icon. 118 PS-300_060602.indd 118-119 119 2006.6.
PACKET DATA SERVICE CHECK POINT Go to “Start” e “Settings” e “Control Panel” e “Phone And Modem Options” e “Modems”. Select USB port (COM#) where PS-300 is connected and click “Properties” button. - Check if “Maximum Port Speed” is “115200” on “General” tab. - Set “Extra initialization commands” with “AT+CRM=150” on “Advanced” tab. PACKET DATA SERVICE 2.1 Click the right button of mouse on “Dial-up Connection Sample” icon, and select “Properties”. 2.
PACKET DATA SERVICE H INTERNET ACCESS PACKET DATA SERVICE Click “Dial”. PACKET DATA SERVICE Setup “Dial-Up Networking” as in appendix I. Go to “Properties e General e Configure e Connection Advanced” and type “AT+CRM=1”. Enter “User name” and “Password” as appropriate.* Enter any arbitrary number in “Phone Number”. *User name and Password are given by your local service provider. If you do not have appropriate user name and password, contact your local service provider to obtain one.
CHAPTER 7 MEMO SAFETY AND WARRANTY This chapter addresses the safety guidelines and precautions to follow when operating your cellular telephone. Before operating your cellular telephone, please be aware of all the safety details. This chapter contains the terms and conditions of services and the warranty for your cellular telephone. Please review them thoroughly.
SAFETY AND WARRANTY SAFETY INFORMATION FOR WIRELESS HANDHELD PHONES Read This Information Before Using Your Handheld Portable Cellular Telephone EXPOSURE TO RADIO FREQUENCY SIGNALS Your wireless handheld portable telephone is a low power radio transmitter and receiver. When it is ON, it receives and also sends out radio frequency (RF) signals. In August 1996, the Federal Communications Commissions (FCC) adopted RF exposure guidelines with safety levels for handheld wireless phones.
SAFETY AND WARRANTY SAFETY INFORMATION FOR WIRELESS HANDHELD PHONES SAFETY INFORMATION FOR WIRELESS HANDHELD PHONES SAFETY AND WARRANTY H ELECTRONIC DEVICES POSTED FACILITIES Most modern electronic equipment is shielded from RF energy. However, certain electronic equipment may not be shielded against the RF signals from your wireless phone. Turn your cellular telephone OFF where posted notices so require.
SAFETY AND WARRANTY SAFETY INFORMATION FOR WIRELESS HANDHELD PHONES H PRECAUTIONS Your Handheld Portable Telephone is a high quality piece of equipment. Before operating, read all instructions and cautionary markings on (1) AC Adaptor (2) Battery and (3) Product Using Battery. • DO NOT use this equipment in an extreme environment where high temperature or high humidity exists. • DO NOT abuse the equipment. Avoid striking, shaking or shocking.
SAFETY AND WARRANTY SAFETY INFORMATION FOR FCC RF EXPOSURE BODY-WORN OPERATION This device was tested for typical body-worn operations with the back of the phone kept 2.0 cm. from the body. To maintain compliance with FCC RF exposure requirements, use only belt-clips, holsters or similar accessories that maintain a 2.0cm, separation distance between the user’s body and the back of the phone, including the antenna.
SAFETY AND WARRANTY SAR INFORMATION Before a phone model is available for sale to the public, it must be tested and certified to the FCC that it does not exceed the limit established by the government adopted requirement for safe exposure. The tests are performed in positions and locations (e.g., at the ear and worn on the body) as required by the FCC for each model. The highest SAR value for this model phone when tested for use at the ear is 0.
SAFETY AND WARRANTY PRECAUTIONS WHEN USING BATTERIES • Do not leave the battery in hot or cold places, such as in a car in summer or winter conditions or you will reduce the capacity and lifetime of the battery. Always try to keep the battery at room temperature. A phone with a hot or cold battery may temporarily not work, even when the battery is fully charged. Li-ion batteries are particularly affected by temperatures below 0 °C (32 °F). • Dispose of used batteries in accordance with local regula tions.
SAFETY AND WARRANTY CARE AND MAINTENANCE TROUBLESHOOTING SAFETY AND WARRANTY • Do not use harsh chemicals, cleaning solvents, or strong detergents to clean the phone. Wipe it with a soft cloth slightly dampened in a mild soap-and-water solution. To save the time and expense of an unnecessary service call, perform the simple checks in this section before contacting a service professional. • Do not paint the phone. Paint can clog the device’s moving parts and prevent proper operation.
SAFETY AND WARRANTY TROUBLESHOOTING When your phone does not turn on: • make sure your battery is charged. check to see if your phone works while recharging the battery. When you are unable to send a message: • either you have not been registered to receive the sms service, or you may be out of the service range of your network service provider. when you are unable to charge the battery: • this may be the result of one of the following three cases. 1. your charger may be out of order.
WARRANTY CARD Pantech&Curitel Communications, Inc. (“PANTECH”) represents and warrants that this subscriber unit and its accessories (“Product”) are free from defects in Material and workmanship This warranty is subject to the following terms and conditions:1. This warranty of the Product (including the battery) extends for a period of Twelve (12) months commencing from the date of the activation. 2.
Safety Information 1 . SAFETY INFORMATION FOR FIXED WIRELESS TERMINALS .POTE NTIALLY EXPLOSIVE ATMOSPHERES Turn your phone OFF when in any area with a potentially explosive atmosphere and obey all signs and instructions. Sparks in such areas could cauls e an explosion or fire resulting in bodily injury or even death. INTERFERENCE TO MEDICAL DIVICES Certain electronic equipment may be shielded against RF signal from you wireless phone.
U.S.A. U.S.FEDERAL COMMUNICATIONS COMMISSION RADIO FREQUENCY INTERFERENCE STATEMENT INFORMATION TO THE USER NOTE : This equipment has been tested and found to comply with the limits for a Class B digital device pursuant to Part 15 of the FCC Rules.