SPARROW USER MANUAL 1
Thank you for choosing the Sparrow, our latest EDGE mobile phone. The Sparrow has many features designed to enhance your mobile experience. From its unique, stylish design and QWERTY keypad, we know you will enjoy the entire Sparrow experience. This User Guide contains important and useful information that will maximize your familiarity with all that the Sparrow has to offer.
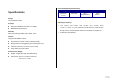
Power Management (Performance) Battery Type Standard Lithium-Ion (Li-ion) Specifications Capacity Standby Time 1000 mAh Up to 10days(250hrs) Talk Time Up to 3hours Design Touch QWERTY Slider Operating Frequency Displays 262k colors AMOLED LCD with 3.1” display 480*800(WVGA) resolution GSM 850Mhz, GSM 900Mhz, GSM 1800Mhz, GSM 1900Mhz, UMTS 850Mhz and UMTS 1900 Mhz networks in North America, South America, Europe, Africa, and Asia-Pacific where these networks are supported.
Phone overview Numeric mode view Earpiece Speaker Camera microSD Charger slot / Ear mic Shake key Press and hold for Left Side key Ambient light sensor Volume up and down /Proximity sensor Multitask function Power on/off key Camera key Internal antenna area Send key Press to make End key End calls, exit menus and answer calls Clear key/Calendar Key Return to previous screen. Access Calendar menu.
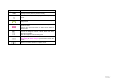
Keys Functions Turn on or off the phone if pressed and held. Quickly lock the phone if pressed shortly. Delete characters from the display, or return to previous menu. Access Recent Calls or dail the last number if taped and pressed Complete the current call. Turn on/off the phone if taped and held. Cancel user input and return to main screen while in Menu mode. Adjust the earpiece volume while making a call. Control the Ringtone volume, vibrate mode and silent all mode in standby.
QWERTY mode view Delete key CAPS key Press to delete a number or letter To type a single uppercase letter, press this key then enter a letter Enter key Press to move to the next row Function key Press to enter a number or symbol, and press the corresponding key the function key, and Tap the Symbol key Vibrate key Space key Press to enter a space Press to enter a symbol
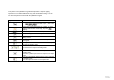
Your phone has a QWERTY keypad which provides a superior typing experience on a small handheld for easy and comfortable texting. You can use all of the phone functions with the QWERTY keypad. Key Function Tap to change ab Ab AB at the text editing screen (all small caps / first letter caps / all caps) Tap to type a special character or number.
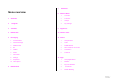
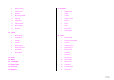
7 Menu overview 1 2 8 Shortcuts Navigator Social Net Address Book 1. Contacts 2. Favorites 3. Groups 4. My Settings 3 YPmobile 9 4 Mobile Web 10 Online Locker 5 Messaging 11 Games 1. Conversations 1. Shop Games* 2. Create Message 2. Tetris 3. Mobile Email 3. Bubble Bash2 4. IM 4. Diner Dash Flo on the Go 5. Outbox 5. TextTwist 2 6. Drafts 6. Katamari 7. Voice Mail 8. Settings 9. Templates 10. Used Space 6 AppCenter Mobile Email 12 Apps 1.
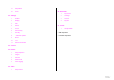
13 6. Online Locker 7. FunScreenz 1. Applications 8. Pic Dial 2. Audio 9. Movies by IMDB 3. Games 10. Hip Hop 4. Online Locker 11. Shop GPS 5. Picture 12. AllSport GPS 6. Video 13. Music Videos 7. Tools 14. Browser 8. Other Files 9. Used Space 20 My Stuff Music 1. Music Player 2. Shop Music 1. Recent Calls 3. Shazam 2. Drawing Commander 4. Radio 3. Camera 21 Tools 5. Music Videos 4. Video Camera 6. Make-UR-Tones 5. Media Player 7. Community 6.
15. Stop Watch 16. Timer 22 Settings 26 Bluetooth 1. My Device 2. Settings 1. Profiles 3. Search 2. Display 4. My Info 3. Call 4. Phone 27 Alarm 5. Touch 1. 6. Connectivity 7. Security Software Update 8. 9. Reset 10. TTY 11. Phone Information 23 Camera 24 Picture 1. Shop Graphics* 2. Images 3. Camera 4. Sketch Pad 5. Face Tagging 25 Video 1.
Contents 2. Calls and address book .....................................21 Making, receiving and ending calls ........................................................ 22 Specifications .......................................................... 3 Using video share .................................................................................... 23 Phone overview ....................................................... 4 Options during a call ............................................................
Voice message settings ........................................................................... 37 World time ............................................................................................... 52 Auto Delete Old Message settings .......................................................... 37 Calculator, tip calculator and converter ................................................... 53 Email ...................................................................................................
Troubleshooting checklist ........................................................................ 66 Safety information .................................................................................... 67 Safety precautions ................................................................................... 68 About the battery usage ...........................................................................
1.
3. Insert the SIM card into the slot. The gold contacts of the SIM card should go against the metal contacts of the phone. Put the connector of SIM card and battery About your SIM card the battery into the hole located at the top of the unit and then insert and press the lower side of the battery until you hear the light click. Make sure you align the gold contacts at the battery end with contacts on the When you subscribe to your network operator, you receive a SIM phone.
To turn off 1. Press and hold [ ]. Screen unlock Unlocking the screen 1. Press any hard keys to turn on the display. 2. Press and hold [ ] to unlock the screen Language Setting up 1. Tap Menu > Settings > Phone > Language. 2. Select Screen Text or Predictive. 3. Select the language > Save. Essential display indications Signal strength. The greater the number of bars, the stronger is the signal. When network is in searching mode displayed A call is being made.
Screen navigation Adding a home screen item The home screen is your starting point for using the applications on your Shortcuts and floor screens allow you to assign items to the screen. phone. 1. Tap Add [ You can customize the home screen to display application icons, shortcuts, 2. Tap a desired menu. ]. folders, and widgets according to your preference. 3. Once you have added one or more items to the screen, [ ] or [ About your home screen ] is displayed to customize the home screen.
Missed events Repositioning a home screen item Mini Map Once the items are assigned to the home When you missed calls, messages, email, instant screen, you can reposition the items for your message, JAVA or voice message, the icons will pop up convenience. and let you know you have missed events. 1. Select an item. The icon will show at the Missed Events Area, tap the 2. Drag to the desired position. each icon to check the details. To make it disappear 3. Position the item, then release it.
Resetting a memory card 3. Select Music Player, Mass Storage or Ask on Connection. 4. Follow the instructions on your computer screen. 1. Tap Menu > Settings > Reset. 2. Enter the password > External Memory Reset. Note: The default password is ‘1234’. Note: Select Music Player when you want to add music to the playlist in your device.
Using the multitask menu • App Manager: Access Games and Applications while using the handset for other tasks. Press and hold [ ] to launch the Multitask menu that Updating software can be accessed from within any active window or page on the phone. There is no need to stop what you are doing, if you want to jump out and activate You can update your software without visiting your nearest dealer. To update the software another common feature.
2.
Note: To redial the last number in the Recent Calls list, tap [ Making, receiving and ending calls Making a call during a call Making a call 1. Enter the phone number or look it up in Address Book. 2. Tap [ 1. Dialer > Enter the area code and phone number. 2. Tap Call or press [ ]. ] to dial the second call. The first call is automatically put on hold. ]. Switching between two calls Answering a call 1. Tap Swap. 1. Press [ ]. Making an international call Ending a call 1. [T] Press and hold [ 1.
Replying to a missed call Making video share call 1. Tap View to display the list of missed calls. 1. Enter the area code and phone number > [ 2. Select a number to call by scrolling the screen. 2. Tap Options > Video Share. 3. Tap [ 3. Select Live or Recorded. ]. ]. Note: To use video share in the Recent Calls, tap Options > Video Share. Answering a second call** 1. Tap [ ]. The first call is automatically put on hold. 2. Tap [ ] to end the second call. Turning off the speakerphone 1.
Stuff > Video. Putting a call on hold and returning** Receiving video share Putting a call on hold 1. After receiving video share, it will ask you whether to accept or reject the video share > Yes to accept and No for reject. 1. Tap Hold [ ] or tap [ ]. 2. Tap Options > Full Screen to enlarge the video to fill the entire screen. Note: When the flip is closed, open the flip to accept or tap Reject to reject Returning to a held call video share. 1. Tap Unhold [ ] or tap [ ] again.
Having a private conversation with one participant book 1. Tap the participant to hold. 1. Tap View. 2. Tap Member. For details on address book, see page 28. 3. Tap [ ]. All of the multi-party call participants can now hear each other. Reading a message during a call 1. Tap Options > View Message. Removing one participant from a multi-party call 2. Select a message > OK. 1. Tap the participant to end. 2. Tap Members. Sending a message during a call ]. 3.
missed, received and dialed calls, tap Options. You can also view the call history simply by pressing [ 2. Tap Recent Calls > Delete Call Logs. ]. Viewing missed calls 3. Select All Calls, Missed Calls, Received Calls or Dialed Calls > Yes. Viewing call time 1. Tap Menu > Tools > Recent Calls or press [ 1. Press [ ] > Missed Calls [ ] or tap Menu > Tools. ] > Call Time. 2. You can view Last Call, Received Calls, Dialed Calls and Total Calls. 2. Tap Recent Calls > Missed Calls.
Speed dialing Searching for a phone number You can dial quickly using speed dialing. Up to 8 phone numbers can be 1. Tap Contacts > All Contacts programmed using numbers 2 to 9. 2. Scroll the screen up or down or tap [ ] and enter the name to find the contact. Setting speed dial 3. Tap the contact > [ ] to view the detailed information. 1. Tap Contacts > My Settings > Speed Dial. 2. Tap an empty entry. 3. Select a person and tap. 4. To update information, tap Edit.
2. Scroll the screen up or down or tap [ ] and enter the name to find the Address book settings contact Managing my info 3. Tap the contact > [ ] > Delete > Yes. 1. Tap Contacts > My settings > My Info. Adding a contact Setting the sort order 1. Tap Contacts > Add. 1. Tap Contacts > My settings > Sort by. 2. Input the fields by tapping the desired filed. 2. Select First Name or Last Name >Save. 3. Tap Save. Setting Sync settings Making groups 1. Tap Contacts > My settings > Sync settings. 1.
as follows. Note: You must to use the headset designed for this device. It is optional accessory. Not all headsets will have a button. While in standby mode 1. Tap the button once to list recent calls. 2. Tap the button twice to redial the last call. Service numbers and fixed dialing Calling your service numbers* You can see the service number to reach the service provider. 1. Tap Contacts > My settings > Service Numbers. 2. Select a number > press [ ].
3.
9 wxyz Predictive mode Entering text The predictive mode automatically compares your keystrokes with an You can enter text with multi-tap, predictive, numeric or symbol. internal linguistic dictionary to determine the correct word. It will display the most commonly used word first. The most commonly used word will appear Useful keys first.
messages full icon will appear. All messages share memory. [Q] Press [ ] to [ ] to input text repeatedly. When It means Text message is full ( SIM and Phone messages ) Numeric mode Moving a message to SIM You can input numbers in this mode. 1. Tap [ ] to change the mode to 123. Press [ ] to change the mode to 123. 1. Tap Inbox [ ]. 2. Select a message > Options > Move to SIM. Deleting a message in the inbox 2. [T] Tap [ ] to [ ] and [ ] to input numbers. 1.
Listening to voice message 2. Tap [ ] > USIM. Receiving messages Viewing a new message [Q] Press and hold [ ] or tap Menu [ ] > Messaging > Voice Mail. ]. It will automatically call the voice mail center. 1. Tap View. Reading a message from the inbox 1. Tap Inbox [ 1. [T] Tap and hold [ ]. 2. Select a received message > View. Saving the contact information from a received message 1. Select a received message > View. 2. Tap Options > Add to Contact. 3. Select New Contact or Update Contact.
Finding all sent messages 3. Tap Insert > Picture > Take New Picture. 1. Tap Menu [ 4. Focus on the object and tap [ ] > Messaging > Outbox. Creating multimedia messages ]. 5. To preview the current page, tap Options > Preview > Current. 6. To preview the whole message, tap Options > Preview > Whole You can create and send new multimedia messages. Capacity is 100Kb, Message. To go back to text editor page, tap Stop. 300Kb, 600Kb. An error message will alert you once you exceed the 7.
3. Tap Insert > Video > Record New Video. 4. Focus on the object and tap [ ]. 5. To stop recording and save tap Stop. 6. To edit the text message, tap the text box. 7. To preview the current page, tap Options > Preview > Current. 8. To preview the whole message, tap Options > Preview > Whole Message. To go back to text editor page, tap Stop. 9. Tap the recipient filed to add a recipient(s) and select the contact > OK. 10. Tap Send. For the recording a video, see page 42.
9. Tap the recipient filed to add a recipient(s) and select the contact > OK. 10. Tap Send. Message templates Setting e-mail gateway 1. Tap Menu> Messaging > Settings. 2. Tap Text Message. 3. Enter new Email Gateway for sending text message by email address. When you often use the same phrases, you can save the message under 4. Tap Save. message templates. Setting profiles for multimedia message Adding the message as a template 1. Tap Menu > Messaging > Settings. 1. Tap Menu > Messaging > Templates.
Voice message settings Using instant messenger Setting for receiving voice message Use Instant Messenger (IM) to send and receive short, simple messages 1. Tap Menu > Messaging > Settings. 2. Tap Voice Mail. that are delivered immediately. Starting an instant messenger 3. Enter the number of the voice mail center > Save. Note: This number may be pre-configured by the service provider upon activation. 1. Tap Menu > Messaging > IM. 2. Select the IM application > Select. 3.
4.
Camera Setting camera settings You can take pictures and record movies using the built-in camera. The photos and video clips can be saved and sent via multimedia messages. 1. Press [ ] in standby mode or tap Menu > Camera. 2. Tap Options > Settings to change settings prior to taking a picture.
Effect Normal( B&W( Self Timer Resolution Off( ), Sepia( ), 2. Tap Options while camera mode is activated or simply just tap [ ) ), 5 secs( 176x144(MMS)( 320x240 ( Advanced Settings ), Negative( ), 10 secs( ) 3. Tap Video Camera Mode. ), 176x144( ), 4. Focus on the object and tap [ ), Vidoe Share( ) Video Quality, Save Location, Sound Recording,Timer Sound, Default File Name ]. 5. Record the motion > Stop. Note: Your video will be saved automatically to Menu > My Stuff > Video.
Using special effects ] and focus on person’s face. When the person winks it will 3. Tap [ capture the person automatically after 5 seconds. Smile effect Face effect 1. Press [ ] in standby mode or tap Menu > Camera. 2. Tap [ ] > Smile [ 3. Tap [ ] and focus on person’s face. When the person smiles, it will 1. Press [ ] in standby mode or tap Menu > Camera. 2. Tap [ ] > Face Effect [ ]. ]. capture the person automatically. 3. Tap [ Self effect / ] to select the effect > Save. 4.
Receive an incoming call [ Stop recording Stop Pause the recording Pause Changing to camera mode Make video share call Video Share 1. Tap Menu > Tools > Video Camera. Photo album 4. Tap Play to play the video clip. 5. Tap [ ] to go back to preview mode. ] 2. Tap Options while video camera mode is activated or simply just tap [ You can save photos to your phone or an external memory card and view, ]. 3. Tap Camera Mode. send or delete them in the photo album.
2. Tap [ ] of the selected picture > Send > as Multimedia Message. For details on creating a multimedia message, see page 35. Playing the saved video clips 1. Tap Menu > Video. Deleting multiple pictures 2. Tap the video clip to play. 1. Tap Menu > Picture > Camera. Using video player controls 2. Tap Options > Delete. To 3. Tap to mark desired files or tap All to mark all files. 4. Tap Delete > Yes. 5. To cancel deleting action tap [ Tap Pause Play ]. Rewind Recognizing face 1.
Audio album Moving or copying multiple sound to external memory You can play, send, delete, move or copy the saved sound to external 1. Tap Menu > My Stuff > Audio. memory or to phone. The supported formats are MP3, AAC, AAC+, and 2. Tap Options > Copy or Move. WMA. 3. Select the file to move > Move. 4. Select the folder > OK. Listening to the recorded sound The selected sound will be copied or moved to Audio folder in external memory card. 1. Tap Menu > My Stuff > Audio. 2. Tap My Voice.
Playing the music Making playlist 1. Tap Menu > Music > Music Player. 1. Tap Menu > Music > Music Player. 2. Scroll to select a category to play the music. 2. Tap Playlists > New Playlist. 3. Scroll to select the file and tap. 3. Enter playlist name > Save. 4. Tap Add to Playlist to add to the playlist. 4. Tap All Music, Albums, Artists or Genres. Note: Music will pause when you receive an incoming call and Music will 5. Scroll and tap to select the music file and tap Done to add to playlist.
Created, License and Sharing. Listening the radio 1. Tap Menu > Music. Setting as ringtone 2. Tap Radio. 1. Tap Menu > Music > Music Player. 2. Scroll and tap to select a category. 3. Scroll and tap to select the file. 4. Tap the selected file. 5. Tap [ Using music identification 1. Tap Menu > Music. 2. Tap Shazam. ] > Set as Ring Tone. Note: You cannot set the music file while it is playing. If a music file is larger than 300Kb, the file will be deactivated for setting ring tone. Deleting music 3.
2. Tap Music Apps. Gesture setting Music player settings 1. Tap Menu > Music > Music Player. 2. Tap Settings > Gesture Setting. Shuffling music 3. Drag the commander bar to On or Off. 1. Tap Menu > Music > Music Player. ] to select the gesture for Play&Stop, Next Play, Previous 4. Tap [ / Play, Volume Up and Volume Down. 2. Tap Settings > Shuffle. 3. Tap Shuffle On or Shuffle Off. 4. Tap Save. Repeating the music 1. Tap Menu > Music > Music Player. 2. Tap Settings > Repeat. 5.
Managing memory Viewing memory status 1. Tap Menu > My Stuff. 2. Tap Used Space. 3. Scroll to view the information. 4. To view external memory card memory status, tap [ ] and select the Memory Card. Playing games You can play pre-installed demo game or download games. It is easy to download and you can preview them beforehand. You will only be able to view games that are available on your mobile. Play games 1. Tap Menu > Games. 2. Scroll and tap to play pre-installed games. Shop games 1.
5.
Setting simply alarm Alarm 1. Tap Menu > Tools> Alarm Clock. 2. Tap Simply Alarm. Setting an alarm 1. Tap Menu > Tools> Alarm Clock. 2. Tap Create. 3. Scroll and set the time. 4. Tap Save. Calendar 3. Set the Cycle, Time, Alarm Sound, Alert Type, Volume, Snooze and Power Alarm. 4. Tap Save. Calendar helps you manage your schedule including your time for calls or special days. You can set a reminder on any given date with this function.
Notepad and voice memo Pause Play Using notepad Rewind Fast Forward 1. Tap Menu > Tools > Notepad. Previous Track Next Track 2. Tap Create New. 3. Enter the memo > Save. 4. To edit memo, scroll and tap [ Tap : Fast Rewind, Fast Forward Tap and hold : Previous, Next Repeat all ] of the memo > Edit. 5. To delete memo, tap Delete and tap to select the memo > Delete. 6. To send memo via message, scroll and tap [ ] of the memo > Send Repeat off Repeat Single Track via Message.
Calculator, tip calculator and converter Stop watch and timer Using calculator Using stop watch 1. Tap Menu > Tools> Calculator. 1. Tap Menu > Tools> Stop Watch. 2. Tap the numbers and [ + / - / X / /] to calculate. 2. Tap [ 3. Tap [C] to erase one digit. 3. Tap Start to start. 4. Tap [AC] to reset. 4. Tap Stop to stop. 5. Tap [.] to use the decimal point. 5. Tap Continue to restart. / ] to select Basic, Split or Lap. 6. Tap Reset to clear.
Sketch pad Setting as wallpaper You can draw memos or drawings and set as wallpaper or send as 1. Tap Menu > Tools > Sketch Pad. multimedia message, mobile share or Bluetooth. 2. After saving drawing, tap [ ] > Options > Set as Wallpaper. Draw sketch Sending the drawing 1. Tap Menu > Tools > Sketch Pad. 1. Tap Menu > Tools > Sketch Pad. 2. Tap [ ] to select pencil thickness, color, eraser and undo. 2. After saving drawing, tap [ 3. Select each options and tap [ ] for more space to draw. 4.
6.
Adding a device 1. Tap Menu > Bluetooth > Search. Bluetooth 2. The available device will display. Bluetooth technology enables free wireless connections between electronic 3. Tap to select the device. devices within a maximum range of 33 feet (10 meters). Bluetooth 4. Tap Pair to pair the device. connections can be used to send images, text, business cards, calendar 5. Enter password > OK. events and notes or to connect to computers using Bluetooth technology. 6.
Setting the visibility Accessing AppCenter 1. Tap Menu > Bluetooth > Settings. 1. Tap Menu > AppCenter. 2. Drag the Visibility bar to On or Off. 3. Tap Save. Naming the phone Accessing Apps 1. Tap Menu > Apps. 1. Tap Menu > Bluetooth > My Info. Accessing Where 2. Tap Name filed to edit the name > OK. 1. Tap Menu > Where. Note: The device name is what identifies your phone to Bluetooth network. Accessing family map Accessing the web 1. Tap Menu > FamilyMap.
2. Tap Home. 3. Tap Go. Note: It will access your service provider’s homepage. Viewing history Viewing bookmarks 1. Tap Menu > Browser > History. 1. Tap Menu > Browser > Bookmarks. 2. Scroll left or right to select the site and tap to open. Setting advanced options 3. To send via text message, tap Options >Send By MSG. 1. Tap Menu > Browser Setting new bookmarks 2. Tap Manage > Options. 3. Change the Rendering Mode, Cache, Cookies, Security Warring, 1. Tap Add. 2.
6. To view the certificates, tap Current certificate. Deleting profile Viewing download status 1. Tap Delete. 1. Tap Menu > Browser 2. Tap Manage > Download Manager. Profile settings You can set profile and view Profile Name, Home URL, Connection Type, Proxy Address and Proxy Port. Viewing default profile 1. Tap Menu > Browser 2. Tap Manage > Profiles. 3. Tap [ ] to view the detail. Adding new profile 1. Tap Create. 2. Tap each filed to enter the filed > OK. 3. Tap Save. Editing profile 1.
7.
2. Select Normal, Outdoor, Vibrate only, Silent or Flight Mode. Note: Tap [ Phone ] to change Call, Message and Phone. Each category has options to change. Change the options and tap Save. Setting time & date 1. Tap Menu > Settings > Phone. 2. Tap Time & Date. 3. Change Time Format, Date Format or Auto Update> Save. Display Shopping home screen 1. Tap Menu > Settings > Display. 2. Tap Shop Wallpapers. Setting shake actions 1. Tap Menu> Settings > Phone. 2. Tap Shake Actions.
4. Flick to view the clock types > Select. Note: The Touch Volume and Vibration Intensity will available depends on phone’s setting. Setting the font 1. Tap Menu > Settings > Display. Setting touch calibration 2. Tap Font Style. 1. Tap Menu > Settings > Touch. 3. Scroll and tap to select the font type > Save. 2. Tap Calibration. 3. Tap the [+] on the screen. Setting the brightness 1. Tap Menu > Settings > Display. Setting touch lock automatically 2. Tap Brightness. 1. Tap Menu > Settings > Touch.
1. Tap Menu > Settings > Security. the SIM card or determined by the SIM card) . 2. Drag the PIN bar to On or Off. 3. Tap Yes for enable unlock Note: To change the PIN code tap Menu > Settings > Security > Change Reset Resetting the phone PIN. 1. Tap Menu > Settings > Reset Locking the FDN 1. Tap Menu > Settings > Security. 2. Drag the FDN bar to On or Off. 3. Enter PIN2 code. Note: You have only 3 trials. If you enter the wrong code 3 times, the phone 2. Enter password > Master Reset. 3.
- Disable: TTY mode is disabled. - TTY Full: Users who cannot talk and hear, can send and receive a text messages. - TTY Talk: Users who can talk but cannot hear, can receive text messages and reply with voice message. -TTY Hear: Users who can hear but cannot talk, can send a text message and receive a voice message.
8.
Input PIN1. If you cannot remember it, contact your service provider. You can still receive calls even if your mobile phone becomes locked after Alert message entering the incorrect PIN1 on three consecutive attempts. If you experience any problem while using your mobile phone, please refer to the following checklist. If the problem still persists, contact your dealer or nearest carrier.
When your mobile phone does not turn on: your local service provider. Make sure your battery is charged. Check to see if your phone works while recharging the battery. Safety information When you are unable to send a message: Either you are not registered to receive an SMS service, or you may be in an area where your network service provider cannot provide such a service. The following list shows how to maintain your mobile phone, together with precautions to take.
Safety precautions of the hospital. Switch your phone off when using medical equipment for private purposes, if Using a mobile phone while driving may be prohibited. possible. Always consult with the medical equipment’s manufacturer or an Please check local laws and regulations with regard to the prohibition of expert regarding phone use near the medical equipment. mobile phone use while driving, and comply with them.
explosion or other hazard. Use an authorized battery and charger only. Do not put your battery into contact with conductive objects. Since overcharging may shorten battery life, remove the phone from its Dispose of and recycle used batteries in accordance with local charger once it is fully charged. Unplug the charger, once charging is regulations. Do not dispose of batteries by burning; they may explode. complete.
with their hearing devices. Not all phones have been rated. Phones that are rated have the rating on their box or a label located on the box. The ratings are not guarantees. Results will vary depending on the user’s hearing device and hearing loss. If your hearing device happens to be vulnerable to interference, you may not be able to use a rated phone successfully.
FCC Regulatory Compliance occur in a particular installation. If this equipment does cause harmful interference to radio or television reception, which can be determined by FCC Regulatory Compliance This device complies with Part 15 of the FCC Rules.
exposure limits specified in ANSI/IEEE Std. C95.1-1992 and had been careful. Some of these products may not be compatible to use with your tested in accordance with the measurement procedures specified in product and may damage the unit or cause it to malfunction. FCC/OET Bulletin 65 Supplement C (2001) and IEEE Std. 1528-2003 If service is required on your unit and it is determined that a non- accessory Ministry of Health (Canada), Safety Code 6.
(b) Product whose mechanical serial number or electronic serial number has - Return address been removed, altered or defaced. - Daytime phone number or fax number (c) Damage from exposure to moisture, humidity, excessive temperatures or - Model # extreme environmental conditions; - IMEI # (Look for the 15 digit IMEI # behind the battery of the device.
REPLACED. No person or representative is authorized to assume for the Company any liability other than exTaped herein in connection with the sale of this product. Some states or provinces do not allow limitations on how long an implied warranty lasts or the exclusion or limitation of incidental or consequential damage so the above limitation or exclusions may not apply to you.