SLALOM USER MANUAL 1
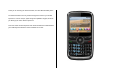
Thank you for choosing the Pantech Slalom, our latest EDGE mobile phone. The Pantech Slalom has many features designed to enhance your mobile experience. From its unique, stylish design and QWERTY keypad, we know you will enjoy the entire Slalom experience. This User Guide contains important and useful information that will maximize your familiarity with all that the Pantech Slalom has to offer.
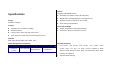
Camera Integrated 1.3M CMOS Camera Specifications z Resolution up to 1280 x 1024 (1,310,720 pixels) z Mpeg4 Video recording/playing up to 15f/s(QVGA size) Design z Self-timer function (5 seconds or 10 seconds) QWERTY Candybar z Photo album and video album Displays Dimensions & Weight z 262k colors TFT LCD with 2.4” display z Weight: 112g/3.950oz (with standard battery) z 320*240 resolution z Dimensions: 115.2 mm x 60.9mm x 9.
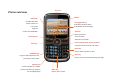
Receiver Phone overview Display Navigation Up: Write New SMS Left / Right Soft key Down: Contact List Perform the functions shown At the bottom line of the display Left: E-mail Right: IM Center: OK / Mobile Web Clear key Return to previous Speakerphone screen or delete characters in text mode.
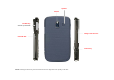
Speaker Camera Left Side key Volume up and down Charger slot / Ear mic microSD Slot Camera key NOTE: Holding the device by the internal antenna area might affect the quality of all calls.
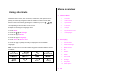
Menu overview Using shortcuts 1 Address Book Numbered menu items, such as menus, sub-menus, and options can be 1. Contacts quickly accessed by using their shortcut numbers. In Menu mode, Main 2. Add Contact 3. Speed Dial corresponding to their location on the screen. 4. Favorites Example: Accessing the Language menu. 5. Groups 1. Press Menu. 6. My Business Card 7. Yellowpages Menus can be accessed by pressing the number keys (1 to 0, 2. Press the [ , ) ] for Settings. 3.
4 Mobile Email 3. MusicID 5 Mobile Web 4. XM Radio 6 AppCenter 5. Music Videos 7 AppCenter 6. Make -UR-Tones 8 GPS 7. Community 8. Music Apps 9 1. Navigator 2. Where 12 Mobile Video 3. AllSport GPS Platinum 13 Settings 4. Shop GPS Apps YPmobile 10 My Stuff 1. Profiles 2. Display 3. Call 4. Phone 5. Network Connections 1. Applications 6. Network* 2. Audio 7. Connectivity 3. Games 8. Security* 4. Online Locker 9. Software Update 5. Picture 10.
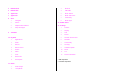
Quick & Easy Keys Functions Perform the functions shown at the bottom line of the display by using these soft keys. Scroll through the menu options in Menu mode. In standby mode, Left: Access E-mail menu Right: Access IM menu Up: Access Create Message menu Down: Access Contacts menu Work in Word search mode if pressed in the Predictive text input mode. Select a menu function or store user-input information, such as names. Also use this key for confirmation as the [OK] key.
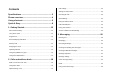
Contents Call settings ............................................................................................. 22 Settings for video share........................................................................... 23 Specifications .......................................................... 3 Checking all calls..................................................................................... 23 Phone overview ....................................................... 4 Speed dialing...............
4. Multimedia.......................................................... 37 6. Connectivity .......................................................52 Camera .................................................................................................... 38 Bluetooth ................................................................................................. 53 Photo album............................................................................................. 40 Using the Mobile Web .......
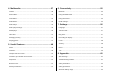
FCC Hearing-Aid Compatibility (HAC) Regulations for Wireless Devices64 FCC Regulatory Compliance ................................................................... 66 Warranty...................................................................................................
1.
2 2 3. Insert the SIM card into the slot. The gold SIM card and battery About your SIM card 1 contacts of the SIM card should go against the metal contacts of the phone. Put the contacts of the battery into the hole located at the bottom of the unit insert and When you subscribe to your network operator, you receive a SIM press the upper side of the battery until you hear the “click”. (Subscriber Identity Module) card containing your registration information, PIN code, etc. 2 4.
Turn phone on/off To turn on 1. Press and hold [ ]. To turn off 1. Press and hold [ ]. Keypad unlock Unlocking the keypad 1. Press Unlock > [ ] to unlock. Essential display indications Signal strength. The greater the number of bars, the stronger the signal. When network is in searching mode is displayed A call is being made.
Memory card 2. To copy the file back to phone, press Options > Copy to Phone. You can use microSD card as a memory To move the file to the card card. It gives you more space to save pictures, videos, music, etc. 1. Select the file > Options > Move to External Memory. 2. To move the file back to phone, press Options > Move to Phone. Inserting and removing the memory card 1. Open the memory card slot. To delete the file from the card 2. Insert the card. The [ 1.
Using the QWERTY key pad 1. Press Shortcuts in standby mode > select Unassigned. 2. Press Add. 3. Select the menu and sub menu. Your phone has QWERTY keypad which provides a superior typing experience on a small handheld for easy and comfortable texting. You can use all of the phone functions with the QWERTY keypad opened. Updating software Note: QWERTY keypad can be used when the number pad is closed. With the number pad is opened, the QWERTY keypad can not be opened.
Messaging, Mobil Web, Music player and Games & Apps. This key keeps • Games & Apps: Access Games and Applications while using the handset you from having to completely exit from your current task or window, for other tasks. whether that be a text message, a web page, or an active call, quickly do something else. Multitask functions To using multitask function, press and hold the side up key [ ].
2.
Making a call during a call 1. Enter the phone number or look it up in Address Book. Make, receive and end calls 2. Press [ Making a call hold. 1. Enter the area code and phone number. 2. Press [ ] to dial the second call. The first call is automatically put on Switching between two calls ] key. 1. Press Swap. Answering a call Making an international call 1. Press [ ]. 1. Press and hold [ ] key for the international prefix until the ‘+’ character Ending a call 1. Press [ appears. ]. 2.
3. Press [ Making video share call ]. 1. Enter the area code and phone number > [ Answering a second call** ]. 2. Press Options > Video Share. 1. Press [ ]. The first call is automatically put on hold. 2. Press [ ] to end the second call. 3. Select Live or Recorded. Note: To use video share in the Recent Calls, press Options > Video Share. The call on hold is automatically reconnected. Turning off the speakerphone Using video share 1.
Ending video share Putting a call on hold and returning** 1. Press Stop to end the video share. Putting a call on hold 2. It will ask you whether you will stop video share > Yes to stop. Note: Even you end video share, the call will not be ended. Press [ ] to 1. Press Options > Hold or press [ end the call. The recorded video will be saved in My Stuff > Video. Returning to a held call Receiving video share 1. Press Options > Unhold or press [ 1.
The call ends with that participant, but you can continue to talk to the other participants. Writing a message during a call 1. Press Options > Send Message. Searching for a number in the address book during a call For details on creating a text message, see page 30. Viewing calendar during a call 1. Press [ ] and press OK or press Options > View Contacts > 1. Press Options > View Calendar. Contacts. 2. Select a number > [ ].
NOTE: You can answer with any key except [ ] and Ignore. 3. Select IMS or Mobile Web> Select. Setting recording location Settings for video share Turning the alert on/ off 1. Press Menu > Settings > Call > Video Share. 2. Press Recording Location. 3. Select Phone Memory or External Memory > Select. 1. Press Menu > Settings > Call > Video Share. 2. Press Alerts. 3. Select On or Off > Select. Checking all calls You can view information about all Recent Calls.
Viewing Ranking calls Viewing data transmitted information 3. Press Shortcuts in standby mode or press Menu > My Stuff > Tools. 1. Press Shortcuts in standby mode or press Menu > My Stuff > Tools 4. Press Recent Calls >Call Ranking. Press Recent Calls > Packet Counter. - Current Info: You can view transmitted data in the current session, in Kbytes. Sent, Received and Total information are also available. Deleting call logs 1. 2.
Changing speed dialing person 4. To update information, press Edit. 1. Press Menu > Address Book > Speed Dial. 2. Select a number > Change or OK. Calling from the contact list 3. Select a person > OK or Select. Removing from speed dial 1. Press Menu > Address Book > Speed Dial. 2. Select a number > Delete. Using the address book You can save names, phone numbers, and information on the SIM or phone. Entries can depend on the capacity of the SIM card. 1.
3. Input the fields. 4. Press OK or Save. While in standby mode 1. Press the button once to list recent calls. Making groups 2. Press the button twice to redial the last call. 1. Press Menu > Address Book > Groups. While the phone is closed 2. You can select group either on phone or SIM. There will be defaulted groups. 3. To add new group, press Options > Add Group. 1. Press the button once to receive a call. 2. Press the button once to end the call. 4. To edit group press, Edit Group.
NOTE: PIN2 must be correctly entered within 3 attempts. If you input the incorrect code three times in a row the PIN2 code will be blocked. If the PIN2 code is blocked please contact your service provider. PIN2 code supplied with the SIM card.
3.
8 9 tuv wxyz ùü úü Entering text You can enter text with multi-tap, predictive, numeric or symbol. Predictive mode Useful keys The predictive mode automatically compares your keystrokes with an internal linguistic dictionary to determine the correct word. It will display the Functions only work when the slide is closed. most commonly used word first. The most commonly used word will appear ] [ [ ] ] Display symbols first.
1. Press [ ] to change the mode to 123. 2. Press [ ] to [ ] and [ 2. Select a message > Options > Move to SIM. ] to input numbers. Deleting a message in a mailbox Symbol mode 1. Select a message > Options > Delete > Selected > OK. You can input symbols. 1. Press [ 2. Press [ Deleting multiple messages ] to view the symbols. / / / ] to select symbol and press Insert. Messaging 1. Press Options > Delete > Multiple. 2. Select the message to erase by pressing OK. 3. Press Options > Delete.
Loading URL using Push message Reading a message from the inbox 1. Press Menu > Messaging > Inbox > OK. 2. Press Options > Load URL. 1. Press Menu > Messaging > Inbox. 2. Select a received message > View. Save connection setting using Configuration message Saving the sender address from a received message 1. Press Menu > Messaging > Inbox > OK. 2. Press Options > Install. 1. Select a received message > View. 2. Press Options > Save. 3. Select New Contact or Update Contact.
Finding all sent messages Adding a new picture to the message 1. Press Menu > Messaging > Sent. 1. Press [ ] or press Menu > Messaging > Create Message. 2. Write a message. Creating multimedia messages You can create new multimedia message. Capacity is 100Kb, 300Kb, 600Kb and an error message will alert you once you exceed the capacity. 3. Press Insert > Take New Picture. 4. Focus on the object > OK. 5. To preview the current page, press Options > Preview > Current. 6.
Message. To go back to text editor page, press Stop. 7. To edit the text message, press [ / ] to select the text box. 8. Press Send to and select the person to send message and press Select or OK. Adding a recorded voice memo to the message 1. Press [ ] or press Menu > Messaging > Create Message. 2. Write a message. 3. Press Insert > Sound. 9. Press Send. 4. Select Audio > My Voice. 5. Scroll to the saved audio clip and press Select or OK. Adding a new video to the message 1.
Message templates 6. To edit the text message, press [ / ] to select the text box. 7. To preview the current page, press Options > Preview > Current. When you often use the same phrases, you can save the message under template messages. 8. Press Pause to stop listening. 9. To preview the whole message, press Options > Preview > Whole Adding the message as a template Message. To go back to text editor page, press Stop. 10. Press Send to and select the person to send message and press 1.
3. Enter new Center Address. 2. Press Email Gateway. 4. Press Save. 3. Enter new gateway for sending text message by email address. 4. Press Save. Setting profiles for multimedia message 1. Press Menu > Messaging > Settings. Setting for receiving notice for push message 2. Press Multimedia Message > MMS Profiles. 1. Press Menu > Messaging > Settings. 3. Select a profile. 2. Press Push Message > Receive. 3. Select On or Off. Note: When you receive push message the [ ] icon will displays.
Receiving an email 1. Press Menu > Messaging > Mobile Email. 2. Select an email > OK. Using instant messenger Use Instant Messenger (IM) to send and receive short, simple messages that are delivered immediately. Starting an instant messenger 1. Press Menu > Messaging > IM. 2. Select the IM application > Select. 3. Enter login and password > Sign In. Viewing the conversation log You can view the conversations log in the Instant Messenger Saved History.
4.
In the options menu for camera Camera Icons You can take pictures and record movies using the built-in camera. The photos and video clips can be saved and sent via multimedia messages.
Camera. Zoom in and out 1. Press [ / ]. It ranges from x1 to x4. 2. Press Options > Photo Album. 3. Select the picture > OK. After taking pictures Increasing or decreasing the brightness 1. Press [ / ]. It ranges from -2 to +2. Taking a picture 1.
For details on taking a picture, see page 38. NOTE: To access Picture, press Menu > My Stuff > Picture. Viewing the recorded video clip Viewing the saved pictures 1. Press Menu > My Stuff > Tools > Video Camera. 1. Press Menu > My Stuff. 2. Press Options > Video Album. 2. Press Picture > Camera. 3. Select the video clip > OK. 3. Select a picture > OK.
Deleting multiple pictures Using video player controls 1. Press Menu > My Stuff. To Press 2. Press Picture > Camera. Pause OK 3. Press Options > Multiple Select. Play OK 4. Press OK to select more than one picture. Rewind 5. Press OK to unselect. Fast forward 6. Press Options > Delete. Control volume Viewing file information 1. Press Menu > My Stuff. 2. Press Picture > Camera. 3. Select a picture. 4. Press Options > Properties.
Audio album 2. Select a sound and press Options > Multiple Select. 3. Press OK to select more than one sound file. You can play, send, delete, moves to external memory or to phone the saved sounds. The supported formats are MP3, AAC, AAC+, and WMA. 4. Press Options > Copy to External Memory or Move to External Memory. The selected sound will copy to Audio folder in external memory card. Listening the recorded sound Sending sound file using multimedia message 1. Press Menu > My Stuff > Audio. 2.
3. Open the Sync tab in Windows Media PlayerTM in your computer. Repeat all 4. Select the music from the list and drag and drop to your device. Repeat off Note: Windows Media PlayerTM 10, 11 and Window XP version is required. Repeat Single Track Shuffle On / Off Playing the music ON: the current list of songs are randomly shuffled for playback OFF: songs play in order and are not shuffled 1. Press Menu > Music > Music Player. 2. Select the categorize using [ / ] to play the music.
6. To rename the playlist press Options > Rename Playlist. 7. To delete the playlist press Options > Delete. 3. Select the file using [ / ]. 4. Press Options > Set as Ring Tone. Note: During playing the music the file can not be set as ring tone. You Listening music with Bluetooth headset cannot set a file which is larger than 300 Kb as a ringtone. 1. While music is playing in the standby mode, Press Menu > Music > Music Player. 2. Press Now Playing > Options > Transfer to B/T Headset.
Listening the radio Music player settings 1. Press Menu > Music. Shuffling music 2. Press XM Radio. 1. Press Menu > Music > Music Player. 2. Press Settings. Watching the music video 1. Press Menu > Music. 2. Press Music Videos. 3. Select Shuffle. 4. Select Shuffle On or Shuffle Off > OK. Repeating the music 1. Press Menu > Music > Music Player. Viewing Billboard information 1. Press Menu > Music. 2. Press Make – UR – Tones. 2. Press Settings. 3. Select Repeat. 4.
Removing Volume 5. Press Menu > Music > Music Player. Previous Next 6. Press Settings. Long Press : Fast Rewind, Fast Forward Pause Play 7. Select Remove. 8. Select License Data File or All Music Contents > OK. Repeat On Media player Playing the video clip You can play video clips with the media player. NOTE: Do not use this feature illegally. Sound and video can be protected by copyright. It is illegal to copy such sound / video tracks for the purpose of selling or distribution.
Other files Shop games You can manage files in unsupported formats saved on your phone. It also 1. Press Menu > My Stuff. lists files received via Bluetooth from other devices. 2. Press Games. 3. Select Shop Games > Select. 4. Play the demo and press BUY to download the complete game. Viewing the list of the files 1. Press Menu > My Stuff. 2. Press Other Files. Managing memory Viewing memory status 1. Press Menu > My Stuff. 2. Press Used Space. 3. Use [ / ] to view the information.
5.
Alarm Calendar Setting an alarm Calendar helps you manage your schedule including your time for calls or 1. Press Menu > My Stuff > Tools > Alarms. special days. You can set a reminder on any given date with this function. 2. Press Select for new alarm for the first time. 3. Set the Cycle, Time, Alarm Sound, Alert Type, Volume, Snooze and Viewing calendar Power Alarm > Save. 1. Press Menu > My Stuff > Tools > Calendar. NOTE: Monthly view is displayed as default. Viewing the saved alarms 1.
3. Input the events > Save. NOTE: You can create events for dates from 01/01/2000 to 12/31/2099. Play OK Stop Options > Stop Control volume Side key up or down or / Notepad and voice memo Calculator, tip calculator and converter Using notepad 1. Press Menu > My Stuff > Tools > Notepad. 2. Press Select for the first time. To add new note press Create New. Using the calculator 1. Press Menu > My Stuff > Tools > Calculator. 3. Write a message. Press Save or OK. 2. Use [ Recording voice memo 3.
3. Select current unit and enter figure. 4. The result will be displayed in all other unit. Bluetooth. 3. Search for device or choose the device to send via Bluetooth and press Select. Write a message for Multimedia Message. Stop watch Using stop watch 4. Press Send to and select the person to send message and press Select or OK. 5. Press Send. 1. Press Menu > My Stuff > Tools > Stop Watch. 2. Press Start or OK. 3. Press Stop to stop. 4. Press Continue to restart. 5. Press Reset to clear. 6.
6.
Bluetooth Bluetooth technology enables free wireless connections between electronic devices within a maximum range of 33 feet (10 meters). Bluetooth 2. Press Search or press OK. 3. The available device will display. 4. To select the device press > Select. To view the details press View. 5. Enter password. Note: The other device must be in pairing mode. connection can be used to send images, text, business cards, calendar and notes or to connect to computers using Bluetooth technology.
Setting the visibility Viewing bookmarks 1. Press Menu > Settings > Connectivity > Bluetooth > Visibility. 1. Press Menu > My Stuff > Applications > Browser > Bookmarks. 2. Select Hide or Show. 2. To open the site, press Go. 3. To send via text message, press Options >Send by MSG. Naming the phone 1. Press Menu > Settings > Connectivity > Bluetooth > My Bluetooth Setting new bookmarks Info. 1. Press Menu > My Stuff > Applications > Browser > Bookmarks. 2.
Profiles. 2. Press Options > Create. Viewing certificates 3. Enter the fields > Save or press OK. 1. Press Menu > My Stuff > Applications > Browser > Manage > Security > Certificates. Editing profile 6. Press Menu > My Stuff > Applications > Browser > Manage > Using memory operations 1. Press Menu > My Stuff > Applications > Browser > Manage Profiles. 7. Select other profile > Options > Edit. > Private Data. 2. To clear the cache, press Clear Cache > Yes 3.
7.
Language Decorating the display Setting up Setting the display 1. Press Menu > Settings > Phone > Language. You can set the Wallpaper, Clock Type and Text. 2. Select Screen Text or Predictive. 1. Press Menu > Settings > Display > Home Screen. 3. Select the language > Select. Setting the menu type Time and date Setting up 1. Press Menu > Settings > Phone > Time & Date. 2. Select Auto Update, Time, Time Format, Date or Date Format > Select. 1. Press Menu > Settings > Display > Menu Type.
Note: Modifying backlight time may affect battery life. 1. Press Menu > Settings > Security > Auto Key Lock. 2. Select On. Note: The auto key pad lock time is equivalent to the backlight display time. Locks Locking the phone 1. Press Menu > Settings > Security > Phone Lock > Phone Lock. 2. Select On. NOTE: The default password is ‘1234’. To change the password press Menu To change the backlight time, press Menu > Settings > Display > Backlight Timer. Unlocking Auto Key Lock 1.
- TTY Full: User who cannot talk and hear, sends and receives a text message. Reset Resetting the phone - TTY Talk: User who can talk but cannot hear, receives a text message and sends voice message. -TTY Hear: User who can hear but cannot talk, sends a text message and 1. Press Menu > Settings > Reset 2. Enter password > Master Reset. NOTE: It will return configuration settings to default. The default password is ‘1234’. Clearing the phone 1. Press Menu > Settings > Reset 2.
8.
Input PIN1. If you cannot remember it, contact your service provider. You can still receive calls even if your mobile phone becomes locked after Alert message entering the incorrect PIN1 on three consecutive attempts. If you experience any problem while using your mobile phone, please refer to the following checklist. If the problem still persists, contact your dealer or nearest carrier.
When your mobile phone does not turn on: your local service provider. Make sure your battery is charged. Check to see if your phone works while recharging the battery. Safety information When you are unable to send a message: Either you are not registered to receive an SMS service, or you may be in an area where your network service provider cannot provide such a service. The following list shows how to maintain your mobile phone, together with precautions to take.
Safety precautions of the hospital. Switch your phone off when using medical equipment for private purposes, if Using a mobile phone while driving may be prohibited. Please check local laws and regulations with regard to the prohibition of possible. Always consult with the medical equipment’s manufacturer or an expert regarding phone use near the medical equipment. mobile phone use while driving, and comply with them.
• • Do not put your battery into contact with conductive objects. • Dispose of and recycle used batteries in accordance with local charger once it is fully charged. Unplug the charger, once charging is regulations. Do not dispose of batteries by burning; they may explode. complete. Leaving the battery in hot or cold places, especially inside a • Do not use an unauthorized charger. car in summer or winter, may reduce the capacity and life of the battery.
are rated have the rating on their box or a label located on the box. The ratings are not guarantees. Results will vary depending on the user’s hearing device and hearing loss. If your hearing device happens to be vulnerable to interference, you may not be able to use a rated phone successfully. Trying out the phone with your hearing device is the best way to evaluate it for your personal needs.
FCC Regulatory Compliance interference to radio or television reception, which can be determined by turning the equipment off and on, the user is encouraged to try to correct the FCC Regulatory Compliance interference by one or more of the following measures: This device complies with Part 15 of the FCC Rules. Operation is subject to • Reorient or relocate the receiving antenna.
tested in accordance with the measurement procedures specified in Pantech product and may damage the unit or cause it to malfunction. FCC/OET Bulletin 65 Supplement C (2001) and IEEE Std. 1528-2003 If service is required on your unit and it is determined that a non-Pantech Ministry of Health (Canada), Safety Code 6. The standards include a accessory has created the problem with your unit, the Warranty will not substantial safety margin designed to assure the safety of all persons, apply.
(b) Product whose mechanical serial number or electronic serial number has - Return address been removed, altered or defaced. - Daytime phone number or fax number (c) Damage from exposure to moisture, humidity, excessive temperatures or - Model # extreme environmental conditions; - IMEI # (Look for the 15 digit IMEI # behind the battery of the device.
REPLACED. No person or representative is authorized to assume for the Company any liability other than expressed herein in connection with the sale of this product. Some states or provinces do not allow limitations on how long an implied warranty lasts or the exclusion or limitation of incidental or consequential damage so the above limitation or exclusions may not apply to you.