User Manual Thank you for purchasing the Verizon 4G LTE Mobile Hotspot MHS291LVW. The MHS291LVW is a Global ReadyTM wireless device that enables high-speed wireless communication from your computer and easily connects at high speeds to the Internet, your corporate Intranet, and your email while you’re away from the office or out of the country. The MHS291LVW is simple to install and use.
Table of Contents Before Using 5 About this User Manual......................................................................................................5 Product Features....................................................................................................................5 Getting Started 6 System Requirements..........................................................................................................6 Introduction to the Verizon 4G LTE Mobile Hotspot MHS291LVW .........
HARDWARE Idle Screen 19 Settings 20 Wi-Fi Info................................................................................................................................20 Connected Devices............................................................................................................20 Messages...............................................................................................................................20 Network Settings.................................................
About Jetpack 41 Internet Status.....................................................................................................................41 Jetpack Info..........................................................................................................................41 Diagnostics...........................................................................................................................42 Statistic & Logs....................................................................
Before Using About this User Manual You will find all the information you need to install and to use the mobile hotspot in this user manual. Before using the mobile hotspot , you must properly install the mobile hotspot software by closely following the installation instructions. Product Features • Advanced antenna design: Efficient, innovative internal antenna design optimizes data transfer rate and sensitivity to network signals. • Supports 4G and 3G network technologies.
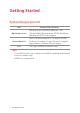
Getting Started System Requirements Item Required Specification Operating system Windows 8 (32-bit/64-bit), Windows 7 SP1 (32-bit/64-bit), Windows Vista SP2 (32-bit/64-bit), Windows XP SP3 32-bit or higher Internet Browser Microsoft Internet Explorer 7 or higher, Mozilla Firefox 3.6 or higher, Google Chrome 9 or higher, Apple Safari 5 or higher, Opera 9 higher Port One Type-A USB Port (USB 2.0 only) Note • To use Wi-Fi mode, your computer needs Wi-Fi capability and internet browser software only.
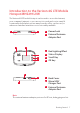
Introduction to the Verizon 4G LTE Mobile Hotspot MHS291LVW The Verizon 4G LTE mobile hotspot can be used to access the Internet, your company’s intranet, or you can use it to send and receive email. It is extremely useful when you are away from the office, on the road, or wherever a wireline Internet access is not readily available.
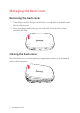
Managing the Back Cover Removing the back cover 1. Turn off your mobile hotspot and hold it securely with both hands with the front facing out. 2. Place your finger nail in the groove at the left of the mobile hotspot, and then lift it up. Closing the back cover Place the back cover over the battery compartment and press it downward until it clicks into place.
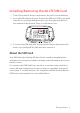
Installing/Removing the 4G LTE SIM Card 1. Turn off your mobile hotspot and remove the back cover and battery. 2. Insert the SIM card into the slot. Position the SIM card (“SIM” is inscribed near the slot opening) with the Verizon logo facing up and slide into place until it’s fully inserted. Then, close the back cover. 3. To remove the SIM card, turn off your mobile hotspot and remove the back cover. Gently pull the SIM card out to remove it.
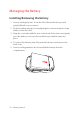
Managing the Battery Installing/Removing the battery 1. Insert your finger tip into slot at the left of the mobile hotspot and gently lift back cover to remove. 2. Slide the battery into the slot by aligning the contacts and press down until you hear the “click”. 3. Align the cover tabs with the slots on the back of the device and gently press the battery cover onto the mobile hotspot until it snaps into place. 4. To remove the battery, turn off your mobile hotspot and remove the back cover. 5.
Charging the battery 1. Connect the USB cable into the Wall/USB Charger. Note Make sure to align the connector as indicated in the image. Otherwise, the charging connector may become damaged and the battery will not be charged. 2. Plug the USB cable into the mobile hotspot’s charging port.
3. Plug the Wall/USB Charger into an electrical outlet. The battery starts charging. 4. Disconnect the charger when the battery is fully charged. About the battery The mobile hotspot uses a Lithium Ion (Li-Ion) battery. Make sure to use the authorized battery and charger only. Maximum hours to use the battery might vary depending on service types offered by the service provider and temperatures. For more details, contact your nearest dealer.
To Install USB Driver Please check if the USB port is USB 3.0 port, if then use another port which supporting USB 2.0. The use of blue pantone thermoplastics in USB 3.0 ports is recommended on systems with a mix of USB 2.0 and USB 3.0 ports. If your computer only has USB 3.0 ports, try to update the USB 3.0 host controller driver. 1. Turn on your computer. 2. Plug the USB cable into the mobile hotspot’s micro USB port. Then connect the USB cable into your computer’s USB port. 3.
5. To continue without installing the Hotfix, at the prompt, click OK. Then click Finish to complete the installation. If your computer won’t recognize the mobile hotspot, follow the steps below. 1. Open the My Computer folder and double-click Verizon Mobile. 2. Open the Windows folder and double-click the driver file. 3. The install Wizard screen will appear automatically. Click Next > Install to continue the installation. It might take a few minutes. 4.
To install the Windows Hotfix, follow the steps below. 1. When the prompt appears, leave the installation manager open, use the Wi-Fi manager(Windows OS) or AirPort menu bar icon(Max OS) to connect to the MHS291LVW wireless network. 2. Connect to the network name found on the sticker that appears on the back of the mobile hotspot as well. The network name or SSID is in the format Verizon-291LVW-XXXX Secure, where XXXX are four digits unique to your device. 3. Enter the 8-digit Wi-Fi/Admin password.
Using Mobile Hotspot Activate Your Mobile Hotspot If the device has not been activated yet, follow the instructions below to activate it. Depending on your state of account or how and where you purchased your device, it may be ready to use or may need process to be activated on your Verizon account. • If you purchased your device at a Verizon Store, it is probably activated and ready to use. • If you received your device in the mail, you can activate it by clicking My Jetpack Home > My Verizon Wireless.
3. Connect to the network name found on the sticker that appears on the back of the mobile hotspot as well. The network name or SSID is in the format Verizon-291LVW-XXXX Secure, where XXXX are four digits unique to your device. 4. Enter the 8-digit Wi-Fi/Admin password. The password appears on the back of the mobile hotspot as well. 5. You can change device settings by connecting to the on-device web page. Refer to page 29 for more information.
HARDWARE Idle Screen Settings
Idle Screen The icons on the LCD screen indicate the status of the mobile hotspot.
Settings Wi-Fi Info 1. In the idle screen, select Menu and press 2. Select Wi-Fi Name/Password and press . . 3. You can see the current Wi-Fi information about the mobile hotspot. Connected Devices 1. In the idle screen, select Menu and press 2. Select Connected Devices and press 3. Select device name and press . . . 4. You can disconnect the device by selecting Disconnect and press Messages 1. In the idle screen, select Menu and press 2. Select Messages and press . 3.
Network Settings Network Select 1. In the idle screen, select Menu and press 2. Select Network Settings and press . . 3. You can change the network type by selecting Global Mode, LTE/ CDMA Mode or GSM/UMTS Mode and press . Wi-Fi Settings Start WPS 1. In the idle screen, select Menu and press . 2. Select Wi-Fi Settings > Start WPS and press 3. Select WPS and press . . 4. Press the WPS button on your wireless router within 2 minutes to setup connection. Wi-Fi Band Select 1.
Wi-Fi Network Mode 1. In the idle screen, select Menu and press . 2. Select Wi-Fi Settings > Wi-Fi Network Mode and press . 3. You can change Wi-Fi network mode by selecting 802.11b+802.11g, 802.11b only, 802.11g only or 802.11b+802.11g+802.11n, and press . Broadcast SSID 1. In the idle screen, select Menu and press . 2. Select Wi-Fi Settings > Broadcast SSID and press . 3. You can set Broadcast SSID by selecting On or Off and press . AP Isolation 1. In the idle screen, select Menu and press .
Software Update Check for Update The Check for Update menu allows you to update software. 1. In the idle screen, select Menu and press . 2. Select Software Update > Software Check and press 3. Select Check Now and press . . 4. Follow the steps to update. Reset Factory Settings 1. In the idle screen, select Menu and press . 2. Select Software Update > Factory Reset and press 3. Select Yes and press . . 4. The mobile hotspot will be reboot automatically.
About Jetpack Jetpack Info 1. In the idle screen, select Menu and press . 2. Select About Jetpack > Jetpack Info and press . 3. You can see detailed information about the MHS291LVW. Note You can change the admin password. Refer to page 29 for more information. Data Usage 1. In the idle screen, select Menu and press . 2. Select About Jetpack > Data Usage and press 3. You can see the usage history details. 24 Settings .
SOFTWARE Start the Verizon Wireless Manager Jetpack Settings Message Center About Jetpack
Start the Verizon Wireless Manager You can configure the Wi-Fi settings on your device using the easy-to-use web-based User Interface(Verizon Wireless Manager). 1. Turn on your computer and turn on the mobile hotspot. 2. On your computer, use the Wi-Fi manager(Windows) or the AirPort menu bar icon(Mac) to connect wirelessly to the mobile hotspot wireless network.
My Jetpack Home 1. Click My Jetpack Home. 2. You can see the current status information. Data Usage 1. Click Data Usage. 2. You can review your usage history.
Connected Devices 1. Click Connected Devices. 2. Click Edit and adjust settings for connected devices. • Enter the nickname of a device in the Nickname field. • To add a device to Blocked Device Info, select Blocked Device Only from Device Filtering drop-down list, Then click Block next to Nickname field. You can also block a device by click Add and enter the MAC Address. • To delete a device from Blocked Device Info, select Blocked Device Only from Device Filtering drop-down list.
Jetpack Settings Jetpack Jetpack Admin Password 1. Click Jetpack Settings > Jetpack > Jetpack Admin Password. 2. Enter your password in the Enter Current Password field. 3. Enter the new password in the New Password field. Then enter the new password again in the Confirm New Password field. 4. Click Save Changes.
Preferences 1. Click Jetpack Settings > Jetpack > Preferences. 2. Adjust settings. • Turn off Display After: Select the amount of time that expires before the display turns off. • Automatic shutdown: Select the amount of time that expires before the device automatically shuts down. • Check USB Mode: Enables or disables the USB tethered mode feature. 3. Click Save Changes. Software Update 1. Click Jetpack Settings > Jetpack > Software Updates. 2.
Backup and Restore 1. Click Jetpack Settings > Jetpack > Backup and Restore. 2. To download(backup) the settings file to your computer, enter your administration password in the Enter Jetpack Admin Password field in the Back up section and click Download. Then click Save in the File Download pop-up screen to save the settings file to a specified location on your computer. 3.
Wi-Fi 1. Click Jetpack Settings > Wi-Fi. 2. Adjust settings for Wi-Fi. • Wi-Fi On/Off: Turn Wi-Fi on or off. • Wi-Fi Name (SSID): Enter the name of the MHS291LVW device’s wireless network. • Display the Wi-Fi Name on Jetpack screen: Displays the current Wi-Fi name. • Broadcast Network Name (SSID): Displays the current Wi-Fi name. • Security: Select the security type used to encrypt the wireless network. • Wi-Fi Password (Key): Enter the new password of the Wi-Fi connection.
• Max Wi-Fi Connections: Select the maximum number of devices that can be connected. • 802.11 Mode: Select the wireless network technology used. 802.11g + 802.11b + 802.11n is most compatible, allowing both 802.11b, 802.11g, and 802.11n devices to connect to the wireless network. • Wi-Fi Multimedia (WMM) Mode: Wi-Fi Multimedia enables your device to stream multimedia files. • Wi-Fi Privacy Separation: Enables or disables the privacy separation feature. 3. Click Save Changes. Advanced Networks 1.
Network Selection Automatic Selection 1. Click Jetpack Settings > Advanced > Networks. 2. Select GSM/UMTS Mode from Network Type drop-down list. 3. Select the network subtype from Sub type drop-down list. 4. Select Automatic from Network Selection drop-down list. 5. Click Save Changes. Manual Selection 1. Click Jetpack Settings > Advanced > Networks. 2. Select GSM/UMTS Mode from Network Type drop-down list. 3. Select the network subtype from Sub type drop-down list. 4.
SIM 1. Click Jetpack Settings > Advanced > SIM. 2. To lock the SIM card, select Turn on PIN Lock from Desired Action drop-down list. Enter the PIN code in the Enter Current SIM PIN field. 3. Click Save Changes. GPS 1. Click Jetpack Settings > Advanced > GPS. 2. To enable the GPS, click Start > Apply. 3. Click Yes to accept the notification.
Firewall 1. Click Jetpack Settings > Advanced > Firewall. 2. Adjust settings. • VPN Passthrough: If this is On, this feature allows VPN clients to connect through the mobile hotspot to remote VPN servers. If this is Off, VPN clients will not be allowed to connect. • Enable DMZ: Enables or disables the DMZ feature. The DMZ feature allows all unknown traffic to be sent to a designated IP address. • Destination IP Address: Enter the IP address for the DMZ feature. 3. Click Save Changes.
LAN 1. Click Jetpack Settings > Advanced > LAN. 2. Adjust settings. • IP Address: Enter the IP address for the mobile hotspot. • Subnet Mask: Enter the subnet mask address for the mobile hotspot. The default value 255.255.255.0 is standard for small networks. If you change the IP Address, ensure you use the current subnet mask for IP address range. • Host Name: Enter the network name for connected device.
Port Filtering 1. Click Jetpack Settings > Advanced > Port Filtering. 2. The Port Filtering allows you to block outgoing internet connections. When the Port Filtering is enabled, you must select a port filtering application in the Applications to allow that application to connect to the internet. 3. Enable each port filtering application that are needed to access the internet. 4. Click Add Custom Application to define and enable custom port filtering application.
Port Forwarding 1. Click Jetpack Settings > Advanced > Port Forwarding. 2. The Port Forwarding allows you to forward incoming traffics from the internet to a particular connected computer or device that are connected to the wireless network of the mobile hotspot. 3. Click Save Changes. Note The Port Forwarding and DMZ features cannot be used simultaneously.
Messages 1. Click Messages. 2. You can see the received messages. 3. Click to delete a message. You can also click Delete All to delete all messages.
About Jetpack Internet Status 1. Click About Jetpack > Internet Status. 2. You can see the detailed information about current internet status. Jetpack Info 1. Click About Jetpack > Jetpack Info. 2. You can see the detailed information about the mobile hotspot.
Diagnostics 1. Click About Jetpack > Diagnostics. 2. You can see the information about the mobile hotspot firmware and other system-level information. This screen is used mostly for troubleshooting and is not required for normal operation.
Statistic & Logs 1. Click About Jetpack > Help and Support > Statistics. 2. You can see the data usage statistics. Click Reset to reset the statistics. 3. Click Logs. 4. You can see detailed usage logs. • To export a log file, click click Export File. and select start date and end date. Then • To review the log for specified time period, click date and end date. Then click Filter File.
Help and Support 1. Click About Jetpack > Help and Support. 2. It allows you to provide contact information and useful links for you to use the mobile hotspot.
Troubleshooting Windows XP(SP3) Symptom 1 The RNDIS device no longer works correctly. For example, the data application on the computer may report an error that the data transmission has failed. To resolve this problem, you have to restart the computer. Resolution Consider the following scenario: • A Remote Network Driver Interface Specification (RNDIS) device is installed on a Windows XP-based computer, such as a USB radio device. • You perform a surprise removal of the RNDIS device from the computer.
Windows Vista(SP2) Symptom 1 A bus driver that manages a Network Driver Interface Specification (NDIS) miniport is not loaded as expected. Therefore, a yellow exclamation mark (!) appears in Device Manager next to the device that is driven by the miniport. The driver also displays error code 38 (CM_PROB_DRIVER_FAILED_PRIOR_ UNLOAD). For example, this problem may occur on a bus driver that manages a USB composite device that includes a network adapter.
Windows 7 / Vista(SP2) Symptom 1 The communication between the modem and the computer stops. Additionally, a yellow exclamation mark (!) appears next to the device name in Device Manager. Resolution Consider the following scenario: • You have a computer that is running Windows 7, Windows Server 2008 R2, Windows Vista or Windows Server 2008. • You attach a USB Remote Network Driver Interface Specification (RNDIS) device to the computer through an external USB hub.
Windows 7 Symptom 1 Windows does not load the WWAN adapter driver. Additionally, you receive an error message that resembles the following: Windows cannot load the device driver for this hardware because a previous instance of the device driver is still in memory. Resolution Consider the following scenario: • You have a Windows 7-based or Windows Server 2008 R2-based computer that uses a third-party Wireless Wide Area Network (WWAN) adapter.
Glossary • 1X — Internet at 1/10 the speed of EV-DO. • 3G — Third Generation. 3G refers to the third generation of mobile telephony technology. • 4G LTE — Fourth Generation. 4G LTE refers to the fourth generation of mobile telephony technology. • 802.11 (b, g, n) — A set of WLAN communication standards in the 2.4, 3.6 and 5 GHz frequency bands. • bps — Bits per second. The rate of data flow. • Broadband — High-capacity high-speed transmission channel with a wider bandwidth than conventional modem lines.
• HTTP — Hypertext Transfer Protocol. An application-level protocol for accessing the World Wide Web over the Internet. • IP — Internet Protocol. The mechanism by which packets are routed between computers on a network. • IP Type — The type of service provided over a network. • IP address — Internet Protocol address. The address of a device attached to an IP network (TCP/IP network). • Kbps — Kilobits per second. The rate of data flow. • LAN — Local Area Network.
• Router — A device that directs traffic from one network to another. • SIM — Subscriber Identification Module. Found in LTE and GSM network technology, the SIM is a card containing identification information for the subscriber and their account. The SIM card can be moved to different devices. • SSID — Service Set IDentifier. The name assigned to a Wi-Fi network. • TCP/IP — Transmission Control Protocol/Internet Protocol. The set of communications protocols used for the Internet and other similar networks.
Safety and Warranty Regulatory Notices MHS291LVW complies with Parts 15, 22, 24, and 27 of the FCC rules. This mobile hotspot must not be co-located or operated in conjunction with any other antenna or transmitter. If you use this mobile hotspot in any other configuration, the FCC RF Exposure compliance limit can be exceeded. Warnings and Cautions • Modifying or changing this mobile hotspot without express authorization can nullify compliance with RF exposure guidelines.
• This mobile hotspot does not exceed the Class B limits for radio noise emissions from digital apparatus as set out in the interference causing equipment standard entitled “Digital Apparatus”, ICES-003 of the Department of Communications. • If you have purchased this product under a United States Government contract, it shall be subject to restrictions as set forth in subparagraph (C)(1)(ii) of Defense Federal Acquisitions Regulations (DFARs) Section 252.
Safety Information for Mobile Hotspot READ THIS INFORMATION BEFORE USING YOUR MOBILE HOTSPOT Exposure to radio frequency signals Your mobile hotspot is a low power radio transmitter and receiver. When it is ON, it receives and also sends out radio frequency (RF) signals. In August 1996, the Federal Communications Commissions (FCC) adopted RF exposure guidelines with safety levels for mobile hotspot. Those guidelines are consistent with the safety standards previously set by both U.S.
Electronic devices Your mobile hotspot is a low power radio transmitter and receiver. When it is ON, it receives and also sends out radio frequency (RF) signals. Most modern electronic equipment is shielded from RF energy. However, certain electronic equipment may not be shielded against the RF signals from your mobile hotspot. Therefore, use of your device must be restricted in certain situations.
Posted facilities Turn your device OFF where posted notices require so. Other safety guidelines Aircraft FCC regulations prohibit using your device while in the air. Turn your device OFF before boarding an aircraft. Always request and obtain prior consent and approval of an authorized airline representative before using your device aboard an aircraft.
Precautions Your mobile hotspot is a high quality piece of equipment. Before operating, read all instructions and cautionary markings in the User Guide. • DO NOT use this equipment in an extreme environment where high temperature or high humidity exists. • DO NOT abuse the equipment. Avoid striking, shaking or shocking. When not using, lay down the unit to avoid possible damage due to instability. • DO NOT expose this equipment to rain or spilled beverages. • DO NOT use unauthorized accessories.
Safety Information for FCC RF Exposure WARNING! READ THIS INFORMATION BEFORE USING CAUTIONS In August 1996 the Federal Communications Commission (FCC) of the United States with its action in Report and Order FCC 96-326 adopted an updated safety standard for human exposure to radio frequency electromagnetic energy emitted by FCC regulated transmitters. Those guidelines are consistent with the safety standard previously set by both U.S. and international standards bodies.
SAR Information THIS MODEL MEETS THE GOVERNMENT’S REQUIREMENTS AND EUROPEAN UNION (EU) STANDARDS FOR EXPOSURE TO RADIO WAVES. Your mobile hotspot is a radio transmitter and receiver. It is designed and manufactured not to exceed the emission limits for exposure to radio frequency (RF) energy set by the Federal Communications Commission of the U.S. Government. These limits are part of comprehensive guidelines and establish permitted levels of RF energy for the general population.
as in compliance with the FCC RF exposure guidelines. SAR information on this model is on file with the FCC and can be found under the Display Grant section of http://www.fcc.gov/oet/fccid after searching on FCC ID: JYCORBIT. Additional information on Specific Absorption Rates (SAR) can be found on the Cellular Telecommunications Industry Association (CTIA) web-site at http://www.ctia.org. * In the United States and Canada, the SAR limit for mobile phones used by the public is 1.
This equipment generates, uses, and can radiate radio frequency energy and, if not installed and used in accordance with the instructions, may cause harmful Interference to radio communications. However, there is no guarantee that interference will not occur in a particular Installation.
This Warranty does not apply to: (a) Product subjected to abnormal use or conditions, accident, mishandling, neglect, unauthorized alteration, misuse, improper installation or repair or improper storage; (b) Product whose mechanical serial number or electronic serial number has been removed, altered or defaced.
To obtain repairs or replacement within the terms of this Warranty, the product should be delivered with proof of Warranty coverage (e.g. dated bill of sale), the consumer’s return address, daytime phone number and/or fax number and complete description of the problem, transportation prepaid, to the Company at the address shown below or to the place of purchase for repair or replacement processing.
IN USA: Personal Communications Devices, LLC 1516 Motor Parkway Hauppauge, NY 11749 1-800-229-1235 IN CANADA: PCD Communications Canada Ltd. 5535 Eglinton Avenue West, Suite 210 Toronto, Ontario M9C 5K5 1- 800-465-9672 ©2013 Verizon Wireless. All Rights Reserved.