USER MANUAL
Characteristic Specification Display Dual c lamshell TF T LC D both Main & S ub.
Caution Please c hec k and follow simple guidelines below for your safety, and for the proper operation of the phone. F urther detailed information is given in the Appendix. ANTENNA Use of the antenna not proved by the phone manufac turer c an c ause severe damage or malfunc tion to the mobile. TRAF F IC S AF ETY F irst c hec k and make sure the traffic regulations related to the wireless phone use. Don’ t use a hand- held phone while driving a vehic le.
C onsult a physic ian or the manufac turer of the medic al devic e if you have any questions about using the phone in hospital. PUBLIC PLAC E Do not switc h on the phone in the area where wireless phone use is prohibited. BOARDING AN AIRC RAF T S witc h off your phone before boarding an airc raft. The use of wireless telephones in an airc raft may be dangerous to the operation of the airc raft.
guarantee the permitted guidelines, and also c an not assure the safety of all persons, regardless of age and health. PROPER US AGE Use the phone only in its normal operating positions. Don’ t touc h or bend the antenna unnec essarily while you are c alling. It may degrade the c all quality and eventually limit the battery’ s performanc e. Do not attempt to open the phone. Non- expert handling may damage it. Use only the supplied or approved batteries, c hargers and ac c essories with this phone model.
Table of contents C aution C omponents Handset desc ription Internal LC D(Main LC D) S ub- L C D Menu options F unc tion keys Quic k start Getting started Basic c all func tions Menu func tions i. Message ii. C all logs iii. S ound iv. S ettings v. Net servic e vi. Organizer vii. F un & Tools viii. S TK ix. Phonebook x. Hot folder Appendix - How to use T9 & etc .
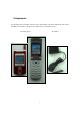
Components The pac kage items may differ from the ones shown below. The items depend on the servic e provider’ s spec ific ation, and the pic ture below is for user referenc e only.
Handset Description * For detail usage of key Earpiece Ant enna LCD display Ear- m icrophone Menu key N Side keys OK key N Navigat ion keys Sub display Cam era key Clear key N Alphanum eric keys Microphone Power Adapt or Connect ors Ant enna Cam era Ear- m icrophone Side key s Pow er Adapt or Connect ors 8
Internal LCD(Main LCD) T here are two areas in both L C D display s (Main and S ub). One is for icons to show the status of the mobile phone. T he other is to show message, phone number, icons and etc. Ic ons are displayed when spec ific func tions are ac tive or when you have rec eived a message. The figure above shows an overview all possible ic ons and where they appear.
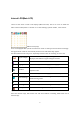
Sub-LCD Menu options Your mobile phone provides extra options for you to selec t with sub—LC D menu. The following sec tions desc ribe options in the sub- LC D menu and their func tions respec tively. There is the ways to ac c ess the menu options: [ Normal ac c ess ] In standby mode with flip c lose, press [ Vol Down] key to enter the list menu sc reen. Press [ Vol Up] /[ Vol Down] keys to browse between the func tions in the main sc reen, then press [ C amera] key to selec t and enter.
F lash ON You c an turn on the c amera flash for emergenc y light . (1). On standby mode, keep pressing [ Vol Up] key to turn on the flash (2). Release the key to turn off the flash.
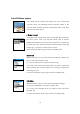
Function keys There are function keys, which have one and more features. Following table shows list of function keys. Function keys Key I con Name S END KEY END KEY OK KEY Key Function Press this key to make a c all, or answer inc oming c all (exc ept ANY KEY ANS WER). Press this key long to redial a last c all number. Press this key onc e to retrieve the list of last dialed. Press this key to end a c all, to return to standby state in menu (C anc el, Exit).
Quick start F ollow steps below for the first time use; Install the S IM c ard When you subsc ribe to a c ellular network, you are provided with a plug- in S IM c ard loaded with your subsc ription details (PIN, optional servic es available and so on). If nec essary, switc h off the phone by holding down [ END] key until the powering down message is displayed. 1. Remove the battery 2. C hec k the S IM slot c lear, and plac e the S IM c ard into slot 3.
Install the battery Insert tabs on the base of the battery into the notc hes on the base of the phone, as shown bellows: 1. Insert the bottom of battery into the groove at the bottom of the handset. 2. Press in the top of the battery until you hear a c lic k. C harge the battery Your phone is powered by a rec hargeable Li- ion battery. A travel adapter is provided with your phone. Use only approved batteries and c hargers. Ask your loc al PANTEC H dealer for further details.
Getting started 1. Turn on the phone power Long key press (3 sec onds) [ END] key to turn the phone power on. 2. Turn off the phone power Long key press [ END] key to turn the phone power off. 3. Make a call Phone power on by long key press [ END] key. Insert S IM c ard into S IM slot if “ Insert S IM c ard” message showed. Enter your PIN1(Maximum up to 8 digits) and to unloc k handset(if applic able.) After the PIN is ac c epted, network searc hing is started automatic ally.
6. Adjust the earpiece volume When you are speaking with your phone, press the volume adjustment keys on the side of the phone to adjust volume of the earpiec e. S even levels of volume are available for your selec tion. 7. Browse main menu Press [ Menu] key to enter main menu in standby mode. Press [ End] key to exit menu to standby sc reen With navigation keys, [ up] [ left] and [ down] [ right] , you c an browse among menu items.
Basic call functions 1. S peed Dialing There are two ways for you to do one- touc h dialing while in standby mode: You c an use the 100 rec ords[ 00- 99] saved in the Phone book by long pressing the desired number. F or instanc e, if the number is saved in the Phone book at the loc ation of 5, long press [ 5] key to initiate the c all. 2.
7. Inc oming c all waiting (This is the Network and subsc ription dependent feature. Not available in all areas.) When a c all c omes in, you c an press [ MENU] keys to enter the c all options. [ MENU] 1. Answer 2. Rejec t 3. I am busy If another c all c omes in while you are on the phone, you c an: Press [ End] key to rejec t the waiting c all. Press [ S end] key to hold on the ac tive c all and c onnec t to the waiting c all. 8.
End all calls - Under a c irc umstanc e of multi- party c all, you c an end all c alls on one of them by selec ting this func tion.
Menu functions MENU TYPE There are two types of Menu in this phone. One is basic menu, and the other is hot folder menu. To enter the main menu, press one of , 20 , and Keys.
1. Messages Y ou can send new messages, and check received messages 1.S MS /E MS EMS (Enhanc ed Messaging S ervic e) is sent via S MS (S hort Message S ervic e). You c an add pic ture, animation, melody, message and emotic on to a text message, and format the text, using EMS (Enhanc ed Messaging S ervic e). Before you start Y ou must make sure that the number of your servic e c enter is set. Usually, The number is supplied by servic e provider and is saved on the S IM c ard. 1.1 C reate 1.2 Inbox 1.
1.4.1 Message c enter 1.4.2 Message lifetime 1.4.3 Message format Eac h func tion is desc ribed as follows in detail. Message c enter - - Allows the address (URL) of the proxy relay or MMS C to be set. Message lifetime - C ontrols the lifetime of c reated messages (1 hour – 6 months) Message format – (normal, fax, voic email, ermes, nation’ l paging, x.400, internet) 3.
Reading Inbox and Outbox messages 1. Inbox 1. S c roll to “ Inbox” and press [ OK] key. 2. Press [ OK] key from the Inbox messages. 3. Press [ Menu] key. 4. Now, You c an selec t “ Edit” , “ Delete” , “ F orward” , ” Text Reply” or “ Voic e c all” as you want. 2. Outbox 1. S c roll to “ Outbox” and press [ OK] key. 2. Press [ OK] key from the Outbox messages. 3. Press [ Menu] key. 4. Now, You c an selec t “ Edit” , “ Delete” , or “ F orward” as you want. C reating and sending a message 1.
Text style You c an c hange the text format in a text message. 1. While writing your message press [ MENU] key. 2. S elec t “ Text style” and press [ OK] key. 3. S elec t format “ Underline” , “ Bold” or “ S trikeout. T9 options You c an find how to edit with this options in appendix page, whic h explains how to use T9 editor. 2. S ending a text message 1. S c roll to “ C reate” and press [ OK] key. 2. Write your message and press [ OK] key. 3. S c roll to “ S end” and Press [ OK] key. 4.
Rec eiving a message When you rec eived a text message, the user will be alerted to the arrival of a message in the c onvention manner. When the user reads an inc oming message the c ontents are analyzed and displayed on the sc reen. To read the text message Message is saved in “ Inbox” in text message menu. Press [ OK] to read the text message. S aving inc oming text message Inc oming text messages are saved in the S IM c ard. When the S IM c ard is full, you c annot rec eive messages any more.
2.MMS C reating and S ending a message A new message is c reated by ac c essing the “ New message” . The user is presented with a sc reen showing the first page in a blank MMS message. Notic e! The sc reen displays the page with an informational/status bar above the message showing: The presenc e of any sounds or attac hments on the c urrent page. The size of the whole MMS in bytes or kilobytes. The c urrent page number/total number of pages. C reating multimedia message 1.
wish to add and press [ ok] key. Then, the ic on is shown in the top of the sc reen. To add a text, Press [ MENU] key and selec t More - > Objec t properties - > selec t text files(*.txt) to add and press [ OK] key. Then, you c an see Objec t Property menu. Now, let’ s c ontrol for how long the c urrent page is shown when read. S elec t “ Displayed after” and press [ OK] key. And sc roll 4 sec onds To add a new text press [ MENU] key and selec t Add page then enter text you want to write.
7. Press [ MENU] key and selec t Preview for c orrec tion. At the end of c orrec tion, press [ C ANC EL] - > [ MENU] key and selec t Done. 8. In the shown Address option menu, move down to the “ To:” line and press [ OK] key with the “ Add address” line selec ted. 9. When done entering phone number Press [ OK] key. 10. S elec t “ S ubjec t” line with [ OK] key and write your subjec t. 11. And selec t the S end orS end later line and press [ OK] key.
3.Voic email [ MENU] 1. C all 2. On 3. Off 4. S ettings With this func tion, you c an c all the voic e mailbox provided by your network servic e provider to listen to the voic e mail. You c an enter this item by selec ting C all and the phone dial the designated voic e mailbox number for you automatic ally. Eac h func tion is desc ribed as follows in detail. C all - The Phone makes a c all to pre- defined voic e mailbox system to get voic email.
4.C ell broadcasts [ ME NU] 1. Read new 2. Read info 3. S ettings You c an rec eive c ell broadc ast offered by your network servic e. This func tion is to set and to read info message(C ell Broadc ast)provider, and c hoose preferring topic s and languages. Eac h func tion is desc ribed as follows in detail. Read new Read info - You c an rec eive the message that Newsflashes and Distric t from offered by network servic e.
2. C all logs With this func tion, you c an set Rec eived c alls, Dialed numbers, Missed c alls, C lear logs, C all timers and C all c osts. 1) Rec eived c alls This func tion displays the phone number of the rec eived c all. Phone number of rec eived c all c an operate rec eived time view, phone number store, delete. 2) Dialed c alls This func tion displays the list of phone number dialed. With menu key, “ C all time” and “ Add to Pbook” features c an be displayed.
return to the previous list window by pressing one of OK key, C LR key, and END Key. To store a number in the log into the P- Book, selec t the number by using sc roll up/down key, and press MENU key. Then, POP window shows “ add to P- Book” and press OK key. To send S MS to the number in the list, move to the number by using sc roll up/down key, and press ME NU key. Then sc roll to the “ S MS ” popup menu, and press OK key.
This func tion displays the c ost of the last c all with units. [ 2] All c alls This func tion displays the c ost of all c alls with units. /****You c an also c lear logs with PIN2 authorization. ****/ [ 3] C lear logs This func tion is to c lear all logs of c all c ost related after you enter PIN1. [ 4] C ost units You c an read defined unit or set the unit of c ost in servic e area. This func tion has following sub- options to selec t. - Read units : You c an read of C ost unit.
last time. (3) GPRS all This func tion display the total kbyte sent and rec eived. (4) C lear logs This func tion is to c lear all logs of GPRS related.
3. S ound You c an set a sound for ringing, message, key, flip, and etc . 3.1 Ringing setting 3.2 Message alert 3.3 Key tone 3.4 F lip Open tone 3.5 S ound effec t 3.1 Ringing S ettings Ring Type Ring; ring with one of melody, bell, voic e sound, natural sound, or my melody. Vibration; no sound, just vibration. Vib then Ring; ring after vibration. Vib and Ring; ring and vibration c ome together. Asc ending; ring gets louder and louder. None(Quit); no ring, no vibration. Only lamp.
3.2 Message alert - S elec t mode Onc e/Every 2 mins/Every 5 mins/off tone alerts that there is no message arrived in every 2 minutes/5 minutes. - Tones Bell 1/Bell 2/Bell 3 (the number of Tone will c hange in the near future) Message Tone selec tion - volume Ringing volume has total 8 steps (0~ 7). 3.3 Key Tone S etting: On/Off Tones DTMF /Beep/Voic e (the number of Tone will c hange in the near future).
3.5 S ound effec t C onnec tion/Minute minder/Disc onnec tion/Area alerting /On&Off melody/menu moving Melody plays when one of the c hec ked c onditions is satisfied. [ detail desc ription of sound setting] S etting the bell/vibration/volume selec t the S ounding S etting in the S ound Menu, and sc roll to the bell/vibration/volume by using Up/Down/Left/Right key. Press OK key to save the setting. If you do not want to store the setting, press C LR or END key.
F lip Open Tone sounds when the F lip opens. S ound effec t C onnec tion tone sounds when the Outgoing C all is alerting. Minute minder sounds in every 1 minute while talking on a c all. Disc onnec tion alerts the release of the c urrent C all. Area alerting sounds when the phone goes out of servic e area. On & Off melody sounds when the Phone is On/Off. Menu moving tone sounds when moving to another menu. S elec t a tone item by using Up/Down key, and set/reset with the Right/Left key.
4. S ettings You c an c hange items below. 1. Display 1.1 Visual setting 1.1.1 S c reen Option You c an c hange eac h sc reen image as shown below.
1.1.2 S c reen Option You c an c hoose display options for the handset idle sc reen. There are three option and shown below. S c reen option : you c an c hange the display image of idle sc reen. Display string : you c an c hange the string of the idle sc reen. F ont c olor : you c an c hange the font c olor in handset. To move to eac h option, use the up/down key. S c reen option you c an one of 4 images to be displayed by using left/right key. Normal image : display the image set in S c reen setting.
D- day : display the D- day message. You c an input the D- day message in organizer\ sc heduler. F ont c olor You c an c hange the all text c olor in the handset. There are Red, Blue, Green, and Dark grey inc luding default c olor. 1.2 Greeting You c an insert greeting message. 1.3 C ontrast You c an set Main LC D Brightness, Main LC D c ontrast, S ub LC D c ontrast.
1.4 Bac klight You c an set the Light Level of Main S ub LC D. Use Navigation [ UP/DOWN] Keys to move up and down to the mode you want to c hange and then use Navigation [ RIGHT/LEF T] keys to c hange the value. 1. Light level(off, low, medium, high, maximum) A. You c an set the brightness of LED Bac k light while it is on. 2. Minimal bright(off, low, medium, high, maximum) A. You c an set the brightness of the LE D Bac k light while it is off after the Light Duration is expired.
2.2 S et date Press OK key and store when you move the c ursor to the date you want. 2.3 S et time zone Press OK key and store when you c hoose the time zone you want. 2.4 Display S et the time format as 12 hour or 24 hour. S et the date format as one of D:M:Y, M:D:Y, or Y:M:D. C hoose the display as one of Time only, Date only, or Date & Time.
Press OK key and store when you c hoose proper options. 3. Language Language S elec t the language to be displayed. c hoose one of lists, and press OK key. when c hoosing Automatic , it shows the Language Preferenc e stored in S IM. 4. Reset settings Reset settings Restore the saved setting values into the default values.
5. Information 5.1 Own number You c an input, edit, store, and delete your phone number. If there is no number stored, List empty shows. When press OK key in this state, it goes to the own number edit window. Input the numbers in the editor and press OK to store the number. If there is any number stored, press ME NU key and selec t a menu you want. 1. Edit : modify and edit the number. 2. Add : add new number. 3. Delete : delete the number. you c an input Own number up to 2 5.
6. Voic e LE D You c an set voic e LE D func tion. When the voic e LC D func tion sets on, the sub LC D is flic kering with different c olors depending on the rec eiver’ s voic e in ac tive c all state.
5. Net S ervic es 1. Divert c alls Divert c alls – With this options, you c an redirec t your inc oming c alls to another number predefined by you. Also you c hoose a forwarding rule to eac h servic e. 1. 1 All c alls Divert all c alls – You c an redirec t all of voic e c alls, data, fax and messages to another number. 1. 1. 1 On S elec t ON to direc t all of the servic es provided by network, voic e c alls, data, fax, and messages.
1.2 When busy c alls diverted when handset is engaged on another c all – When your handset is already c onnec ted to a c all, you c an c hoose this option to be diverted to another number. You c an set this as shown in 1.1[ Divert All C alls] . 1.3 On no answer c alls diverted when handset does not answer – This option allows you to divert the c alls to a predefined number. When you c annot answer the phone in 5 sec onds to 30 sec onds (you should enter this timeout period), the c all is diverted.
1. 5 C anc el all C anc el all the diverts you set – You c an c anc el all the diverts by using this option. 2. C all S ettings C all settings – You c an c hoose one of a number of features for c ontrolling the way in whic h you make and rec eive c alls. 2. 1 Answer type Answer type – When a c all is inc oming to your handset, you c an c hoose the way you start to answer. 2. 1. 1 F lip open S elec t “ F lip open” to c onnec t a c all by opening the flip. 2. 1.
2. 2 C all waiting C all waiting – Your handset c an warn you when you’ ve got a sec ond c all while you are already in a c all. 2. 3 C aller number S how c aller’ s number or c alled number – You c an see the number of the c aller or you c an show your number to the c aller when some c aller is making a c all to you. And vic e versa. 2. 3. 1 S how c aller no This option shows the number of the handset making the inc oming c all 2. 3.
2. 3. 4 C all settings - > C aller number - > Hide if c alled You c an hide your handset number from any c allers. This func tion overrides “ S how c aller no” 2. 3. 5 C all settings - > C aller number - > C aller name You c an see the name matc hed to c aller’ s handset number if the number and its c orresponding name is registered in your phone book. 2.
the network. - Delete: delete the network name (3) N/W selec tion You c an selec t network with your flavor or make a list of network that you like out of the available networks. [ 1] Automatic A network c an be selec ted automatic ally. [ 2] Manual You c an c hoose a spec ific network to subsc ribe. (4)C hange password The network password is available from your network servic e provider. It is also used for setting Network C all Barring options and is not the same as your S IM c ard PIN1. 4.
- Loc k : When the handset is power- up, PIN1 password is required to ac c ess the main menu. - Unloc k : When the handset is power- up, no PIN1 is required and you c an see the main menu. - C hange PIN : This menu is visible when “ S IM loc k setting” is set to “ Loc k” . The user c an c hange PIN1 immediately. (2) Handset loc k Your handset c an be loc ked to prevent c alls being made unless the c orrec t handset loc k c ode is entered when it is switc hed on.
selec t the List of bar outgoing menu. A List of prefixes is showed then you c an add, or edit, or delete one entry or the entire list. After setting c all barring, your phone will display the message “ C all fail C all barred” , when you make a c all whic h restric ted by you. - S ub option : Bar all, Bar prefixed, Unloc k (4) N/W barring This feature is dependent on network servic e provider and subsc ription. S ome of the bars are set by the network servic e provider.
- S tatus : to see whether the c all is barred or not [ 6] C lear all After selec ting a c all type, ac tivate or deac tivate servic e type of information as following.
- C lear all : The all the pre- set C UG identifiers and C UG names are erased. [ 2] S elec t 1.C UG name list spec ified by the user is displayed 2.
6.Organizer In Organizer, you c an set alarms, keep trac k of events, make notes, use a simple c alc ulator, c onvert measures, and time events. 1. Alarm Navigation [ Left] Button Æ 1.Alarm You c an set alarms to ring for onc e, or on daily or weekly base. [ Default sc reen without any alarm registered] Adding & Deleting alarms Press [ Menu] key - > [ OK] button. F ill in the alarm time and sc roll down onc e to On/Off toggle bar. Then, dec ide On or Off.
[ repeat type : Onc e] [ repeat type : Daily] [ repeat type : Weekly] If you c hoose [ Onc e] , then it will ring just onc e on the given Alert Date. If you c hoose [ Daily] , then it will ring every day at the given time. If you c hoose [ Weekly] , then it will ring on the weekdays you c hec k by pressing Navigation Right [ - >] key. S elec ting alarm melody, Press [ Menu] key then you will see a popup menu where if you selec t [ Melody] , you c an selec t alarm melody you like to hear.
Up to 5 alarms c an be added. 2. S c heduler Navigation Left [ <] key Æ 2.S c heduler You c an keep trac k of your events by putting short notes and alarms on the c alendar. You will see a blue rec tangular c ursor on the c alendar whic h you c an move around with navigation keys. [ C alendar without any event set] Adding & deleting E vents Move the blue rec tangular c ursor onto the date on whic h you want to put an event. Then press [ Menu] key - > selec t [ Add Event] .
Then you will see following sc reens. – Use navigation keys to sc roll up and down. 1) Event : You c an c hoose the type of the event ( Meeting, C all, restaurant, entertainment, birthday, Travel, and Others). 2) Memo : Press [ - >] to put a short note about the event. 3) Time : S et the alarm time. 4) Alarm alert : You c an set when the alarm to ring (On time, 1Hour Before, 2Hour Before, 1Day Before, 2Day Before, and No alerting ) 5) repeat : You c an set how often the event happens.
OK Æ MenuÆ Press [ Menu] key and then you will see a popup menu. 1. Add Event : To add anther event on the selec ted day. 2. On D- day : S how you how many days are left until the event. 3, 4 Delete & Delete All : Deletes one or all of events registered on the selec ted day. 5. Memory Info : shows the number of events registered.
3. Memo You c an keep short notes on your phone. Press [ MENU] then you will see following sub menus. 1. Add : You c an c reate a short note. 2. Delete : Delete the selec ted note. 3. Delete all : Deletes all notes. After you are done with writing, press [ OK] key to save the note. You c an edit notes by pressing [ OK] key on the list view. You c an keep notes up to 20.
4. C alc ulator Addition, subtrac tion, multiplic ation, and division of dec imal numbers are supported. One of the four operators is selec ted with navigation keys. [ Ok] key gives you the result of c alc ulation. Press [ *] Key to set point and [ # ] to toggle the sign of number. E xample : [ Keypad 6X 5/2+ 2= 6] , [ S croll Left] , [ 5] , [ S c roll Right] , [ 2] , [ S c roll Up] , [ 2] , 5.
S elec t the result unit pressing navigation [ Left] key or [ Right] key. This c onverter displays the result value c onverted whenever entering the target value or c hanging the target unit/result unit. It is impossible some of units are c onverted. In that c ase, this c onverter displays the result value as zero. 6. S top Watc h You c an time an event using this stopwatc h func tion. The stopwatch c an be operated with the navigation key.
7. F un & Tools 1.Games - Smokey In the middle age, at the peac eful forest Village, Dark monsters (S mokey) haunt and make there very dirty. The duty of a sorc erer boy is keeping the village c lean and peac eful. He must c atc h and c age them up. He c an only push the monsters in the c ages and one c age is for just one monster. If all of the monsters are in the c ages, S tage will be c leared. This game c onsists of over 200 game maps applied various diffic ulty.
2.Downloaded You c an view a list of downloaded images and melodies and exec ute the basic file operation like browse, delete, rename, set as wallpaper, play, and view. 1. image file browser View a list of image files Browse image files using UP/DOWN key. © ª If you want file operation, then press MENU key and browse file operation you want using UP/DOWN key.
View the full sc reen image. S et as wallpaper Press OK key after saving to wallpaper image. If you want to display wallpaper image then goto display visual option. View file information. Delet e t he im age file..
if t he confirm w indow popuped, t hen press OK key. Don’t press any key and wait a m om ent if you want t o cancel delet ing. Rename the file Press OK key after modifying the file name.
2. Animation file browser View a list of animation image files S end via S MS refer the S MS 3.
3. Voic e rec ord You c an rec ord your voic e or those of other people using this func tionality. This is c omposed of the voic e rec order and the voic e player. S o, you c an rec ord your voic e with the rec order and then play it with the player. Using the key [ MENU] on the voic e memo view list, you c an go into the voic e rec order as the following pic ture. Basic ally, the voic e rec order have the func tionalities as REC ORD / S TOP / PLAY (PrePLAY) / S AVE.
4.Wap You c an surf on Internet with WAP browser. That means you c an c onnec t to Internet anywhere, anytime. C ontac t to nearest dealer for detail information. 1) Home 2) Resume You can reconnect the latest web site. 3) Bookmarks You can store on Internet address with WAP browser. 4) Push messages Mobile can receive Push Messages from Service Provider.
5) S ettings With this func tion, you c an set C onnec tion settings, S ec urity c ertific ation, C ac he mode, Push sec urity.
A. B. C. Homepage : This is an address of homepage. Image : You c an selec t image display option. C onnec tion : You c an selec t c onnec tion- orientation/c onnec tion- less or withsec urity / without sec urity D. Gateway : This is an ID and password of Gateway E. Bearer : You c an selec t bear type( Data / S MS / GPRS ) F .
(2) S ec urity These are lists of S ec urity C ertific ation. (3) C ac he mode You c an set mode in two options(Always c hec k/Never c hec k).
3) Empty Temp F ile - Empty c ac he - Empty C ookies - Empty Password 4) Version info This func tion is to view the software version of WAP browser. 5) On-line menu If you press a menu key when browsing, browser menu will be available. S top : stops c urrent page download Go bac k : navigates bac k one page in the history list Bookmarks : presents the list of bookmarks Add bookmark : c reates a new bookmark for the page you are viewing.
5.C amera With the c amera you c an take pic tures of people or events while on the move. The pic tures are manually saved in the images applic ation, where you c an rename them and organize them in folders: [ S napshot ] This menu allows you to take a pic ture. You c an make it by pressing numeric ‘ 1’ key or selec ting ‘ S anpshot’ on the c amera menu. < preview> < captured> A. Proc ess i) Ac c ess snapshot then you c an see the preview mode . ii) Press ‘ OK’ or ‘ S ide c amera’ key to take a pic ture.
menu. A. Proc ess The proc ess is same with the S napshot proc ess. [ Album ] This menu allows you to manage the taken pic tures. You c an make it by pressing numeric ‘ 3’ key or selec ting ‘ Album’ on the c amera menu. < List mode> A. < Zoom mode> Album’ s new mode has list mode and zoom mode. Press ‘ OK’ key to move between the modes. B. You c an c hoose a pic ture in the view mode using navigation key. C . In view mode, use menu key to use the following options.
v) Delete all : Delete the whole pic tures saved at the album. [ Setting ] This menu allows you to manage the taken pic tures. You c an make it by pressing numeric ‘ 4’ key or selec ting ‘ S ettings’ on the c amera menu. A. You can adjust various setting value related with camera using ‘Navigation’ key. Use ‘ left- right navigation’ key to c hange the target. Use ‘ up- down navigation’ key to c hange the target’ s value. The present set value is displayed on the bottom side of the sc reen. B.
8. S TK The feature allows you to use a set of c ommands and proc edures during the network operation of GS M.
[ HOT KE Y ] Phonebook Phone book menu allows you to set up your own phone book. You c an add or delete the rec ords anytime you want. In addition, you are able to c hoose to save the rec ords either in S IM c ard memory or phone memory. You c an store up to 500 entries in the phone book. ※ Y ou c an use the [ Phonebook] key(down key) in idle mode. (1) Group searc h You c an searc h a person’ s number registered to eac h group.
If press Ok key, S earc h a person in the PhoneBook list by typing PINYIN or AlphaBet in the T9 Editor. If no input in the T9 Editor, show the total list of Phone Book. ok ok menu/selec t ‘ E dit’ If the size of a Name overflows, it sc rolls. Move to eac h phone number with navigation key. You c an make a c all with number listed first by pressing S end Key in a list.
of the information about the person, but c an not modify the information. To modify the information, press Menu Key and selec t Edit. ( 3) Add New Name Add new phone number in the Edit mode. To edit the Name / PhoneNumber / Memo / Pic ture, move to the item and press any key on the item. Y ou c an selec t group / individual bell by pressing left or right navigation key. You selec t Pic ture, then go into Album. By pressing OK Key, you c an store the pic ture.
5- 1) S ave nos.to S elec t the memory for an item to be stored by pressing OK key. Memory c hoic e will be one of the S IM c ard / Phone memory / C hoic e, etc . In the c ase of C hoic e, when you selec t Add New Name in the menu # 3, the window asking whic h memory (S im / Phone) you want will be shown. 5- 2) Used spac e S how the memory c urrently used. S tore total 500 entries to the phone book.
Hot folder This menu is c onsist of lists that frequently used. Press left navigation key in idle mode. 1. Game 2. Downloaded 3. Display 4. Alarm 5.
S tatement ac c ording to F C C part 15.19 This devic e c omplies with Part 15 of the F C C Rules. Operation is subjec t to the following two c onditions: (1) this devic e may not c ause harmful interferenc e, and (2) this devic e must ac c ept any interferenc e rec eived, inc luding interferenc e that may c ause undesired operation. F C C ID: J Y C G510 S tatement ac c ording to F C C part 15.
(0.6 inc hes) to the body. and should be avoided. Use of other ac c essories may violate F C C RF exposure guidelines Health and S afety Information F C C Exposure to Radio F requenc y (RF ) S ignals Your wireless phone is a radio transmitter and rec eiver. It is designed and manufac tured not to exc eed the emission limits for exposure to radio frequenc y (RF ) energy set by the F ederal C ommunic ations C ommission of the U.S . Government.