
Operating Guide

9
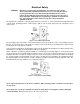
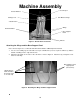
6. Blade guard warning and blade size.
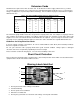
7. Motor serial tag with electrical specifications. The machine serial tag is mounted on the left corner of
machine frame.
INSTALLATION
The Panel Pro saw comes from the factory prealigned. You will only have to mount the following parts before you
can run this tool:
Left and right support wings
Base support panel
Counterbalance
Cord keeper
Vertical and horizontal rulers
Wheels
Optional Equipment
Upper extension brackets
Lower extensions with rulers
Dust Kit
Tools Required for Installation
NOTE: Additional tools may be required for installing accessories.
7/16” wrench
5/8” wrench
9/16” blade wrench (provided)
5/16” nut driver (for upper extension brackets)
Operating Environment
For safe operation, install the tool in an area that is well lit. Eliminate all shadows that could interfere with clear
viewing of the work area.
Do not locate the tool in a damp or wet location, or a location where it may be exposed to rain.
Avoid explosive atmospheres (gaseous fumes, dust, or flammable materials).
Secure the area so that children and bystanders are kept a safe distance from the work area. Provide barriers and
shields as needed.
NOTE: The average noise level of Panel Pro saws is less than 80 dB.
Unpacking
1. Lay the carton flat with the label side facing up. Open the carton.
2. Remove all the plastic sheeting and protective cardboard crating.
3. Remove the prealigned center section of the Panel Pro, the two wings, wheels, and the base support panel.
4. Remove upper extension brackets, lower extensions, and the dust kit. (optional accessories)