
Operating Guide

21
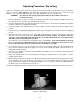
Operating Procedure: Rip cutting
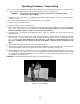
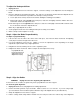
A rip cut is a horizontal cut that can be done either from the left to the right or from the right to the left, as shown in
Figure 12. Rip cuts must always be done by moving the work piece in the direction of the arrow on the saw
carriage. (See also “General Operating Tips” above and “Limitations of the Tool.” on page 16)
WARNING: To reduce the risk of injury, ripping must always be done with the direction of
the arrow on the saw.
1. Before you begin, be sure there is enough space on both sides of the saw to completely load the work piece on
the saw frame, move it past the saw, and completely off-load it.
2. Select the ripping direction, from right or from left, based on preference. Then rotate the turntable to the ripping
position as shown. See “Rotating the Turntable”.
3. Select the height of the saw blade above the base support. Lock the carriage securely to the guides in this
position.
4. Start the motor (see “Starting and Stopping the Motor” above) and allow it to reach full speed before beginning
the cut.
5. When the motor has reached full speed, slowly and smoothly push the work piece through the saw, in the
direction of the feed arrow on the saw. Avoid placing your hands, clothing, or body parts under the
carriage or in the cutting path of the saw blade. Do not look directly down the line of cut because dust
and debris are generated during this operation.
Be careful not to force the work piece through the saw, to avoid binding. If the saw blade binds in the work
piece, or the work piece shifts during the cut, stop the saw motor, carefully back the work piece out of
the saw, reposition the work piece, restart the motor, and begin the cut again.
6. As the work piece passes across the machine, move to the other side and complete the cut by pulling the work
piece past the saw blade. Support the upper piece to keep it from pinching the blade or the kerf protector, or
falling away from the machine.
7. Once the cut is complete, turn off the motor and wait for the blade to come to a full stop. Remove the work
pieces from the machine.
8. Rotate the turntable back to the vertical position and return the carriage to the top of the guides. Lock the
carriage in this position.
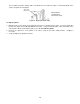
9. When making cuts that are less than 1 inch, the chatter guard (located inside the blade guard) must be resting
on the work piece, not on the cut-off piece. See Figure 13. If it is not positioned this way, it will jam the work
piece and prevent the carriage from continuing through the cut. If the saw jams, turn the tool OFF and wait for
the blade to stop. Then back the saw out of the cut.
10. When rip cutting material that is longer than 48” we recommend using the optional lower and upper extensions.
Figure 12: Rip cutting