
Operating Guide


18
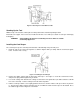
Changing the Blade
1. Unplug the saw. Observe appropriate lockout/tag out procedures to insure the tool cannot accidentally be
powered.
2. Remove the blade guard.
3. To keep the spindle from turning while you loosen the arbor bolt push the spindle lock located behind the
handle.
4. Use the 9/16” wrench provided with the saw to loosen and remove the bolt counterclockwise.
5. Remove the spring washer, outer blade flange, blade, and inner blade flange.
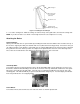
6. Clean the spindle, flanges, bolt, and blade to remove built-up dust and debris.
7. Reinstall the inner flange, slide on the new blade with the arrow pointing counterclockwise, reinstall the
outer blade flange, spring washer and hand-tighten the bolt clockwise.
8. Use the 9/16” wrench to tighten the bolt while pushing the spindle lock.
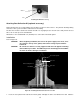
9. Reinstall the blade guard.
10. Loosen the carriage lock and allow the saw carriage to return to the top of the guides.
11. Reconnect the power.
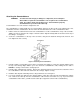
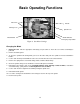
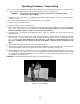
Index Pins
Carriage Lock
Blade Guard On/Off Switches
Handle
Figure 9: Saw Motor Carriage
Spindle Lock
Basic Operating Functions
Emergency Stop Switch