
Operating Guide


14
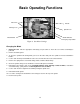
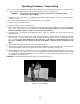
Figure 8: Installing the Cord Keeper
5. Loosen the carriage lock. Allow the carriage to return to the top of the guide tubes, then lock the carriage lock.
NOTE: If you discover there is too much or not enough slack in the cord, readjust as necessary.
Attaching the Rulers
Horizontal Rulers
Attach your horizontal rulers on your machine by mounting the metal extrusions with the rulers in them to the top of
the face base support panel that your material slides across (Measurement facing operator). Once this is done you
can adjust your rulers to the thickness of the blade you are using by sliding them in the extrusions. We recommend
that you then fix the rulers into the position once adjusted. The optional lower extensions come with longer rulers.
These rulers are mounted in the same manner as above but on the face of the extensions.
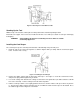
Vertical Rip Ruler
To mount the rip ruler you want to attach the ruler to the metal banding with eye bolts attached at each end. You
then want to attach the metal banding to the left side of the motor on the top and bottom end brackets of the guide
tube plates (Just inside the left guide tube). The next step is to attach the rip indicator to the left, top side of the
mounting plate. This indicator will tell you your measurement when doing a rip cut. You then adjust your indicator
in the slot provided to the correct ripping height.
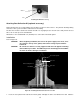
Frame Wheels
To mount the wheels, bolt one wheel to each end of the frame as shown in photo below.
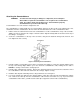
Rubber Stopper
Pull cord keeper
so it is parallel
to the floor.
No slack in cord.
Carriage (at the
bottom of the guides)