
Operating Guide


12
Attaching the Counterbalance
WARNING: To reduce the risk of injury or damage to components, do not attempt to
disassemble or repair the counterbalance. Do not pull on the counterbalance
cable. The cable is under strong spring force: the unit must be properly
assembled before you remove the cable clip.
A counterbalance is used to offset the weight of the saw.
The counterbalance is shipped with the necessary hardware. Remove the two 1/4-20 x 5/8” carriage bolts, nuts,
and washers from the counterbalance. Do not remove the bolt and nut that are on the counterbalance cable.
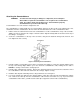
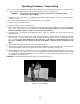
1. Pull the end of the cable from the inside of the counterbalance. Set the counterbalance on top of the tool frame,
slightly off-center to either the left or right, so that the cable is aligned vertically with an oval hole near the top of
the carriage. See Figure 5.
2. Secure the counterbalance to the top of the tool frame, using the two attached carriage bolts, washers, and
nuts. Tighten the nuts securely.
Figure 5: Attaching the Counterbalance
3. Hold the carriage securely while you loosen the red carriage lock (Figure 3). Raise the carriage until the hole in
the top of the carriage aligns with the eye in the end of the counterbalance cable, making sure the cable is
behind the carriage. Then lock the carriage rip lock.
4. Hold the cable end behind the carriage. Remove the carriage bolt and nut, and use them to attach the end of
the counterbalance cable end to the oval hole in the carriage. Tighten securely.
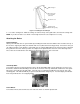
5. Bend the cable clip tabs forward by hand, so they look like the ones in Figure 6.
6. Loosen the carriage lock and lower the carriage until the cable clip is fully exposed, then tighten the carriage
lock. Remove the cable clip from the counterbalance cable and save it for future use (e.g., if you remove the
counterbalance in the future, you will need the cable clip to support the tension in the counterbalance).