
Operating Guide


11
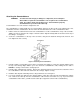
1. Attach the base support panel to the front of the unit. Attach loosely, using four 7/16” bolts to attach the
support panel to each wing, and eight to attach the panel to the saw frame.
2. Tighten the fasteners.
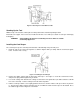
Attaching the Lower Extensions (optional accessory)
Using the four 7/16” bolts provided, attach the left and right lower extensions to the
base support panel. The holes are pre-set at the factory for easy positioning and
installation on the base support.
Attaching the Upper Extension Brackets (optional accessory)
Using a 5/16” nut driver, attach the upper extension brackets to the back side of the
machine frame using the four ¼” self tapping screws. The brackets should be
installed approximately 14” from the top of the left and right wings for the best
support on larger material.
Building the Upper Extensions
1. Start by cutting a standard 2x4x8 to make two 34” long pieces.
2. Attach each 34” piece using three 2” wood screws to each end of another full
sized 2x4x8.
3. Next, take a ½” thick piece of material and cut two pieces so that they
measure 3 ½” wide x 34” long. Attach each 34” piece to the shorter 2x4’s
from step one using 2” wood screws.
4. Your upper extensions are now complete and are ready to mount into the
upper extension brackets on the back of the machine.
******* Additional brackets can be purchased to add more material back support if necessary.
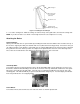
Attaching the Left and Right Quick Stop Angle to your Upper Extension (optional
accessory)
1. Identify the left and right angle by referencing the tape measure attached
to them. The left angle tape starts at 14 ¼” and the right at 13 ¾”.
2. Set your upper extensions (See Building the Upper Extension) on a flat
surface and set the left and right angle on the corresponding top surface of
the extension, the 4” surface. The tape side of the angles should be
running parallel with the extension face (1/2” material side). The angles
should be mounted flush with the front of the extensions using the two
screws provided for each side.
3. Adjust your rulers to the thickness of the blade you are using by sliding
them in the extrusion.
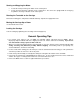
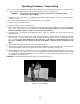
Lower Extensions
U
pp
er Extension Brackets
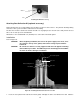
U
pp
er Extensions
Quick Stop Angle
Full
y
Assembled