
Submittal


EASY-MARK
84
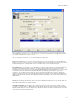
"More >>" Button: Clicking on the "More >>" button will display the two optional fields for this screen, Floor and
Space. When clicked, the button will change to "Less <<" Clicking on this button will hide the optional fields, but leave
any information entered in them.
Floor and Space: Both fields are optional, but will be used in the legends for the ports if available.
Add: When port values are entered, the Add button will be enabled. Clicking it will add the ports to the Ports list.
Update: When a port is selected in the Ports grid, clicking Update will change the values of the port.
Clear: Clicking Clear will blank all input fields without changing the values in the dropdowns.
Delete: When a port is selected, clicking Delete will present you with a confirmation dialog. If accepted, the port and
all related data will be removed.
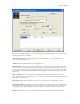
In direct mode, clicking on a row in the grid will only update the field information above if the selected row matches the
selected cable type and layout.
When at least one port is created and you are in Data Center Project, the "Generate Labels" button will be enabled.
Clicking this button will take you to the "Format Selection" screen with the Ports application selected.
Clicking Back will take you to either the Format Selection screen (non-Data Center Project) or the Panel screen (Data
Center Project).
The Next button is only enabled in Data Center Project when at least one port is created. Clicking the button will take
you to the Cable Labels screen.
Clicking "Finish" will prompt you to save all data from the session. If you have selected the "Default" project, you will
be prompted to create a new project if desired.
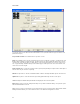
Output: The legend format for output from this screen will be in the form "(f
1
s
1
).x1y1-p1Ports PN
1
to (f
2
s
2
).x
2
y
2
-
p
2
Ports PN
2
"
Page 8: Cable Labels