
Submittal


EASY-MARK
80
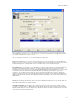
You enter the Panel screen either from the Format Selection screen (non-Data Center Project) or the Rack screen
(Data Center Project).
Project and Room Grid: These fields function as in previous screens.
Rack: This field will be either a text box (non-Data Center Project) or dropdown. If a text box, you will enter the rack
identifier with no validation of format performed. If Data Center Project, this dropdown will contain a list of all racks
created for the selected Room Grid. You will be able to select a rack directly from the list, or type in a value for the
rack. If typed manually, validation will be performed when trying to add the panel to the list to ensure that the rack
exists for the selected room grid.
Panel and Panel To: You enter in the start panel value (required) and optionally the end panel value. Either alpha or
numeric values may be entered for sequencing.
Add: When a panel value is entered, the Add button will be enabled. Clicking it will add the panel to the Panels list.
Update: When a panel is selected in the Panels grid, clicking Update will change the values of the panel.
Clear: Clicking Clear will blank all input fields without changing the values in the dropdowns.
Delete: When a panel is selected, clicking Delete will present you with a confirmation dialog. If accepted, the panel
and all related data will be removed.
When at least one panel is created and you are in Data Center Project, the "Generate Labels" button will be enabled.
Clicking this button will take you to the "Format Selection" screen with the Panel application selected.