
Submittal


Data Center Wizard
77
If a user has already planned their racks or has a large number of racks to define, it may be easier to create the racks
manually rather than using the grid input.
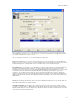
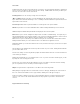
Project and Room Grid: These fields function the same as in the Rack (Grid) screen. They will default to the
selections from the rack (Grid) screen.
Grid Input: Clicking this button will return you to Rack (Grid) screen.
Rack and Rack To: You can specify a single rack (required field) or a range of racks by specifying the Rack To value
as well. The fields are dropdowns when in the Data Center Project, containing a list of all racks created on previous
screens (if any). You may select any value from the dropdown, enter any value not present in the list, or begin typing
in the dropdown, which will begin to automatically fill in the first value that matches the characters typed to speed up
manual entry.
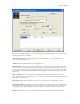
"More >>" Button: Clicking on the "More >>" button will display the two optional fields for this screen, Floor and
Space. When clicked, the button will change to "Less <<" Clicking on this button will hide the optional fields, but leave
any information entered in them.
Floor and Space: Both fields are optional, and will be used for legend creation of other applications if entered.
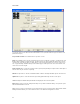
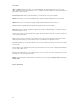
Rack/Cabinet Identifiers: This grid will contain a list of all created racks. If any were defined on the Rack/Cabinet
Location (Grid) screen, they will be listed here by default. Clicking on a rack will populate the values in the other fields
for updating or deleting. Racks will be listed in the order in which they were created, and not in ascending order.
Add: When a Rack value is entered, the Add button will be enabled. Clicking it will add the rack to the Racks list.