
Submittal


EASY-MARK
34
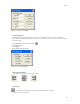
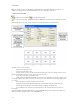
Figure 2.1
The legends are generated either through import from CSV files or through import from Microsoft Excel (*.xls) files. If the
user imports from Excel, he must specify the name of the worksheet, and the cell range over which the import is to be
executed.
After specifying these items, the user can click the "Update Preview" button. This will populate the grid below with the
specified range of cells from the spreadsheet. The user can change the column import order by dragging the columns in
the preview into the desired order. Note: This affects only the preview, not the selected spreadsheet.
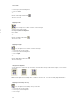
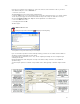
The "Less<<" button hides the additional options. With these, the user can specify at which row to begin the import
(Start Import Row), the Import by ("Row" will import from Left To Right then Top to Bottom vs. Column will import from
Top to Bottom then Left To Right), and whether or not to combine columns into one label (with possible separator
characters) or import columns into separate labels. The initial screen display will not show these additional options. The
"Less>>" button will show as a "More>>" button, which shows the additional options.
The fields are described below:
• Select Worksheet: A dropdown list of the available worksheets if an Excel file is selected.
• Begin at Cell: The first Excel cell to include in the import.
• End at: The last Excel cell to include in the import.
• Start import at row: The first row to start the import process, relative to the Begin At cell. Useful if there is a
header row that should not be imported.
• Import Order: Select either Row or Column to specify whether to import from rows first, or columns first. Not
available if Combine Columns is selected.
• Combine columns for import: If checked, the data in all selected columns will be combined for each row into a
single label legend.
• Column Separator: Available if Combine columns is selected. Text entered in this field will be added between
the values of each column when being combined into a single label legend.
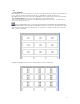
The grid will show a preview of the content of the spread sheet. The user can drag and drop to rearrange the columns of
the grid, in order to modify the import order of the columns.
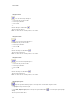
Double-clicking a column header will select a column for import. By default, all columns will be imported unless specific
columns are highlighted. Double-clicking the column header again will deselect the column.
If the selected file is a CSV file, then all controls below the browse button will be disabled, because these controls apply
only to import from Excel spreadsheets.
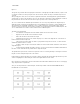
Once you enter the parameters for the Data Import, click OK and you will be returned to EASY-MARK with labels
populated with your selected data.