
Submittal


EASY-MARK
108
3. Close and turn the printer on.
4. When ready to print the front side, click the Print button below.
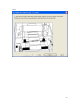
The “target label” is a single label with an arrow pointing up on the label to indicate which direction the media should
be fed into the printer when you flip it for the back side and a message that the front side should be face down when
you feed the media back into the printer for the back side printing. In the event that selected format has multiple
separate labels in a row, the message will be spread out across the entire row.
If you select the two “target labels”, then two separate target labels are printed. The first one as described above, the
second one two rows down from the first target label. This is used during the second phase to guarantee the
alignment is correct before printing the back side of the labels.
Two blank rows of labels are printed to allow for alignment adjusting when printing the back side, and then the front
side of all selected labels will print.
After you click the “Print” button you will be taken to the next screen. Because it is not possible to know the outcome
of the print job, you will need to use the “Back” button to return to the previous screen if the front side print job has
failed.
If you selected to turn off the print alignment mode, then the confirm alignment checkbox is disabled, and no “target
label(s)” print for the front side.
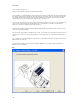
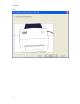
If you checked the “Graphical View” check box then EASY-MARK takes you through a step-by-step graphical
illustration of steps 1 through 4.
Step 1