
Submittal


97
EASY-MARK Print Wizard
EASY-MARK Print Wizard
Because the process of printing multiple PEM files is very similar to the process used by the Data Center Wizard, a
general Print Wizard is also be available from within the main EASY-MARK application.
A toolbar icon has been added to the Standard toolbar as well as adding a "Print Wizard" menu option on the File
menu. Clicking either the icon or menu item will open the Print Wizard.
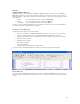
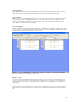
File Selection
The File Selection screen allows you to browse for PEM files to print.
The screen uses a standard "dual-list" which allows you to add or remove selected files to be printed.
The left column will display all PEM files located in the folder specified in the Folder field. You may select one or more
files at a time and click the ">>" button to select the files for printing.
The display on the right contains both the filename of the PEM file, and the folder location to allow you to see in which
folder the PEM file resides. In this way, a user may print PEM files from multiple folders in the same print job.
Clicking the "X" button will remove a selected file (or files) from the right list, while clicking "XX" will remove all files
from the right list. The "X" is used rather than "<" since the folder being displayed on the left may not match the folder
for the file selected to be removed. Moving the filename from the right to the left is not meaningful in this situation, so
the "X" will simply remove the file(s) from the "to Print" list.
When at least one PEM file is selected to print, the "Next" button will be enabled. Clicking the "Next" button will take
you to the PEM File Print screen.